
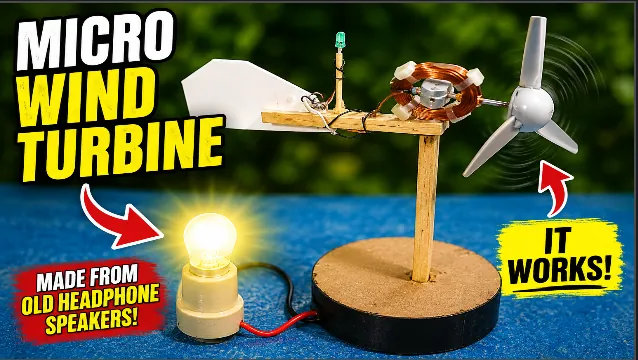
How to Build a DIY Micro Wind Turbine Using Old Headphone Speakers
Building your own DIY micro wind turbine is one of the most exciting ways to explore renewable energy while giving old electronic parts a second life. Instead of throwing away broken headphone speakers, you can transform their magnets into the heart of a miniature wind-powered electricity generator. This project combines recycling, science, engineering, and creativity into a practical experiment that demonstrates how wind energy can be converted into electrical power.
Modern wind turbines generate electricity by rotating magnets around coils of copper wire. Although commercial wind farms use massive towers and blades, the same scientific principles can be demonstrated on a much smaller scale. By carefully assembling recycled components such as headphone magnets, a water pump shaft, copper wire, wooden sticks, and simple plastic materials, anyone can create a functional micro wind turbine capable of powering a miniature light bulb.
This project is ideal for students, hobbyists, DIY enthusiasts, science teachers, and anyone interested in renewable energy. It requires only basic hand tools and inexpensive materials, making it an affordable weekend project. Throughout this guide, you'll learn how each component contributes to electricity generation and why proper alignment, balance, and construction techniques significantly improve performance.
Unlike many complicated electrical projects, this homemade wind turbine focuses on understanding the fundamentals rather than producing large
amounts of power. Even a small amount of generated electricity demonstrates electromagnetic induction—the same principle used in commercial generators, hydroelectric plants, and industrial wind turbines around the world.
Recycling electronic waste also plays an important role in sustainable engineering. Millions of electronic devices are discarded every year, yet many contain valuable magnets, copper wire, and metal parts that can be reused in educational projects. Repurposing these materials helps reduce waste while encouraging creativity and environmental responsibility.
In this comprehensive tutorial, you'll discover every stage of building a homemade micro wind turbine—from dismantling old headphone speakers and extracting powerful magnets to winding the generator coil, assembling the wooden tower, installing the wind vane, mounting the blades, and finally testing the completed turbine with a miniature light bulb. Along the way, you'll gain practical experience with renewable energy technology and develop a deeper understanding of how electricity can be generated from the natural power of the wind.
Introduction to Building a DIY Micro Wind Turbine
Discover the Power of Renewable Energy at Home
Renewable energy continues to grow in popularity across the United States as homeowners, educators, and hobbyists search for cleaner and more sustainable ways to generate electricity. While full-size wind turbines produce enough energy to power entire neighborhoods, a DIY micro wind turbine offers a simple and affordable way to understand the same engineering principles on a much smaller scale. Building one yourself provides valuable hands-on experience while demonstrating how wind can be converted into usable electrical energy.
One of the most rewarding aspects of this project is that it relies heavily on recycled materials. Instead of purchasing expensive generator components, you'll reuse permanent magnets from broken headphone speakers, giving electronic waste a second life. Recycling old electronics not only reduces landfill waste but also encourages creative thinking and practical engineering skills. Every recycled component contributes to a sustainable approach to learning and innovation.
The project begins with carefully opening an old headphone speaker to recover two small but powerful permanent magnets. These magnets are essential because they create the magnetic field required for electricity generation. When the magnets rotate around a copper wire coil, they induce an electric current according to Faraday's Law of Electromagnetic Induction. This scientific principle forms the foundation of nearly every electrical generator used today.
Although the output of a homemade micro wind turbine is relatively small, its educational value is enormous. Watching a miniature light bulb illuminate solely from wind energy provides a clear demonstration of how renewable energy systems operate. Students can observe the direct relationship between wind speed, rotational speed, and electrical output, making abstract scientific concepts easier to understand through practical experimentation.
Another advantage of this project is its accessibility. Most of the required materials can be found in old household electronics or purchased inexpensively from hardware and hobby stores. Basic tools such as screwdrivers, pliers, glue, and wire cutters are sufficient for assembling the generator. Even beginners with limited electronics experience can complete the project by following each step carefully.
Throughout this guide, you'll not only build a functioning micro wind turbine but also gain insight into magnetism, electrical induction, mechanical design, renewable energy, and sustainable engineering practices. By the end of the project, you'll have created a working miniature wind generator that demonstrates how recycled materials and simple engineering can produce clean electricity while inspiring future experimentation and innovation.
Gathering Materials and Preparing the Generator Components
Building a reliable DIY micro wind turbine begins with selecting the right materials and preparing each component carefully. While the finished project looks simple, every part plays an important role in converting wind energy into electrical energy. Using quality recycled materials and assembling them correctly will improve efficiency, reduce vibration, and make the turbine more durable. This stage focuses on collecting the necessary components, safely dismantling the old headphone speaker, extracting the magnets, and preparing the rotating shaft that forms the core of the generator.
Choosing the Right Materials for Your DIY Micro Wind Turbine
One of the biggest advantages of this project is that most of the required materials are inexpensive or can be salvaged from broken electronics. The main components include an old headphone speaker, a 12V water pump shaft, 0.274 mm enameled copper wire, sturdy wooden sticks, a small PVC sheet, a strong adhesive, lightweight turbine blades, a miniature 1.5V light bulb, and a few basic hand tools. These simple materials are enough to demonstrate the same electromagnetic principles used in commercial wind turbines.
Before beginning, inspect each part carefully. The headphone speaker should still contain intact permanent magnets, as cracked or chipped magnets may reduce the generator's performance. The water pump shaft should be straight and free from corrosion so it rotates smoothly with minimal friction. Selecting lightweight yet rigid materials for the tower and blades also helps improve stability and responsiveness in light winds.
Organizing your workspace before assembly is equally important. Arrange all tools—including screwdrivers, pliers, wire cutters, a hobby knife, sandpaper, and glue—within easy reach. Keeping components organized minimizes the risk of losing small parts such as magnets or screws and makes the build process safer and more efficient.
Safely Opening the Old Headphone Speaker
The first hands-on step is carefully opening the old headphone speaker. Since the magnets inside are relatively small and can snap together unexpectedly, work slowly and avoid using excessive force. Use a precision screwdriver or a thin prying tool to separate the speaker housing without damaging the internal components.
As you open the speaker, you'll notice the voice coil, diaphragm, and permanent magnets. While the diaphragm and other plastic parts are not required for this project, avoid damaging the magnets during removal. These magnets provide the magnetic field necessary for electricity generation, making them the most valuable part of the recycled speaker.
Take your time throughout this process. Rushing may crack the magnets or deform the speaker housing, making extraction more difficult. Wearing safety glasses is recommended because small plastic pieces or adhesive fragments may loosen during disassembly. Once opened successfully, place all reusable components on a clean work surface.
Removing and Preserving the Permanent Magnets
After exposing the internal components, gently remove the two permanent magnets from the headphone speaker. Use a small flat tool if necessary, but avoid applying excessive pressure that could fracture the magnets. Once removed, keep them separated until installation to prevent them from snapping together with enough force to chip their edges.
These recycled magnets may appear small, but they produce a surprisingly strong magnetic field. As they rotate around the copper coil, they repeatedly change the magnetic flux passing through the winding. This changing magnetic field induces voltage in the wire according to Faraday's Law of Electromagnetic Induction—the fundamental principle behind generators of every size.
Inspect each magnet for damage before proceeding. Smooth, intact surfaces help maintain a consistent air gap during rotation and contribute to smoother generator operation. If adhesive residue remains on the magnets, gently clean it using fine sandpaper or a soft cloth so they can be securely mounted later.
Store the magnets safely away from electronic devices, memory cards, watches, and other magnetic-sensitive items. Keeping them organized now will make the assembly process easier in later stages of the project.
Preparing the 12V Water Pump Shaft
With the magnets ready, the next component is the rotating shaft from a 12V water pump. This shaft serves as the central axle of the homemade generator, allowing the magnets to spin smoothly within the magnetic assembly. A straight, balanced shaft is essential for minimizing vibration and maintaining consistent electrical output.
Carefully disassemble the water pump and remove the shaft without bending it. If necessary, clean away rust, grease, or debris using fine sandpaper or a soft cloth. A clean shaft rotates more freely and reduces mechanical resistance, allowing the turbine to generate electricity more efficiently.
Check both ends of the shaft to ensure they are smooth and free from burrs. If rough edges are present, lightly polish them before installation. Proper preparation at this stage improves bearing performance and extends the overall lifespan of the wind turbine.
Test-fit the shaft through your mounting structure before attaching the magnets. It should rotate easily without excessive side-to-side movement. Any misalignment discovered now is much easier to correct than after the generator has been fully assembled.
Mounting the Magnets onto the Shaft
Once the shaft has been prepared, it's time to attach the two recycled headphone magnets. Apply a high-strength epoxy or industrial adhesive to the shaft and carefully position the magnets according to your design. Accurate alignment is extremely important because uneven placement can create imbalance, resulting in vibration and reduced efficiency.
The magnets should be centered on the shaft and secured firmly before the adhesive cures. Maintain equal spacing wherever possible so the rotating assembly remains balanced. Even small alignment errors can affect the magnetic field passing through the coil and reduce electrical output.
Allow the adhesive to cure completely according to the manufacturer's recommendations. Avoid rotating or handling the shaft until the glue has reached full strength. Patience during this step helps prevent future mechanical problems and ensures reliable operation once the turbine begins spinning.
After the adhesive has hardened, rotate the shaft manually to verify that the magnets remain secure and that the assembly spins smoothly without wobbling. A properly balanced rotor is the foundation of an efficient homemade wind turbine.
Preparing for the Coil Winding Stage
With the magnets firmly attached, the generator's rotating assembly is now complete. The next major step involves winding a precision copper coil using 0.274 mm enameled copper wire. This stationary coil will interact with the spinning magnetic field to generate electricity.
Before winding begins, gather the copper wire, prepare a suitable coil form, and ensure the wire remains clean and free from kinks. Neatly wound coils improve magnetic coupling, increase efficiency, and produce more stable voltage during operation. Consistent winding tension and even spacing between turns are essential for achieving the best possible performance.
At this point, your project has successfully transformed discarded electronic components into the foundation of a working renewable energy generator. The next stage will focus on creating the copper coil, mounting it near the rotating magnets, and optimizing the air gap for maximum electrical output.
Winding the Copper Coil and Building the Generator Assembly
The heart of every wind-powered generator is the interaction between a rotating magnetic field and a stationary copper coil. While the magnets provide the magnetic force, the coil is responsible for converting that changing magnetic field into usable electrical energy. Even in a small DIY micro wind turbine, the quality of the coil winding directly affects the voltage, efficiency, and overall performance of the generator. In this section, you'll learn how to wind the coil using 0.274 mm enameled copper wire, mount it correctly around the rotating magnets, and prepare the generator for smooth operation.
Winding the Generator Coil with 0.274 mm Enameled Copper Wire
The first step in building the generator is winding a clean and uniform copper coil. Use 0.274 mm enameled copper wire, which offers a good balance between electrical resistance and the number of turns that can fit into a compact coil. The enamel coating acts as insulation, preventing short circuits between adjacent windings while allowing the coil to generate electricity efficiently.
Begin by preparing a simple coil form or winding jig. Secure one end of the copper wire, leaving several inches free for later electrical connections. Start wrapping the wire evenly around the form, maintaining consistent tension throughout the process. Avoid pulling too tightly, as excessive force may damage the enamel coating or deform the coil. Likewise, loose windings can reduce efficiency and make the coil difficult to mount.
As the winding progresses, each turn should sit neatly beside the previous one. A compact and organized winding pattern improves magnetic coupling and produces a stronger electrical output. Take your time and inspect the coil regularly to ensure there are no crossed wires or uneven layers.
Once the desired number of turns has been completed, secure the final end of the wire using tape or a small amount of adhesive. Leave enough wire exposed on both ends for later connection to the testing circuit. A properly wound coil is one of the most important factors in achieving reliable electricity generation from your homemade wind turbine.
Why Uniform Coil Winding Improves Generator Performance
Although winding a coil may appear simple, precision makes a noticeable difference. Every turn contributes to the total voltage generated by the turbine. If the wire is wrapped unevenly or the layers are inconsistent, the magnetic field may not interact with the coil as efficiently, resulting in lower output.
Uniform winding ensures that each section of the coil experiences a similar magnetic flux as the magnets rotate. This produces a smoother alternating voltage and minimizes fluctuations during operation. In larger commercial generators, automated winding machines are used to achieve this level of consistency. For a DIY project, careful hand winding can deliver surprisingly effective results.
The insulation on the enameled wire must also remain intact. Scratches or damaged enamel can create internal short circuits that reduce the number of effective turns in the coil. Handle the wire gently throughout the winding process and avoid using sharp tools that could nick the insulation.
After the coil is complete, inspect it from every angle. The windings should be compact, evenly spaced, and securely held together. If necessary, apply a small amount of insulating varnish or adhesive to help maintain the coil's shape during long-term use.
Mounting the Coil onto the Generator Assembly
With the copper coil finished, the next task is mounting it onto the generator frame. Position the coil so that it surrounds or closely faces the rotating magnets attached to the shaft. The goal is to maximize magnetic interaction without allowing any physical contact between the moving and stationary components.
Carefully secure the coil using a wooden support, plastic bracket, or another non-magnetic mounting structure. Avoid using steel brackets near the generator because ferromagnetic materials can alter the magnetic field and reduce efficiency. A rigid mounting system helps keep the coil stable while the turbine operates in varying wind conditions.
As you install the coil, pay close attention to its orientation. The center of the coil should align with the path of the rotating magnets. Proper alignment ensures that the changing magnetic field passes evenly through the winding, generating the strongest possible electrical signal.
Double-check all mounting points before moving forward. A loose coil can vibrate during operation, causing inconsistent performance or even damaging the wire over time.
Setting the Correct Air Gap Between the Coil and Magnets
One of the most critical adjustments in any permanent magnet generator is the air gap—the small distance between the rotating magnets and the stationary coil. This gap should be as small as possible without allowing the magnets to touch the coil during rotation.
A narrow air gap increases the strength of the magnetic field passing through the coil, resulting in higher voltage generation. However, if the gap is too small, slight shaft movement or vibration may cause contact between the magnets and the coil, leading to mechanical damage.
Rotate the shaft manually while observing the clearance from every angle. The magnets should pass smoothly around the coil with a consistent gap throughout the rotation. If you notice uneven spacing, adjust the coil position until the clearance remains uniform.
This careful adjustment may take several attempts, but it has a major impact on generator performance. Even small improvements in alignment can noticeably increase electrical output.
Testing the Mechanical Rotation Before Final Assembly
Before attaching the wind turbine blades or building the tower, it's important to verify that the generator assembly operates smoothly. Hold the shaft and rotate it by hand while observing the magnets, coil, and mounting structure. The rotation should feel free and balanced without scraping, wobbling, or excessive resistance.
Listen for unusual sounds such as rubbing or clicking, which may indicate that the air gap is too small or that the shaft is misaligned. If necessary, loosen the mounting hardware and make fine adjustments until the generator spins effortlessly.
This manual testing stage also provides an opportunity to verify that the magnets remain firmly attached to the shaft. Any movement or looseness should be corrected before continuing with the build. A secure rotor ensures reliable performance and improves the overall safety of the project.
Once satisfied with the rotation, lightly spin the shaft several times. A well-balanced assembly should continue rotating briefly due to its own momentum, indicating low friction and proper alignment.
Understanding Electromagnetic Induction in Your Homemade Generator
Now that the generator assembly is complete, it's worth understanding exactly how it produces electricity. As the wind turbine blades spin, the shaft rotates the permanent magnets. These moving magnets continuously change the magnetic field passing through the stationary copper coil.
According to Faraday's Law of Electromagnetic Induction, a changing magnetic field induces an electrical voltage in the coil. The faster the magnets rotate, the more rapidly the magnetic field changes, and the greater the voltage that is generated. This is the same scientific principle used in commercial wind turbines, hydroelectric generators, bicycle dynamos, and power plants around the world.
Although your homemade generator produces only a small amount of electricity, it clearly demonstrates how renewable energy systems convert mechanical motion into electrical power without consuming fuel or producing harmful emissions. This simple experiment offers valuable insight into the technology that supports clean energy production on a global scale.
With the generator fully assembled and tested, you're now ready to build the supporting tower, wind vane, and turbine frame that will allow the system to capture natural wind efficiently.
Building the Wooden Tower and Wind Vane Base
With the generator assembly complete, the next step is constructing a strong yet lightweight support structure that allows the DIY micro wind turbine to operate efficiently outdoors. Begin by measuring and cutting sturdy wooden sticks to create a stable tower capable of supporting the generator while minimizing vibration. Secure each joint with a high-strength adhesive and ensure every connection is square and firmly aligned before the glue cures. A well-built frame not only improves durability but also helps the turbine maintain smooth rotation during changing wind conditions. Next, create the wind vane from a piece of PVC by cutting it into a tail shape and attaching it securely to the rear of the wooden stick. The wind vane automatically turns the turbine to face the wind, allowing the blades to capture airflow more effectively and generate electricity with greater consistency. Before moving on, check that the tower stands upright, the wind vane pivots freely, and the entire structure remains balanced, as careful construction at this stage provides the foundation for reliable performance and prepares the turbine for blade installation in the next step.
Frequently Asked Questions
A DIY micro wind turbine is a small homemade generator that converts wind energy into electricity using recycled magnets, a copper coil, and turbine blades.
Yes. Old headphone speakers contain permanent magnets that work perfectly for building a miniature wind turbine generator.
You need headphone magnets, a water pump shaft, 0.274 mm enameled copper wire, wooden sticks, PVC sheet, glue, blades, and a small light bulb.
The rotating magnets create a changing magnetic field around the copper coil, producing electricity through electromagnetic induction.
This project uses 0.274 mm enameled copper wire because it provides excellent winding density for a compact generator.
It may charge very small rechargeable batteries under suitable wind conditions, but it is mainly designed for educational purposes.
Permanent magnets provide the magnetic field required for generating electricity inside the copper coil.
Yes. Stronger neodymium magnets generally increase voltage output and improve the overall performance of the generator.
The wind vane automatically turns the turbine toward the wind, helping the blades capture more airflow efficiently.
A small and even air gap improves magnetic efficiency while preventing the rotating magnets from touching the coil.
Yes. A household fan is an excellent way to test the wind turbine before using it outdoors.
Check your wiring, magnet polarity, blade balance, coil connections, and ensure the rotor is spinning fast enough.
Yes. Anyone with basic hand tools and patience can successfully build this renewable energy project.
Yes. Larger blades, stronger magnets, taller towers, and additional coils can significantly improve electrical output.
Absolutely. It demonstrates renewable energy, electricity generation, recycling, and engineering concepts, making it an excellent STEM project.
Discussion
No comments yet. Be the first to join the conversation!