
How to Build a Powerful DIY DC Motor at Home Using Simple Materials
Building a DC motor at home is one of the most exciting and educational DIY electronics projects for beginners and enthusiasts alike. A homemade DC motor demonstrates the practical application of electromagnetism, mechanical engineering, and electrical science in a simple yet powerful way. With basic materials such as copper wire, magnets, a wooden plate, and a power supply, you can create a functional motor that spins smoothly and efficiently.
In this detailed guide, you will learn how to build a powerful DIY DC motor step by step. This SEO-optimized article covers everything from preparing the wooden plate to winding coils, assembling the magnetic structure, and testing the final motor. Whether you are a student, hobbyist, or electronics lover, this tutorial will help you understand how DC motors work while building your own working model.
1. Understanding How a DC Motor Works
Before starting the project, it is important to understand the basic working principle of a DC motor. A direct current (DC) motor converts electrical energy into mechanical motion using electromagnetic force. When electric current passes through copper wire coils placed in a magnetic field, the interaction between electricity and magnetism creates rotational force.
A simple DC motor consists of several important components:
- Rotor or armature
- Copper wire windings
- Permanent magnets
- Shaft
- Commutator
- Power supply
- Supporting frame
The commutator plays a critical role by reversing the current direction in the coils, allowing continuous rotation. Magnets create a magnetic field, while copper windings generate electromagnetism when powered.
Homemade DC motors are excellent educational tools because they demonstrate real-world engineering concepts in a practical and affordable way. This project also improves technical skills such as drilling, wiring, precision measurement, and mechanical assembly.
Benefits of Building a DIY DC Motor
Creating your own motor offers several advantages:
- Learn practical electromagnetic principles
- Improve DIY engineering skills
- Understand motor design and construction
- Develop problem-solving abilities
- Create a low-cost science project
- Gain hands-on electrical experience
Many students and hobbyists search online for “how to make a DC motor at home” because it is one of the most effective ways to learn basic electrical engineering.
2. Materials and Tools Required for the Project
To build a powerful homemade DC motor, you need quality materials and proper tools. Using accurate measurements and reliable components helps improve the motor’s efficiency and performance.
Essential Materials
Here are the main materials required:
- Wooden plate for rotor base
- Copper wire with 0.813 mm thickness
- Strong permanent magnets
- Wooden support pieces
- Metal shaft
- 12-point commutator
- 24-volt DC power supply
- Screws and fixing materials
- Adhesive or epoxy
Required Tools
You will also need the following tools:
- Electric drill
- Measuring scale
- Marker or pencil
- Cutting tools
- Protective gloves
- Safety goggles
- Sandpaper
- Wire cutter
- Screwdriver set
Importance of Safety
Safety should always be your first priority while working with electrical and mechanical projects. Always wear gloves and protective eyewear when drilling or handling electrical components.
Follow these important safety practices:
- Work in a dry and clean environment
- Disconnect power during assembly
- Double-check all electrical connections
- Avoid touching exposed wires during testing
- Use stable surfaces while drilling
- Keep tools organized to prevent accidents
A safe workspace helps reduce risks and ensures smooth project completion.
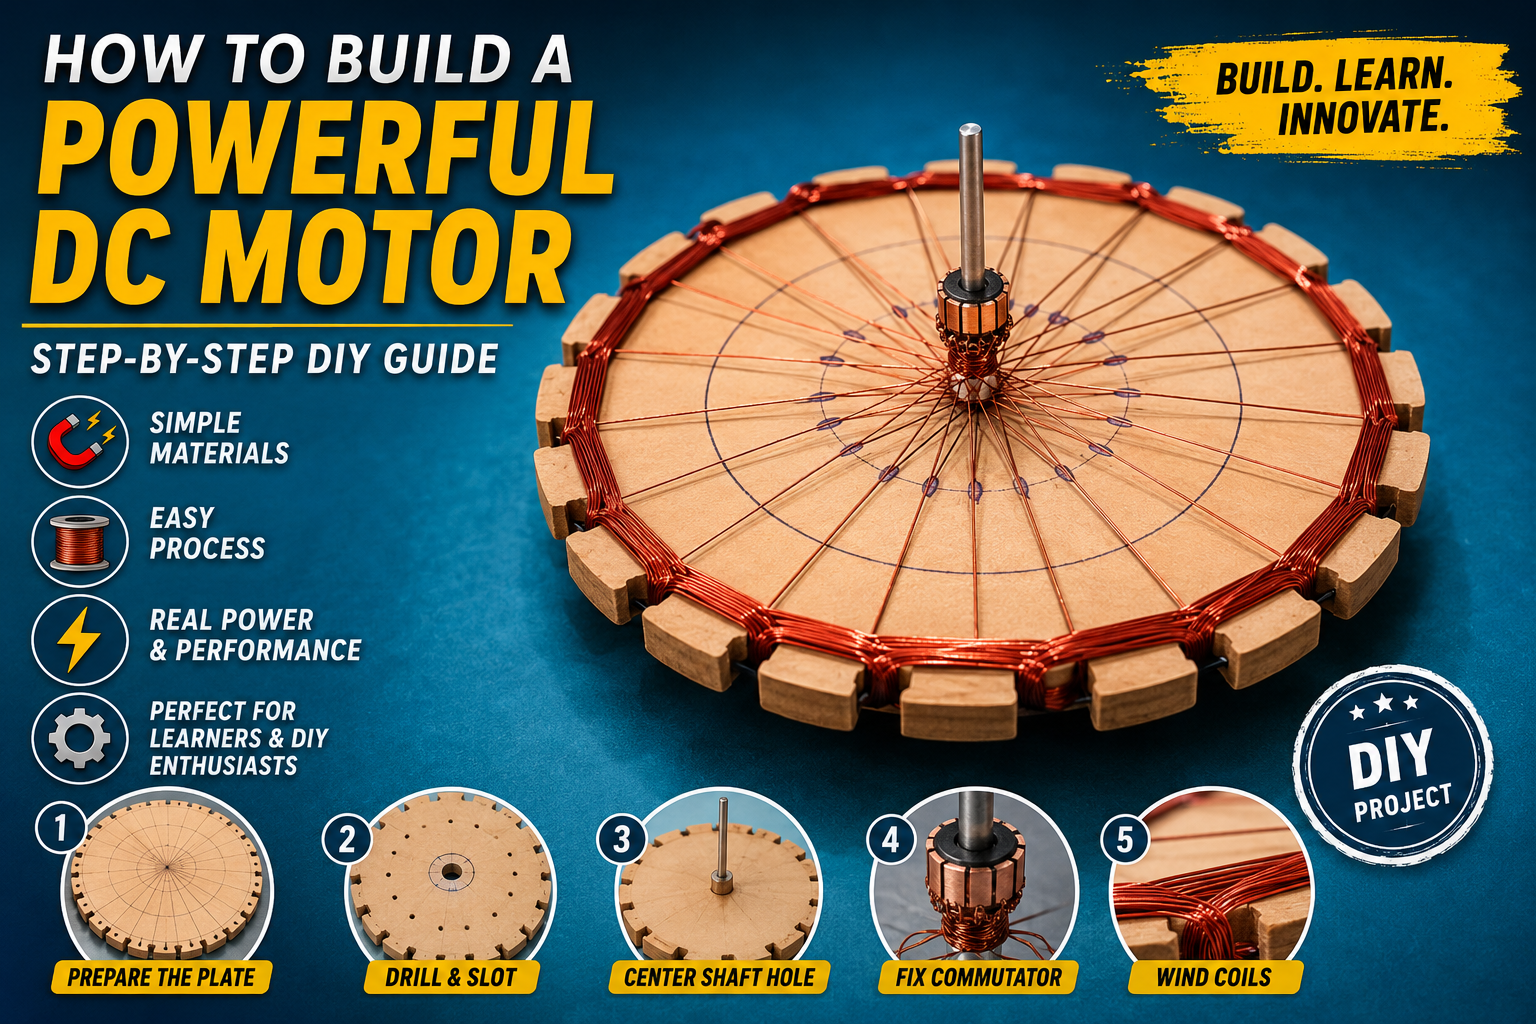
3. Step-by-Step Process to Build the DC Motor
The construction process is the most important part of the project. Accuracy, patience, and proper alignment are essential for creating a balanced and efficient motor.
Preparing the Wooden Plate
The first step involves preparing the wooden plate that will hold the motor windings.
Start by dividing the circular wooden plate into equal sections. Precision is very important because balanced winding placement directly affects motor performance. Carefully mark 24 equally spaced points around the plate.
These markings guide the placement of slots for copper wire coils. Proper symmetry improves magnetic interaction and helps the motor rotate smoothly.
Drilling the Slots
After marking the plate, begin drilling holes at each point.
Place the wooden plate on a stable surface before drilling. Use steady pressure to create accurate holes. Once the holes are completed, shape them into slots where the copper wires will sit.
Maintaining equal slot depth and width is extremely important. Uneven slots can cause imbalance, vibration, and inefficient rotation.
After drilling:
- Remove wood dust
- Smooth rough edges
- Check alignment carefully
- Ensure all 24 slots are equal
This stage forms the foundation of the motor’s mechanical balance.
Creating the Center Shaft Hole
Next, locate the exact center of the wooden plate.
Using a drill, create a straight hole for the shaft. The shaft controls the rotation of the motor, so precise alignment is critical.
A tilted or loose shaft can cause:
- Friction
- Wobbling
- Poor efficiency
- Unstable rotation
Ensure the shaft fits tightly while still rotating freely.
Installing the Commutator
Now attach the 12-point commutator to the shaft.
The commutator controls current flow through the windings and ensures continuous rotation. Proper installation is essential for smooth motor operation.
When fixing the commutator:
- Align it carefully
- Ensure equal spacing between segments
- Tighten all connections securely
- Avoid loose fitting
A poorly aligned commutator may interrupt current flow and reduce performance.
Winding the Copper Coils
Coil winding is one of the most critical steps in the entire process.
Use 0.813 mm thick copper wire to create strong electromagnetic fields. Begin by inserting the wire into the first slot.
Each coil should contain exactly 19 turns. Count carefully to maintain consistency across all windings.
Why Uniform Coil Winding Matters
Uniform winding ensures:
- Balanced magnetic force
- Smooth motor rotation
- Better efficiency
- Reduced vibration
- Improved power output
The project uses a four-pitch winding pattern, meaning the wire skips four slots before continuing the same coil.
This winding pattern is important because it:
- Creates proper electromagnetic interaction
- Improves torque generation
- Maintains balanced operation
- Enhances rotational stability
After completing each coil, connect it carefully to the correct commutator segment.
Repeat this process for all 24 slots.
Take your time and double-check:
- Coil turns
- Wire tightness
- Connection points
- Winding direction
Precision during winding directly determines the final motor performance.
4. Assembling the Motor Structure and Magnets
Once the rotor assembly is complete, the next stage involves building the support structure and magnetic system.
Building the Support Frame
Use two wooden pieces to create side supports for the shaft.
The supports should:
- Be equal in height
- Hold the shaft firmly
- Allow smooth rotation
- Prevent friction
- Maintain alignment
Fix the supports securely onto the base.
Insert the shaft and test its movement before continuing. The shaft should rotate freely without obstruction.
Installing the Magnets
Magnets are responsible for creating the stationary magnetic field required for motor operation.
Place one strong magnet beneath the motor to create a lower magnetic field. Then install four additional magnets around the sides of the rotor.
Importance of Magnet Placement
Correct magnet placement helps:
- Increase motor power
- Improve rotational speed
- Create stable magnetic interaction
- Maintain balance
- Reduce energy loss
Magnets should be evenly spaced and securely fixed.
Poor magnet alignment can lead to:
- Weak rotation
- Unstable movement
- Reduced efficiency
- Excessive vibration
Take time to adjust the magnets accurately before testing.
Checking Mechanical Balance
Before powering the motor:
- Rotate the shaft manually
- Check for friction
- Inspect wire connections
- Ensure magnets are secure
- Verify shaft alignment
A properly balanced motor structure improves both performance and durability.
5. Testing the DIY DC Motor and Troubleshooting Tips
The final stage is testing the completed motor.
Connect the 24-volt DC power supply carefully to the commutator. Ensure the positive and negative terminals are connected correctly.
Gently rotate the shaft by hand to start the initial motion.
If everything has been assembled correctly, the motor should begin spinning smoothly and powerfully.
Signs of a Properly Working Motor
A successful motor will show:
- Smooth rotation
- Stable speed
- Minimal vibration
- Strong torque
- Consistent motion
The combined effect of balanced windings, proper commutator connections, and accurate magnet positioning creates efficient performance.
Common Problems and Solutions
If the motor does not perform correctly, check the following areas.
1. Loose Coil Connections
Loose wiring may interrupt current flow.
Solution:
- Tighten all commutator connections
- Recheck soldered points
- Inspect damaged wires
2. Incorrect Magnet Alignment
Improper magnet positioning weakens the magnetic field.
Solution:
- Reposition magnets evenly
- Ensure equal spacing
- Verify polarity alignment
3. Uneven Coil Winding
Different coil turns create imbalance.
Solution:
- Count turns carefully
- Rewind inconsistent coils
- Maintain equal wire tension
4. Shaft Friction
Misaligned supports increase resistance.
Solution:
- Adjust shaft supports
- Lubricate moving parts if necessary
- Ensure free rotation
5. Weak Power Supply
Insufficient voltage reduces performance.
Solution:
- Use a stable 24V DC supply
- Inspect electrical connections
- Check power delivery consistency
Educational Value of the Project
This DIY project offers more than just a working motor. It provides valuable practical knowledge about:
- Electromagnetism
- Electrical circuits
- Mechanical engineering
- Magnetic force
- Rotational motion
- Energy conversion
Students, hobbyists, and beginners can gain real-world technical experience through hands-on experimentation.
Final Thoughts
Building a powerful DC motor at home is an exciting and rewarding project that combines creativity with science and engineering. By using simple materials such as copper wire, magnets, wood, and a power supply, you can create a functional motor while learning essential principles of electricity and magnetism.
The key to success lies in precision, patience, and careful assembly. Accurate winding, balanced slot design, strong magnet placement, and secure electrical connections all contribute to smooth and efficient motor performance.
Whether you are exploring electronics as a hobby, working on a science project, or improving your DIY engineering skills, this homemade DC motor project is a fantastic learning experience.
With proper construction and testing, your motor can demonstrate how simple scientific concepts can produce powerful real-world motion.
Start building today and discover the fascinating world of DIY electrical engineering.

Frequently Asked Questions (FAQs) About DIY DC Motors
| Question | Answer |
|---|---|
| What is a DIY DC motor? | A DIY DC motor is a homemade electric motor built using simple materials like copper wire, magnets, a shaft, and a power supply to convert electrical energy into mechanical motion. |
| How does a DC motor work? | A DC motor works by using electromagnetic force. When electric current flows through copper coils inside a magnetic field, it creates rotational motion. |
| What materials are needed to build a homemade DC motor? | Common materials include copper wire, permanent magnets, a wooden plate, a metal shaft, a commutator, wooden supports, and a DC power supply. |
| Why is copper wire used in DC motors? | Copper wire is used because it has excellent electrical conductivity and helps create strong electromagnetic fields for efficient motor performance. |
| What voltage is used in this DIY motor project? | This project uses a 24-volt DC power supply to generate enough current for smooth and powerful rotation. |
| Why is coil winding important in a DC motor? | Proper coil winding ensures balanced magnetic force, smooth rotation, reduced vibration, and improved motor efficiency. |
| What is the function of a commutator in a DC motor? | The commutator reverses the direction of current flow in the coils, allowing the motor to continue spinning continuously. |
| Can beginners build a homemade DC motor? | Yes, beginners can build a DIY DC motor by carefully following step-by-step instructions and taking proper safety precautions. |
| What are common problems in DIY DC motors? | Common issues include loose wire connections, uneven coil winding, poor magnet alignment, shaft friction, and weak power supply connections. |
| What can I learn from building a DC motor? | Building a DC motor helps you understand electromagnetism, electrical circuits, motor mechanics, energy conversion, and practical engineering skills. |
Discussion
No comments yet. Be the first to join the conversation!