
🛠️ How to Make a 220V Electricity Generator with a BLDC Motor and Black Magnetic Rotor – Part 1 & 2
Creating a homemade electricity generator can be both a fun DIY challenge and a practical step toward self-sufficiency. In this two-part YouTube video series, the creator demonstrates how to build a 220V electricity generator using a BLDC motor and a black magnetic rotor. Let’s dive into Part One and Part Two of this interesting project.
🔩 Part One: Building the Magnetic Rotor and Generator Base
🧲 Project Overview
The first part of the video series focuses on crafting the core mechanical components of the generator, particularly the black magnetic rotor, which is key for generating electricity through electromagnetic induction.
🔧 Materials Used
Black Plastic Rotor Disk
Strong Neodymium Magnets
BLDC Motor Base
Copper Wire
Wooden or Metal Frame
Screws, Nuts, Bearings
🛠 Steps Covered in Part 1
Magnet Arrangement
The creator shows how to embed neodymium magnets into a black plastic or composite disk. The magnets are placed evenly around the circular rotor, alternating poles for consistent magnetic flux.Creating the Rotor Base
A solid and stable base is built to mount the rotor and motor. This helps reduce vibrations and ensures alignment during high-speed rotation.Mounting the BLDC Motor
A BLDC (Brushless DC) motor is mounted securely. When spun externally, this motor functions as a generator, converting mechanical energy into electrical power.Initial Rotation Tests
By manually spinning the rotor, you can already see the potential of energy generation. Although no actual voltage is measured in this part, it sets the stage for serious power output in Part Two.
⚡ Part Two: Coil Winding, Assembly & Voltage Testing
Watch Part 2 on YouTube (from 22:01)
🔄 From Mechanics to Electromagnetics
In Part 2, the focus shifts to winding copper coils, integrating them into the stator, and finally testing the generator’s ability to produce electricity—targeting a 220V AC output.
🧵 Coil Winding Process
Copper Wire Selection
Thick, enamel-coated copper wire is used to ensure durability and efficient current flow.Manual Winding of Coils
Each coil is wound with precision and consistency, using a simple hand-crank tool or jig. The number of turns is critical to achieving high voltage.Stator Coil Placement
The finished coils are arranged around the rotor, spaced to match the magnetic poles. This ensures maximum magnetic interaction and voltage generation.
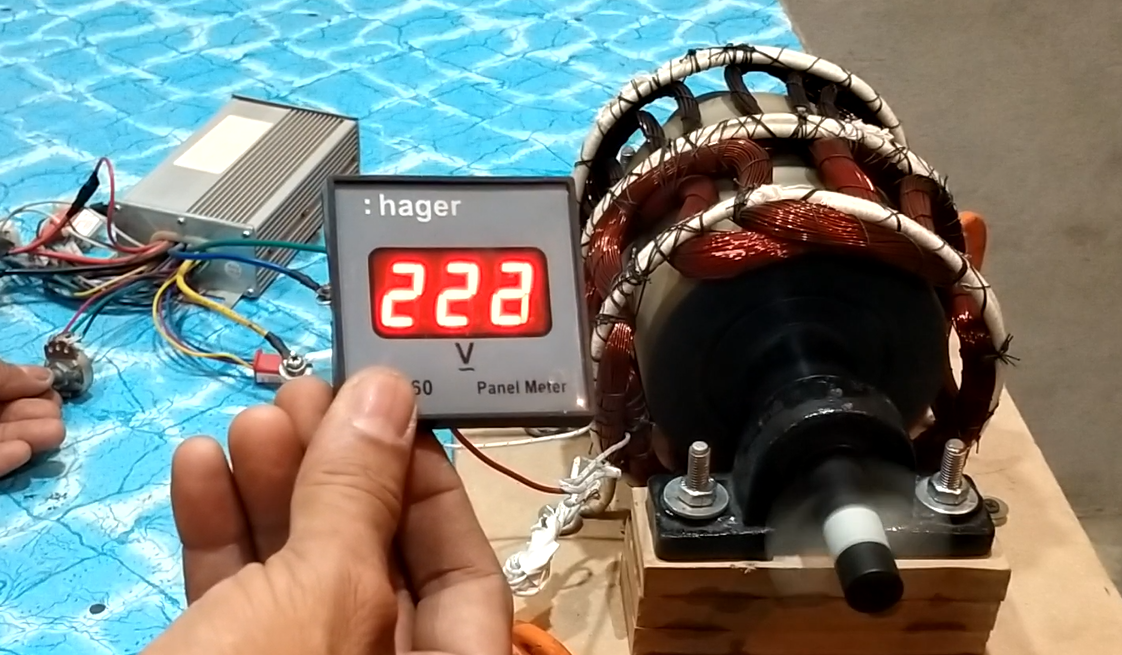
🔌 Final Assembly and Test
The rotor is reattached, aligned perfectly with the stator coils.
A multimeter is connected to measure the output voltage.
When the rotor is spun (manually or with an external motor), the system produces AC voltage, and in tests, it can reach up to 220V, depending on RPM.
🧠 What You Learn from This Project
Basics of electromagnetic induction
How to repurpose a BLDC motor into a generator
The importance of rotor balance and coil winding
How to build a basic yet powerful AC generator at home
🎥 Watch the Full Videos
🔹 Part 1 – Rotor and Base Assembly: https://www.youtube.com/watch?v=4vDfRSF5wsY
🔹 Part 2 – Coil Winding and Voltage Test (from 22:01): https://www.youtube.com/watch?v=JZLqQeFAtmE&t=1321s
❓ Frequently Asked Questions (FAQs)
1. What is the purpose of using a black magnetic rotor?
The black magnetic rotor enhances magnetic flux and stability during rotation, improving the efficiency of electricity generation.
2. Can a BLDC motor really generate electricity?
Yes, when a BLDC motor is rotated externally, it functions as a generator through electromagnetic induction.
3. How much voltage can this generator produce?
The setup in the video demonstrates output nearing 220V AC, depending on rotation speed and coil configuration.
4. Do I need a rectifier for AC to DC conversion?
Yes, if you want to power DC appliances or store electricity in batteries, you’ll need a bridge rectifier.
5. How fast does the rotor need to spin to generate 220V?
It depends on the number of coil turns and magnet strength, but generally, it needs to spin at high RPMs (1000+).
6. Is this generator suitable for continuous power supply?
It’s more suitable for experimental or backup applications. Continuous use requires proper cooling, voltage regulation, and safety mechanisms.
7. What wire gauge should I use for the coils?
Use 18–22 AWG enamel-coated copper wire for balanced resistance and current handling.
8. Can this be used in off-grid solar systems?
It can be part of an off-grid system when combined with inverters and battery banks, but needs precise tuning.
9. How are the magnets placed on the rotor?
The magnets are arranged with alternating poles evenly spaced around the circular rotor surface.
10. What safety precautions should I follow?
Always wear gloves, goggles, and use insulated tools. High voltage generation can be dangerous if mishandled.
11. Can I scale this design for more power?
Yes, by increasing the number of coils, magnets, and rotor size, you can generate higher currents or voltages.
12. How long does it take to build this generator?
Depending on your tools and experience, it can take anywhere from a few hours to a full weekend.
13. Can I automate the spinning mechanism?
Yes, a small petrol engine, wind turbine, or another motor can be connected for continuous spinning.
14. Is coil overheating a problem?
Yes, especially under continuous load. Proper ventilation or heat sinks may be needed.
15. Is this project beginner-friendly?
Yes, the project is explained clearly with visuals. Beginners with basic electrical knowledge can follow along successfully.