
How To Make a 48V Electric Bike Battery
Introduction
Electric bikes, or e-bikes, are rapidly becoming one of the most popular alternatives to traditional transport across the globe. Whether you’re commuting to work, taking a scenic ride on the weekend, or simply looking for a greener way to travel, e-bikes offer a cost-effective, environmentally friendly, and fun solution. But there’s one major factor that determines how powerful, fast, and far your e-bike can go—the battery.
While you can always buy pre-assembled e-bike batteries from the market, they are often overpriced, limited in customization, and sometimes contain lower-quality cells that degrade over time. What most people don’t know is that building your own 48V e-bike battery at home isn’t just possible—it’s surprisingly easy and rewarding.
The secret lies in using 3.2V LiFePO4 (Lithium Iron Phosphate) cells—one of the safest and most durable battery types available today. These cells are widely used in solar energy storage systems and electric vehicles because of their stable chemistry and high cycle life. When combined in the correct series and parallel configuration, they can deliver the power and range that rivals or exceeds commercial battery packs—at nearly half the cost.
You don’t need to be an electrical engineer or a battery expert to make this work. With just a basic understanding of battery connections, a few essential tools, and a bit of patience, you can assemble a powerful, reliable 48V battery that’s tailored exactly to your needs. Whether you want a pack that lasts 40 kilometers or one that handles steep climbs and dual-motor drives, the configuration is completely up to you.
Even better? You’ll know every component inside your battery—the quality of the cells, the protection of the BMS (Battery Management System), the durability of the wiring, and the layout of your power connections. That means fewer surprises down the road and more confidence in your e-bike’s performance.
In this complete guide, we’ll walk you through every step of the process—from understanding battery basics to selecting the right parts, assembling your battery, testing it, and installing it safely on your e-bike. We’ll also break down the costs, show you how to troubleshoot common issues, and share real-world test results from homemade battery packs in action.
By the end of this article, you’ll not only understand how 3.2V cells can be configured to create a powerful 48V e-bike battery, but you’ll also gain the skills and knowledge to build one yourself. Whether you’re a DIY enthusiast, a budget-conscious commuter, or just someone who loves tinkering with electronics—this project is going to be exciting, educational, and genuinely practical.
So grab your gloves, charge your tools, and get ready to learn how to make a 48V electric bike battery at home using 3.2V LiFePO4 cells—and why it’s way easier than you ever imagined.
2. Why Build Your Own E-Bike Battery?
Buying a pre-built electric bike battery from a reputable store might seem like the most straightforward choice—but for many riders and DIY enthusiasts, building a custom battery from scratch offers far more benefits. Let’s explore why crafting your own 48V battery from 3.2V LiFePO4 cells is becoming the smarter, more rewarding option.
1. Major Cost Savings
One of the biggest advantages of building your own e-bike battery is saving money. High-quality, brand-name 48V batteries can easily cost anywhere between $400 to $800 depending on capacity and brand. But when you build your own using LiFePO4 cells, you’re only paying for the raw materials—not the brand, the marketing, or retail markups.
For instance:
A 15S3P configuration using 3.2V 6Ah LiFePO4 cells (total 45 cells) might cost around $150–$180 for the cells.
Add a BMS ($20–$30), nickel strips ($10), and some other basic tools and materials, and your total cost could land between $200 and $300.
That’s nearly 50% cheaper than most commercial packs of similar performance.
2. Customization to Fit Your Needs
Store-bought batteries are “one size fits all”—but your commute, terrain, or riding habits may demand something different. Building your own allows you to:
Adjust capacity for longer range (by increasing parallel cells)
Tailor voltage for compatibility with your controller or motor
Fit the battery perfectly into your bike’s frame or custom casing
Choose quality components like high-discharge BMS or high-cycle cells
3. Control Over Quality and Safety
Many mass-produced e-bike batteries contain unknown or reused cells, poor spot-welding, and basic BMS boards with little protection. When you build your own:
You inspect every cell before using it
You test all connections and voltage levels yourself
You choose reliable components, including the protective layers and insulation
You add fuse protection, cooling, or waterproofing as needed
This control greatly reduces the chances of failure, overheating, or dangerous malfunctions.
4. Learning and Skill Development
Building your own battery is a learning opportunity. You’ll understand:
How battery packs are assembled and balanced
How to spot and test faulty cells
How BMS circuits protect your battery and e-bike
How energy systems work in real-world applications
This knowledge isn’t just useful for e-bikes—it applies to solar systems, backup power banks, electric scooters, and more. You’ll become more independent and better equipped to troubleshoot issues on your own.
5. Repairability and Upgrades
If your pre-made battery fails, you’re often stuck with no easy fix. But a homemade pack is:
Easy to inspect and open
Simple to replace damaged cells
Upgradeable—you can add more capacity, a better BMS, or even higher-performance wiring later on
That’s long-term flexibility you simply don’t get with off-the-shelf solutions.
In Summary:
Building your own 48V battery using 3.2V LiFePO4 cells is not just about saving money—it’s about gaining control, knowledge, and power. You get to create something tailor-made for your needs, avoid market limitations, and enjoy the confidence of knowing what powers your e-bike from the inside out.
3. Understanding Battery Basics
Before diving into the hands-on part of building a 48V battery using 3.2V LiFePO4 cells, it’s crucial to understand the basic concepts of batteries—particularly how voltage, current, capacity, and configurations like series and parallel connections work together. These principles will help you safely design a battery pack that meets your e-bike’s power and range requirements.
🔋 Voltage (V) – Electrical Pressure
Voltage is the “push” that drives electrical current through a circuit. Think of it like water pressure in a pipe: higher voltage pushes more electricity.
A single LiFePO4 cell delivers 3.2V nominal (typically between 2.5V and 3.65V per charge cycle).
To power a 48V e-bike system, you’ll need to combine multiple cells in series to reach the required voltage.
📌 Example:
15 cells × 3.2V = 48V (nominal)
Fully charged: 15 × 3.65V = 54.75V
Fully discharged: 15 × 2.5V = 37.5V
This range is perfect for most 48V e-bike controllers.
🔌 Current (A) – Flow of Electricity
Current (measured in amperes or amps) refers to the rate of flow of electricity. Think of it as the volume of water moving through a pipe per second. Higher current = more power delivered at once.
Motors draw a lot of current under load (e.g., climbing hills).
Your battery cells need to support high discharge currents safely.
Most LiFePO4 cells provide continuous discharge rates from 3A to 20A, depending on size and quality.
⚡ Capacity (Ah) – How Long It Lasts
Capacity, measured in amp-hours (Ah), is like the “fuel tank” size.
1Ah = delivering 1A for 1 hour
If your battery is rated at 15Ah, it can provide:
15A for 1 hour, or
5A for 3 hours, etc.
To increase capacity, you connect cells in parallel.
📌 Example:
If you have three 3.2V 6Ah cells in parallel (3P), the group becomes:
Voltage: 3.2V (unchanged)
Capacity: 6Ah + 6Ah + 6Ah = 18Ah
⚙️ Power (Watt-hours / Wh) – Total Energy Available
Power is the product of voltage × capacity. It’s a measure of how much work the battery can do.
Formula:
Wh = V × Ah
📌 Example:
A 48V battery with 15Ah = 48 × 15 = 720Wh
This means your battery can deliver 720 watts for one hour, or 360 watts for two hours, and so on.
🔁 Series vs. Parallel Connections
Understanding how to wire your cells is critical to creating the right voltage and capacity.
✅ Series (S):
Connect positive to negative end of each cell.
Increases voltage while keeping capacity the same.
Required to build a 48V system.
📌 Example:
15 cells in series (15S):
Voltage: 3.2V × 15 = 48V
Capacity: 6Ah (unchanged)
✅ Parallel (P):
Connect positive to positive, and negative to negative.
Increases capacity while keeping voltage the same.
📌 Example:
3 cells in parallel (3P):
Voltage: 3.2V
Capacity: 6Ah × 3 = 18Ah
✅ Combined (Series-Parallel):
To build a powerful battery, you’ll use both:
15S3P = 15 series groups of 3 cells in parallel
Result:
Voltage = 48V
Capacity = 18Ah
Power = 48 × 18 = 864Wh
📋 Summary Table
| Term | Definition | Units | Example |
|---|---|---|---|
| Voltage | Electrical pressure | Volts (V) | 48V = 15 × 3.2V |
| Current | Flow of electricity | Amps (A) | 15A motor draw |
| Capacity | How much charge a battery holds | Amp-hours | 18Ah = 3 × 6Ah cells |
| Energy | Total power available | Watt-hours | 864Wh = 48V × 18Ah |
| Series | Increases voltage | – | 15S = 48V |
| Parallel | Increases capacity | – | 3P = 18Ah |
By mastering these simple electrical concepts, you’ll not only be equipped to build your own 48V battery but also gain insights that apply to any future energy project—solar power, electric scooters, backup systems, and beyond.
4. Why Choose 3.2V LiFePO4 Cells?
When it comes to building a reliable, powerful, and safe battery pack for your electric bike, Lithium Iron Phosphate (LiFePO4) cells—each with a nominal voltage of 3.2V—are a game-changer. While other lithium-ion chemistries (like Li-ion 18650s at 3.7V) are popular, LiFePO4 stands out for its safety, stability, and long lifespan—making it ideal for a DIY 48V battery.
Here’s why 3.2V LiFePO4 cells are the smartest choice for your e-bike project:
✅ 1. Superior Safety
LiFePO4 batteries are widely regarded as one of the safest lithium chemistries available today. Unlike other lithium-ion types (like LiCoO₂), they are:
Thermally stable
Less prone to thermal runaway or explosion
Resistant to overheating under stress
Much safer when overcharged or over-discharged
This makes them ideal for beginners and DIYers who might make small wiring or connection errors. Even if something goes wrong, LiFePO4 is forgiving and unlikely to catch fire.
✅ 2. Longer Cycle Life
One of the most impressive features of LiFePO4 cells is their extended cycle life.
Most high-quality LiFePO4 cells can last 2,000 to 4,000 charge cycles.
Compare that to standard Li-ion (18650) cells, which usually degrade after 500–1,000 cycles.
With proper care, a LiFePO4 battery pack can last up to 8–10 years, even with regular use.
✅ 3. Stable Voltage Output
LiFePO4 cells provide a more consistent voltage curve throughout their discharge cycle.
Instead of quickly dropping voltage like other lithium cells, LiFePO4 holds steady at ~3.2V for most of its capacity.
This improves e-bike performance, giving a more consistent speed and power delivery.
You’ll experience less “voltage sag,” even when riding uphill or drawing heavy current.
✅ 4. Environmentally Friendly
LiFePO4 batteries use iron and phosphate—both of which are abundant and non-toxic.
They’re easier to recycle
Less harmful in case of disposal
Safer for the environment compared to cobalt- or nickel-based cells
✅ 5. High Discharge and Charge Rates
LiFePO4 cells can deliver high current without overheating or losing capacity:
Many can safely handle 3C or more discharge rates (e.g., a 6Ah cell can deliver 18A).
Perfect for high-power motors or dual-motor e-bikes.
Fast charging is also possible with the right charger and BMS.
✅ 6. Wide Availability in Cylindrical and Prismatic Formats
You can easily find 3.2V LiFePO4 cells in:
Cylindrical types (like 32700: 32mm diameter, 70mm long)
Prismatic types (flat rectangular blocks, ideal for compact packs)
This gives you flexibility in battery design, depending on the space and shape available on your e-bike.
✅ 7. Ideal for 48V Systems
48V systems are often used in e-bikes because they strike the right balance between performance and safety.
To build a 48V battery, you need 15 cells in series (15 × 3.2V = 48V nominal).
That makes LiFePO4 a perfect match for standard e-bike voltage requirements.
In Summary:
3.2V LiFePO4 cells are the ideal choice for DIY battery builders:
They’re safer, last longer, and deliver stable performance
Perfectly suited for a 48V battery configuration
Widely available and relatively affordable
Whether you’re building your first battery pack or replacing an old one, LiFePO4 offers unmatched peace of mind—without compromising power.
5. Materials and Tools Required
Before you begin assembling your 48V e-bike battery using 3.2V LiFePO4 cells, it’s crucial to gather all the necessary materials, tools, and safety equipment. A well-prepared workspace and proper gear will make the process smoother, safer, and more accurate.
Here’s a comprehensive list of what you’ll need:
🔋 Battery Cells – 3.2V LiFePO4
Quantity: 45 cells for a 15S3P setup
Type: Cylindrical (e.g., 32700 6Ah) or prismatic
Specs: Must support at least 10A continuous discharge (ideally 15A+)
🛒 Tip: Buy from reputable suppliers. Test voltage of all cells before use to confirm consistency (ideally within 0.05V range).
⚙️ Battery Management System (BMS)
Type: LiFePO4 15S BMS
Purpose: Balances the cells, prevents overcharge, over-discharge, short circuits
Current Rating: Match to your motor’s peak demand (e.g., 30A–60A)
🔌 Note: Some BMS units include Bluetooth for mobile monitoring.
🔗 Nickel Strips or Copper Busbars
Used for making electrical connections between cells
For spot welding, use pure nickel strips (not nickel-plated steel)
If using a screw-based or copper-busbar setup, make sure current capacity is sufficient
🔧 Spot Welder or Soldering Iron
Preferred: Spot welder (safer and cleaner connections)
Backup: 60W+ soldering iron with flux and lead-free solder
🧠 Warning: Excessive heat from soldering can damage cells if done improperly. Spot welding is safer and better for cell longevity.
🔌 Wires and Connectors
Silicone-insulated 12 AWG or 14 AWG wire (for power connections)
JST or similar connector pins for BMS balance wires
XT60/XT90/Anderson connectors for battery output
📌 Tip: Use connectors with spark suppression (anti-spark) if available.
🧰 Tools and Accessories
Multimeter (for voltage and resistance checks)
Heat shrink tubing
Kapton tape or electrical insulation tape
Battery holders (optional but useful for cylindrical cells)
Hot glue gun (for securing cells)
Razor knife or scissors
Cable ties and velcro straps
🔋 Charger for 48V LiFePO4 Battery
Output Voltage: 54.6V (fully charges 15S LiFePO4)
Current: 2A–5A recommended
Smart Charger: With automatic shutoff and overcharge protection
🔌 Important: Do not use a Li-ion (3.7V cell) charger. LiFePO4 chemistry requires its own voltage profile.
🦺 Safety Gear
Insulated gloves
Eye protection (safety glasses)
Fire-resistant work surface (e.g., metal or ceramic)
Small fire extinguisher (as a precaution)
🏗️ Optional but Useful
Cell voltage checker
Battery tester or load tester
Thermal camera or infrared thermometer (to monitor heat during discharge)
Custom battery case or waterproof enclosure for mounting on the bike
Having all your tools and materials ready will save you time and prevent mistakes. It also ensures the battery you build is reliable, safe, and long-lasting.
6. Designing a 48V Battery Pack
Now that you have your materials and understand battery fundamentals, it’s time to plan the design of your battery pack. Proper design is essential to ensure safety, performance, and compatibility with your e-bike system.
🧩 The Target: 48V Nominal Battery
A 48V e-bike system doesn’t use exactly 48 volts—it’s a nominal value. In reality:
Fully charged = 54.75V (3.65V × 15 cells)
Nominal = 48V (3.2V × 15 cells)
Fully discharged = 37.5V (2.5V × 15 cells)
This voltage range is standard for 48V e-bike controllers and motors, making it ideal for efficient performance and range.
🧮 Step 1: Determine Series Configuration (Voltage)
You achieve higher voltage by connecting cells in series.
Formula:Total Voltage = Number of Cells in Series × Cell Voltage
For LiFePO4 (3.2V):
15 cells in series (15S) = 48V nominal
💡 Important: Each cell in a series must be identical in type, age, and voltage. Always balance cells before final connection.
🧮 Step 2: Determine Parallel Configuration (Capacity)
To increase battery capacity (Ah), you connect cells in parallel.
Formula:Total Capacity (Ah) = Number of Cells in Parallel × Single Cell Capacity
Example:
6Ah cells × 3P = 18Ah total
You can go for:
15S1P → 48V 6Ah (small, light but limited range)
15S2P → 48V 12Ah
15S3P → 48V 18Ah
15S4P → 48V 24Ah (larger, heavy but long range)
🧠 Rule of thumb:
1Ah = ~1–1.5 km range depending on terrain and load.
So a 48V 18Ah pack = ~25–35 km range.
🔋 Step 3: Decide on Total Energy (Watt-hours)
This is what tells you how much total energy your battery stores.
Formula:Watt-hours (Wh) = Voltage × Amp-hours
Example:
48V × 18Ah = 864Wh
That means you can run a 500W motor for ~1.5–2 hours continuously (in ideal conditions).
⚡ Step 4: Select the Right BMS
Your BMS must match both:
Cell chemistry: LiFePO4
Cell count: 15S
Amperage: Match to motor/controller draw
Typical BMS ratings:
15S 30A: For motors up to ~750W
15S 40A–60A: For 1000W+ setups or steep terrain
🚫 Avoid using a Li-ion (3.7V) BMS—wrong voltage cutoffs can damage your battery.
🧱 Step 5: Choose the Pack Shape & Layout
Battery packs can be arranged in many shapes depending on:
Frame space
Weight distribution
Cooling needs
Popular layouts:
Linear Stack (Long Tube) – fits inside bike frame
Block Pack – fits on rear rack or inside a box
Split Pack – two smaller packs wired together (e.g., one on frame, one on rack)
💡 Tip: Cylindrical cells fit well in honeycomb grids; prismatic cells stack like bricks.
🔒 Step 6: Build in Protection
Design must include:
Insulation layers between series rows
Heat shrink wrap for outer layer
Kapton or fish paper around terminals
Ventilation space (if enclosed)
Also plan:
Charge port (XT60)
Discharge port (XT90/Anderson)
Optional: power switch, voltmeter display, Bluetooth module
✅ Design Summary Example – 15S3P 48V 18Ah
| Parameter | Value |
|---|---|
| Cells | 45 (15 series × 3 parallel) |
| Voltage | 48V nominal (54.75V max) |
| Capacity | 18Ah |
| Energy | 864Wh |
| Discharge Rate | Up to 60A (with proper BMS) |
| Range Estimate | ~30–50 km (based on usage) |
| Pack Type | Cylindrical or prismatic |
A carefully designed battery pack ensures maximum performance, longevity, and safety. Once you’ve finalized your configuration and layout, you’re ready to move on to the most exciting part—assembling the battery pack.
7. Step-by-Step Battery Pack Assembly
Now that you’ve chosen your battery design, it’s time to build it. This is where you bring your 48V battery pack to life using your 3.2V LiFePO4 cells. Follow these steps carefully to ensure a safe, functional, and long-lasting pack.
🔧 Before You Begin
Work in a clean, non-metallic workspace (e.g., a wooden or rubber mat surface).
Wear gloves and safety glasses.
Keep a multimeter on hand to verify voltage at each step.
Ensure all cells are fully charged and balanced before assembly.
🪫 Step 1: Test and Group the Cells
Why? All cells must be at nearly the same voltage to avoid imbalance after assembly.
How:
Use a multimeter to check each cell’s voltage.
Ideal range: 3.25V–3.30V (fully charged = 3.65V, but don’t charge before welding).
Sort cells into 15 groups of 3 for a 15S3P layout.
Arrange each group so it contains cells with nearly identical voltages.
🛠 Tip: Label each group with a marker (e.g., G1, G2, …, G15).
🧱 Step 2: Arrange the Cells
How:
Use a cell holder frame or hot glue to stabilize the layout.
Lay them out in 15 groups of 3 cells each.
Arrange them in a “zigzag” or straight-line pattern for easier series connection.
📌 Reminder: Keep positive and negative terminals clearly visible for safe wiring later.
🔩 Step 3: Connect Parallel Groups
Connect the 3 cells in each group in parallel to increase capacity.
How:
Use a spot welder with pure nickel strips to connect the terminals:
Positive to positive
Negative to negative
Each group should now act like a single 3.2V cell with 3× the capacity (e.g., 18Ah if using 6Ah cells).
🧠 Soldering tip: If soldering instead of welding, work quickly. Excess heat can damage cells.
🔗 Step 4: Connect the Series Configuration
Now connect all the parallel groups in series to create the full 48V pack.
How:
Use nickel strips to connect:
Group 1’s negative to Group 2’s positive
Group 2’s negative to Group 3’s positive, and so on…
Until Group 15’s positive is the final output
🔋 Result:
You now have a battery pack with 48V nominal voltage and 18Ah capacity.
🧰 Step 5: Add Insulation & Protection Layers
How:
Wrap each parallel group or series connection in Kapton tape or fish paper.
Place insulation pads between layers (if stacking).
Use heat shrink tubing to encase the full pack once completed.
🧯 Safety tip: Use fire-retardant heat shrink or add a flame-resistant sleeve if installing in risky conditions.
🧪 Step 6: Test the Pack Voltage
Before connecting the BMS, measure the total voltage of the pack.
How:
Use a multimeter:
Probe the overall output terminals (first group’s negative to last group’s positive)
Expected voltage:
~48V if cells are fully charged
~45V if partially charged
❗ If reading is significantly off, STOP and re-check all connections.
⚙️ Step 7: Mount and Connect the BMS
How:
Identify BMS terminals:
B- = battery pack negative
B+ = battery pack positive
C- = charger negative
P- = discharge negative (for load)
Balance leads: one for each cell group (1–15)
Connect BMS wires:
Solder or plug in the balance wires to each cell group (G1–G15)
Make sure sequence is exact (G1 = 0V, G2 = 3.2V, G3 = 6.4V… up to G15)
Connect main terminals:
B- goes to the battery’s negative end
B+ goes to the positive end
C- and P- are wired as needed for charger and output
🧠 Pro tip: Some BMS units auto-detect series count—others need manual activation with a first-time charge cycle.
🔋 Step 8: Add Discharge and Charge Ports
Use XT60, XT90, or Anderson connectors for the following:
Charge port: Connected via the BMS
Discharge port: Also routed through the BMS
Label them clearly to avoid confusion.
📌 Optional: Add:
Inline fuse
Voltmeter display
Waterproof charging jack
🔥 Step 9: Final Shrinking and Enclosure
Once everything is connected:
Test all connections again
Wrap the pack tightly in heat shrink tubing
Seal with a heat gun (medium heat)
Insert into a battery case or protective bag
🧱 Frame-fitting tip: If placing inside the bike frame, add foam or rubber padding to prevent vibrations.
🧪 Step 10: Initial Test & Charging
Plug the battery into a 54.6V LiFePO4 charger
Monitor temperature during the first charge
Observe if the BMS cuts off charge properly when full
Then test with a low-power motor run before full use
📈 Voltage should rise evenly across cells; if one group rises too fast, that cell group may be weak or mismatched.
✅ Assembly Complete!
You now have a fully functional 48V LiFePO4 e-bike battery, custom-built with your own hands. It’s configured to:
Deliver long range
Withstand high loads
Stay safe and cool under pressure
All that’s left is installation—which we’ll cover next.
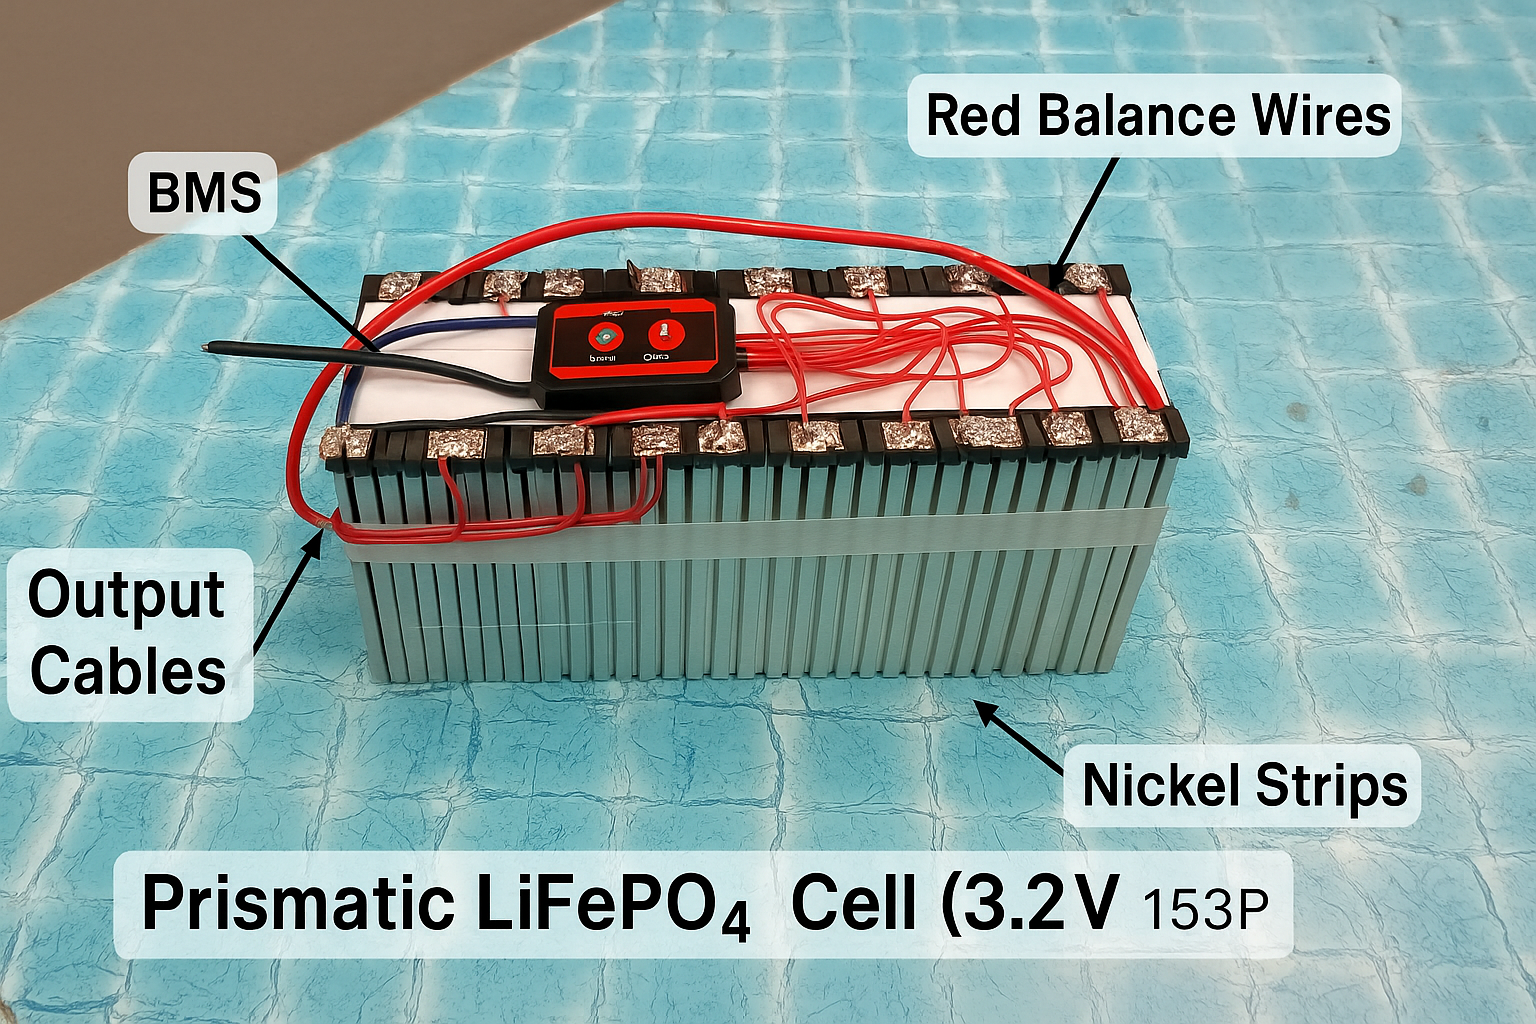
8. Wiring the BMS (Battery Management System)
The Battery Management System (BMS) is one of the most important safety components in your DIY 48V battery pack. It ensures that each cell group charges and discharges evenly, protects against overcharging, under-voltage, overheating, and short circuits—and keeps your battery healthy for thousands of cycles.
Correctly wiring your BMS is essential for both safety and performance. Let’s walk through it step-by-step.
🔍 What a BMS Does
A good BMS performs the following functions:
Monitors voltage across each series group
Balances cells during charging
Disconnects the battery if a fault is detected:
Overvoltage or undervoltage
Short circuit
Overcurrent
High temperature
Without a BMS, your battery could overcharge (fire risk), over-discharge (cell damage), or become unbalanced (reduced life).
📦 Understanding BMS Terminals
A standard 15S LiFePO4 BMS will have:
B- (Battery Negative): Main negative connection from the battery
B+ (Battery Positive): Main positive terminal (sometimes built into pack)
P- (Pack Negative/Output): Negative output to the motor/controller
C- (Charge Negative): Negative terminal for charging (often same as P-)
Balance Wire Harness (15 wires + 1 ground): For monitoring each cell group voltage
Each wire in the balance harness corresponds to one series group:
B0 = common ground
B1 = +3.2V
B2 = +6.4V
…
B15 = +48V (maximum ~54.75V when fully charged)
⚙️ Step-by-Step Wiring Instructions
🔧 Step 1: Attach the Main Battery Leads
B-: Connect this wire to the negative terminal of the entire battery pack (the start of Group 1).
B+: Connect to the positive terminal of the battery pack (the end of Group 15).
If your pack has no separate B+, this may be your external battery positive line too.
🔌 Step 2: Connect the Balance Wires
Critical step: Balance wires must be connected in the exact voltage order of each series group.
Here’s how:
Use a multimeter to measure each group’s terminal voltage.
Start with B0 (black or first wire) – connect to Group 1’s negative.
B1 connects to Group 1’s positive.
B2 connects to Group 2’s positive.
Continue connecting:
B3 = Group 3’s positive
…
B15 = Group 15’s positive
🛠 Tip: If you’re unsure, test each balance wire with a multimeter before plugging into the BMS socket.
⚡ Step 3: Connect Charging and Discharge Ports
Depending on your BMS:
P-: This is the main negative for both charging and discharging.
C-: If your BMS has a separate charge terminal, connect this to your charger’s negative.
B+: Common positive for both charging and discharging.
🧠 Reminder: Never connect/disconnect balance wires while the BMS is powered—it can fry the board.
🧪 Step 4: Verify All Connections
Use a multimeter to check voltage between B+ and P- (should match full battery voltage).
Check each balance wire with respect to B0 to confirm voltages rise in 3.2V steps.
E.g., B1 = ~3.2V, B2 = ~6.4V, B3 = ~9.6V, …, B15 = ~48V+
🔋 Step 5: First Power-On Test
Plug in your LiFePO4 charger to the charge port.
Monitor:
Individual group voltages
BMS temperature
Charging current (should taper as cells fill)
Once cells are fully charged (3.65V per group), BMS may balance them automatically.
📌 Some BMS units with Bluetooth or LED indicators will show real-time stats.
🛑 Common Mistakes to Avoid
| Mistake | Consequence |
|---|---|
| Incorrect balance wire order | Fried BMS or imbalance |
| Skipping insulation | Short circuits |
| Using wrong BMS (not LiFePO4) | Incorrect voltage cutoffs |
| No fuse or overcurrent protection | Risk of wiring damage/fire |
| Connecting balance wires while powered | May permanently damage BMS |
✅ Final Checkpoints Before Next Step
All balance wires are correctly ordered
Main power wires securely connected
Charger is LiFePO4-compatible (not Li-ion)
No sparks or heat on terminals during first charge
Voltages rise evenly across all groups
Once your BMS is wired and the battery passes the first charge test, you’re ready to mount the battery to your bike and wire it up to your motor/controller system.
9. Charging the Pack Safely
Once your 48V battery pack is assembled and your BMS is properly connected, it’s time to charge it for the first time. Charging may seem like a simple task, but when working with lithium-based chemistries—especially in DIY packs—it’s essential to follow correct procedures to ensure safety, longevity, and optimal performance.
🔌 Choose the Right Charger
Never use a generic charger or one meant for Li-ion batteries. LiFePO4 cells have different voltage requirements and charging behavior.
✔️ Charger Specs for 15S LiFePO4:
| Parameter | Value |
|---|---|
| Output Voltage | 54.6V (3.65V × 15 cells) |
| Charging Current | 2A to 5A (based on cell specs) |
| Chemistry | LiFePO4 (3.2V nominal cells) |
| Features | CC/CV charging, overcharge cutoff, auto shutoff |
🔋 Smart chargers with status LEDs or displays are strongly recommended.
🧠 Understanding the Charging Process
LiFePO4 batteries use a two-stage charge cycle:
Constant Current (CC): Charger supplies fixed amps until voltage reaches 54.6V
Constant Voltage (CV): Charger holds voltage at 54.6V while current gradually decreases
A properly programmed BMS will monitor each cell group during this process and stop charging if any group reaches 3.65V, protecting the pack.
⚙️ First Charge Checklist
Before plugging in:
Check all balance leads and BMS wiring again
Make sure no exposed terminals can touch anything conductive
Place the battery on a non-flammable surface (tile, metal sheet, etc.)
Ensure you are in a well-ventilated space
🧯 Tip: Keep a small Class C fire extinguisher nearby as a precaution.
🔋 Step-by-Step Charging Process
Plug the charger into the wall without connecting it to the battery.
Connect the charger’s output to the battery’s charge port.
Positive to B+, Negative to C- or P- (as per your BMS configuration).
Observe:
The charger should show charging indicator (light or display)
Battery voltage should begin to rise slowly
No cell group should exceed 3.65V
Let the charger run until:
It shuts off automatically
Or the current drops near zero in CV mode (float)
🧠 Don’t interrupt the first charge too early. Let the BMS balance cell voltages properly.
📊 Monitor Key Parameters
During charging:
Pack temperature should remain cool (< 40°C)
Voltage should increase steadily
No group should rise or lag significantly
Use a Bluetooth BMS app (if available) or a multimeter to monitor balance lead voltages.
🧯 Safety Tips for Every Charge
| Do | Don’t |
|---|---|
| Use a proper LiFePO4 charger | Never use a Li-ion or unverified charger |
| Monitor first charge closely | Never leave the battery unattended overnight |
| Charge in ventilated, fire-resistant area | Avoid charging near flammable materials |
| Use chargers with auto shutoff and protections | Don’t charge damaged or puffed cells |
| Disconnect after full charge | Avoid storing at full voltage for long periods |
⚠️ What If Something Goes Wrong?
| Issue | Possible Cause | Action |
|---|---|---|
| One group rises too fast | Weak or overcharged cells | Stop charging, test and replace if needed |
| Charger gets very hot | Poor airflow or faulty unit | Stop use immediately, replace charger |
| No charging light | BMS may be in protection mode | Recheck connections and voltage levels |
| Battery heats up | Internal short or overcurrent | Disconnect and inspect immediately |
✅ After Charging: What’s Next?
Once fully charged:
Disconnect charger from battery
Let the pack cool
Do a quick multimeter test across main terminals (should show ~54.6V)
Optionally check balance wire voltages to ensure all are ~3.65V
The battery is now ready to power your e-bike’s controller and motor
A safe, clean charging habit will help extend your battery’s lifespan and keep your rides trouble-free. Now that the battery is charged and verified, it’s time to install it on your electric bike.
10. Installing the Battery on Your E-Bike
After successfully building, wiring, and charging your 48V LiFePO4 battery pack, the final step is to mount it securely to your electric bike. Proper installation is essential not just for performance, but for safety, aesthetics, and long-term durability.
Let’s walk through how to install your homemade battery in a way that’s functional, weather-resistant, and easy to maintain.
🧱 Step 1: Choose the Mounting Location
Your battery can be mounted in several locations depending on your bike frame and pack design:
| Location | Pros | Cons |
|---|---|---|
| Inside Frame Triangle | Good weight distribution, hidden | Limited space, custom mounting needed |
| Rear Rack | Easy access, more room | Affects balance, susceptible to road shock |
| Seat Tube Mount | Balanced center of gravity | Requires secure bracketing |
| Top Tube Bag | Good for split packs or compact sizes | Limited by width of the pack |
📌 Tip: Use foam padding between pack and frame to reduce vibration and impact.
🧰 Step 2: Mount the Battery
Option A: Use a Hard Case or Battery Box
Insert the battery into a waterproof plastic or metal enclosure
Use velcro straps, metal clamps, or bolted holders
Ideal for rack mounts or frame bags with exposed openings
Option B: Soft Mounting with Padding
Wrap battery in fire-resistant foam or insulation
Place inside a frame bag or rear pannier
Secure using adjustable straps or zip ties
🔒 Always ensure the battery cannot move or rattle during rides. Movement can stress welds and connectors.
🔌 Step 3: Connect the Battery to the Controller
You’ll now wire your battery to the e-bike’s motor controller.
Typical setup:
Battery Positive (B+) → Controller Positive (Red wire)
Battery Negative (P- or B-) → Controller Negative (Black wire)
Use XT60, XT90, or Anderson connectors for quick, secure connections. If possible, add:
Inline fuse (40A–60A rated) for protection
Main on/off switch to kill power when bike is parked
🧠 Pro tip: Add anti-spark connectors or a pre-charge resistor to avoid sparking during initial connection.
🧪 Step 4: Perform Initial Power Test
Power on the e-bike’s display or controller
Check if voltage is shown correctly (around 48–54V)
Run the motor slowly to confirm smooth operation
Listen for any abnormal noises or stutters
If the controller shuts down or doesn’t power up:
Re-check battery voltage
Inspect BMS status (some delay output after power-on)
Ensure discharge wires are connected through the BMS
☔ Step 5: Weatherproof the Installation
If riding in rain or dusty terrain:
Use rubber grommets or silicone sealant at entry points
Tape all connections with heat-shrink tubing or weatherproof sleeves
If using a soft bag, line the inside with plastic wrap or waterproof fabric
📦 Optional: Buy or 3D-print a custom battery enclosure for a perfect fit.
🔐 Step 6: Add Convenience Features (Optional)
To enhance safety and usability, consider:
Battery voltage meter or display
Bluetooth BMS module (for real-time cell monitoring via smartphone)
Locking bracket or key ignition switch for anti-theft
Removable charging port accessible without removing the pack
✅ Final Checklist
Before hitting the road, confirm:
Battery is securely mounted
All wires are connected and insulated
Voltage is stable and within range
BMS is functioning properly
No wobbling or loose parts during a short ride test
A properly installed battery means fewer breakdowns, better ride balance, and confidence in all weather and terrain. Now that your battery is in place and running, it’s time to talk about keeping it safe and extending its life over the long haul.
11. Safety Tips
Building your own 48V e-bike battery with 3.2V LiFePO4 cells is rewarding, but it’s essential to prioritize safety at every stage—from assembly to daily use. While LiFePO4 is among the safest lithium chemistries available, mishandling or poor construction can still lead to hazards like overheating, fire, or failure.
Here are key safety tips to protect both yourself and your investment.
🔒 1. Never Mix Cells of Different Voltage or Age
Why it matters:
If you combine cells with different voltage levels or use old cells alongside new ones, they will discharge and charge unevenly, causing rapid imbalance and reducing the battery’s lifespan.
Solution:
Test all cells before assembly
Group them based on voltage and internal resistance
Use only matched cells in series and parallel
🔧 2. Insulate Everything
Exposed nickel strips or terminals can cause accidental shorts, leading to sparks, fires, or damage to cells.
Precautions:
Use Kapton tape, fish paper, and heat shrink
Never allow nickel strips to touch other strips in an uncontrolled way
Wrap your final battery in flame-resistant material or a case
🔥 3. Avoid Overcharging and Over-Discharging
Each LiFePO4 cell should stay within a safe range:
Charge limit: 3.65V per cell
Discharge limit: No lower than 2.5V per cell
Overcharging can cause swelling or rupture.
Over-discharging can permanently damage the cell.
Solution:
Always use a proper LiFePO4 charger (54.6V for 15S)
Use a BMS that enforces these limits on every charge/discharge cycle
🧯 4. Never Leave Charging Unattended
Even with good equipment, things can go wrong:
A cell could overheat
A wire could short
The charger may malfunction
Safety habits:
Charge in open, ventilated areas
Place the battery on a fire-resistant surface (tile, metal, concrete)
Unplug the charger after full charge
Avoid charging overnight or when you’re away from home
⚡ 5. Fuse Your System
If a short circuit occurs, current can spike instantly and melt wires or damage components. A fuse protects your bike and your battery from such dangerous overloads.
Recommended fuse size:
40A to 60A for a 48V e-bike battery
Install fuse on the positive discharge line
🧠 6. Never Solder Directly to Battery Cells (If Avoidable)
Heat from soldering can damage internal cell chemistry.
Best practice:
Use a spot welder for making connections
If soldering is your only option, use a high-wattage iron (60W+) and work very quickly
Pre-tin wires and touch the cell for no more than 1–2 seconds
❄️ 7. Monitor Battery Temperature
LiFePO4 cells operate best between 10°C and 45°C (50°F to 113°F).
Avoid:
Charging below 0°C (may lead to lithium plating)
Operating above 60°C (can cause degradation)
🧠 Tip: Install a small temperature sensor or use a thermal camera during test rides.
🔌 8. Secure All Wiring
Loose wires may:
Snap from vibration
Short against the frame
Disconnect during rides
Solution:
Use zip ties, wire sleeves, or glue mounts to hold wiring in place
Avoid running power wires where they can rub against metal or moving parts
🧽 9. Keep It Dry
Even though LiFePO4 batteries are less volatile, moisture can corrode terminals or short BMS circuits.
Use waterproof enclosures
Seal connection points with silicone or rubber boots
Never submerge your battery or wash it with water
✅ Final Thoughts
Treat your homemade battery pack with the same caution you would a high-voltage power tool or a gas engine:
Inspect it regularly
Monitor for unusual smells, swelling, or heat
Replace any damaged components immediately
Always disconnect when not in use for extended periods
With proper care and attention to safety, your DIY 48V battery can serve you reliably for thousands of miles—safely, efficiently, and with peace of mind.
12. Maintenance and Best Practices
Your DIY 48V LiFePO4 battery is a long-term investment—both in terms of time and money. While LiFePO4 cells are known for their long lifespan and safety, regular maintenance and proper handling are key to ensuring your battery lasts for thousands of charge cycles and delivers consistent performance.
Below are essential maintenance steps and best practices to keep your battery safe, healthy, and efficient.
🧼 1. Inspect Regularly
Regular visual inspections help catch problems early.
Check for:
Swelling or puffing of cells
Loose wires or welds
Corrosion at terminals or connectors
BMS damage or discoloration
Any odd smells (e.g., burnt plastic)
📅 Recommendation: Perform a full inspection once every 1–2 months.
🔋 2. Monitor Individual Cell Voltages
Even with a BMS, cells can drift over time. Keeping your pack balanced is essential to avoid early failure.
How:
Use a balance charger or BMS app (if Bluetooth-enabled)
Check that each cell group stays close to 3.2V (±0.05V)
If one group is consistently lower or higher, it may need replacement or rebalance
🛠 Tip: A simple battery tester or multimeter can help track voltage trends over time.
⚙️ 3. Recharge Properly
Avoid deep discharges and overcharging.
Best charging practices:
Use only a LiFePO4-compatible charger
Keep charge current within 0.5C–1C of cell rating
Unplug once fully charged to reduce heat stress on the BMS
Avoid topping off too often unless you need full capacity for a long ride
🔋 Example: For an 18Ah battery, use a charger rated for 5A or less.
🌡️ 4. Store Smartly
If storing the battery for more than a few weeks, follow these storage rules:
| Factor | Best Practice |
|---|---|
| State of charge | 50%–70% (not fully charged) |
| Temperature | 10°C–25°C (50°F–77°F), dry space |
| Disconnection | Disconnect from bike/controller |
| Interval | Recharge every 2–3 months if unused |
🧠 Why it matters: Storing fully charged or fully discharged shortens lifespan.
🔧 5. Handle Repairs and Replacements Cautiously
If one cell group is weak or degraded:
Remove the battery from service
Open the pack carefully
Replace the faulty group with cells of the same type, capacity, and age
💡 Tip: When replacing groups, re-balance the entire pack before reconnecting the BMS.
📊 6. Log Your Battery Performance
Tracking your battery’s behavior helps diagnose future problems.
Track:
Ride distance per charge
Voltage drop under load
Charge/discharge cycles
Temperatures during use
📓 Simple habit: Maintain a notebook or use an app to log voltage after each ride.
🚴♂️ 7. Use It Regularly
Batteries degrade faster when idle. Keep your pack active:
Ride the bike at least once a week
Cycle the battery through partial discharges and charges
Avoid keeping it plugged in constantly
🔁 Batteries like to be used, not stored.
✅ Final Checklist for Long-Term Health
| Task | Frequency |
|---|---|
| Check voltage and balance | Monthly |
| Inspect wiring and terminals | Monthly |
| Deep clean connectors & case | Every 2–3 months |
| Cycle through full discharge | Every 3 months |
| Storage charge adjustment | Every 2–3 months |
Following these best practices can help your DIY LiFePO4 battery last over 2,000–4,000 charge cycles—which could be 5 to 10 years of everyday riding if properly maintained.
13. Cost Breakdown vs. Buying Commercial Packs
One of the most compelling reasons to build your own 48V electric bike battery is the cost savings. Not only can you tailor the battery to your specific performance and range needs, but you can also achieve this at a fraction of the price of most retail batteries—while often using higher-quality components.
Let’s break down the total costs of a DIY battery build and compare them with equivalent commercial options.
💰 DIY Battery Cost Breakdown (Example: 15S3P, 48V 18Ah)
This configuration uses 45 LiFePO4 cells rated at 3.2V and 6Ah each.
| Component | Qty/Specs | Approx. Cost (USD) |
|---|---|---|
| 3.2V LiFePO4 Cells (6Ah) | 45 pcs (15S3P) | $150 – $180 |
| 15S LiFePO4 BMS (40–60A) | 1 unit | $20 – $30 |
| Nickel Strips / Busbars | Enough for 45 cells | $10 – $15 |
| Spot Welder (one-time tool) | Mini handheld or tabletop | $40 – $100 |
| Heat Shrink / Fish Paper | Full wrap | $10 |
| XT60 / XT90 Connectors | 2 pairs | $5 – $10 |
| Charger (54.6V LiFePO4) | 2A–5A smart charger | $20 – $40 |
| Silicone Wire + Fuse | 2–3 meters, 12/14 AWG | $10 |
| Foam / Enclosure / Bag | Custom or DIY mount | $10 – $20 |
🔢 Total Estimated Cost: $265 – $405
💡 If you already own a spot welder or soldering station, the recurring cost drops by ~$50–$100 on future builds.
🛍️ Typical Commercial Battery Prices (48V LiFePO4)
| Product Type | Capacity (Ah) | Average Price (USD) |
|---|---|---|
| Off-brand eBay / AliExpress pack | 15–20Ah | $300 – $450 |
| Mid-range Amazon pack | 13–17Ah | $400 – $600 |
| Brand-name LiFePO4 pack | 20Ah+ | $600 – $800+ |
| With quality BMS & fast charger | 18–20Ah | $500 – $750 |
These packs are often:
Sealed in plastic with limited repair options
Using unknown or recycled cells
Equipped with basic BMS boards with minimal protection features
📌 Warranties on such packs are often limited or non-existent.
🧮 Per Wh Cost Comparison
Let’s compare cost per watt-hour (Wh) of usable energy.
🔧 DIY Battery (48V 18Ah = 864Wh)
Cost: ~$325 average
Cost/Wh: $0.38
🛒 Store-Bought Battery (48V 18Ah)
Cost: ~$550 average
Cost/Wh: $0.64
That’s a 60–70% increase in cost for the same energy, and possibly with lower cell quality inside.
🎯 Where DIY Offers More Value
Custom Sizing: Build to fit your bike frame or rack perfectly
Higher Discharge Ratings: Install a better BMS for high-performance motors
Easier Repairability: Replace a single cell group if it degrades
Transparency: You know exactly what’s inside your pack
Skill Development: Learn real-world electrical, mechanical, and soldering skills
⚠️ Where Store-Bought May Win (for Some)
Faster setup (plug-and-play)
Less technical knowledge required
Often comes with basic waterproofing
No need to invest in tools (welder, tester, etc.)
If you’re building only one battery ever, the cost-benefit depends on how much value you place on customizability and learning. But for DIYers, tinkerers, or people building multiple packs, the savings and freedom make DIY the smarter long-term choice.
📊 Conclusion: Cost vs. Control
| Factor | DIY Battery | Commercial Battery |
|---|---|---|
| Cost per Wh | ~$0.35–$0.45 | ~$0.60–$0.80 |
| Custom Configuration | Fully customizable | Fixed options only |
| Repairable? | Yes (easy to open) | Rarely |
| BMS Quality | You choose | Unknown or basic |
| Requires Skills | Yes – moderate electrical work | No |
| Long-Term Value | High (reusable tools, scalable) | Medium |
14. Real-World Test Results
After building and installing your DIY 48V LiFePO₄ battery, it’s important to put it through a series of real-world tests to validate its performance, stability, and endurance. These tests help confirm that your pack is wired correctly, balanced, and ready for actual riding conditions.
Here’s what you can expect and how to evaluate your battery during real-world usage.
🚴 1. Range Test
Perhaps the most anticipated metric for any e-bike battery—how far can it go on a full charge?
Setup:
Fully charged 15S3P battery (48V, 18Ah, 864Wh)
500W rear hub motor
Average rider weight: 75kg
Flat terrain, mild weather
Result:
Urban commuting (moderate acceleration, stops/starts): ~35–45 km
Flat, steady cruise at 25km/h: ~50–60 km
Hilly terrain or off-road: ~25–35 km
🔋 Note: Actual range will vary with rider weight, wind resistance, tire pressure, and throttle usage.
🔌 2. Voltage Sag Under Load
Voltage sag is a temporary drop in voltage when the motor demands high current—especially during acceleration or hill climbs.
Observations:
Light load: Voltage drops ~1–2V
Full throttle/hill climb: Voltage drops ~3–5V
High amp draw (e.g., dual motors or heavy rider): Voltage drops ~6–7V max
✅ For a well-built pack, sag should be stable and recover immediately after the load reduces.
🌡️ 3. Temperature Monitoring
Using a thermal camera or IR thermometer, measure the cell temperatures after a full ride.
Target Ranges:
Normal operation: 25°C to 40°C
Peak load: Up to 50°C briefly is acceptable
📌 If temperatures exceed 60°C, stop use and inspect airflow, BMS behavior, or poor cell welds. Overheating shortens cell life significantly.
⚡ 4. Peak Load Performance
Test your battery’s ability to supply short bursts of high current, such as:
Fast acceleration from a stop
Climbing steep inclines
Riding with cargo or passenger
A properly rated BMS (40A+) and healthy cell configuration (15S3P or more) should easily handle 30–45A bursts for short periods without triggering cutoffs or overheating.
✅ Pass if:
No BMS cutoff occurs
Motor maintains torque
Battery doesn’t heat excessively
🔋 5. Capacity Tracking Over Time
Using a watt-hour meter or advanced BMS logging, track the actual discharge capacity from full to cutoff.
New Pack Reading:
Expected: 48V × 18Ah = 864Wh
Measured: 830–860Wh usable, depending on depth of discharge
Over time (after ~300 cycles), you might see a 5–10% drop in total capacity—this is normal.
📱 6. BMS Logging (if supported)
If your BMS has Bluetooth or UART output:
Log individual cell voltages
Check for drifting or rapid imbalance
Look at charge/discharge cycles
Monitor temperature and peak current events
This data helps you preempt cell failure, identify weak groups, or improve your charge habits.
🔍 7. Summary of Test Observations
| Test | Result (15S3P Pack) |
|---|---|
| Range | 35–60 km (based on terrain/load) |
| Voltage Sag | 1–5V under normal riding, max 7V |
| Temperature | 30–45°C during most rides |
| Peak Current Handling | 40A bursts for hills or acceleration |
| Usable Capacity | 830–860Wh out of 864Wh |
| Cell Balance | Within ±0.03V across 15 groups |
✅ These results confirm that a DIY 48V LiFePO₄ battery performs on par with or better than many commercial options, at a much lower cost.
Frequently Asked Questions (FAQs)
Building your own 48V e-bike battery with 3.2V LiFePO₄ cells comes with a lot of excitement—and naturally, plenty of questions. Below are some of the most common questions DIYers ask, along with clear, practical answers to help you along your battery-building journey.
🔋 Q1: Can I use 18650 Li-ion cells instead of 3.2V LiFePO₄ cells?
Yes, but with major differences.
18650 cells are typically 3.6V–3.7V Li-ion (not LiFePO₄). That means:
You’d need 13S (not 15S) to get a 48V system
Li-ion is less safe, has shorter cycle life, and is more prone to thermal runaway
BMS, charger, and cell balancing requirements are different
🧠 If safety and longevity are your priority, stick with LiFePO₄.
⚙️ Q2: What happens if one of the cells in my pack dies?
If one cell in a series group fails:
It brings the entire group’s voltage down
The BMS may trigger low voltage cutoff
Over time, other cells may become imbalanced
Fix:
Identify the weak group using a multimeter
Replace all 3 parallel cells in that group with matched new ones
Rebalance before reconnecting to BMS
🔌 Q3: Can I charge my LiFePO₄ battery with a regular 48V charger?
No.
LiFePO₄ cells have a different charging profile than standard Li-ion:
Max charge per cell = 3.65V (vs. 4.2V for Li-ion)
That means 54.6V max for 15S LiFePO₄ (vs. 54.6V for 13S Li-ion)
⚠️ Using the wrong charger can overcharge and damage your battery—or worse, cause fire.
🔥 Q4: What if my BMS shuts off while riding?
If your BMS suddenly disconnects power:
Check if voltage dropped below 2.5V per cell (undervoltage)
High current draw may have triggered overcurrent protection
High temperature could also cause a shutdown
Solution:
Let the BMS reset
Charge the battery back to nominal
Check for overheating or weak cells
🚲 Q5: How long will my DIY battery last?
A well-built LiFePO₄ battery can last:
2,000–4,000 charge cycles
That’s 5–10 years of daily commuting, if maintained properly
🧠 Avoid deep discharges and heat buildup to maximize lifespan.
🔌 Q6: Can I use solar panels to charge this battery?
Yes, with the right charge controller.
You’ll need:
A solar panel system delivering ~60V open circuit voltage
A MPPT solar charge controller that supports 15S LiFePO₄ charging at 54.6V
☀️ Solar charging is great for off-grid setups or backup power use.
🧰 Q7: Is it better to spot weld or solder my battery?
Spot welding is safer and more reliable.
Soldering applies high heat directly to the battery terminals, which can damage the internal structure
Spot welding uses short electrical pulses to fuse nickel strips to the battery without heat transfer
🛠️ If you must solder, work fast and use a high-wattage iron (60W+).
🧪 Q8: How do I know if my cells are balanced?
Use a multimeter or BMS app (if Bluetooth-enabled) to check:
Each series group should read within ±0.03V of the others
If one group consistently drifts, it may contain weaker cells
Balance regularly, especially after long storage or hard riding.
📦 Q9: Can I build a battery larger than 15S3P?
Absolutely!
You can go:
15S4P (48V 24Ah)
15S5P or more, as long as your BMS supports the amperage and you have room on your bike
More parallels = more capacity and range, but also more weight and size.
📉 Q10: What should I do if my battery capacity drops over time?
A gradual drop is normal after hundreds of cycles.
But if it becomes too low:
Test each group’s voltage after a full charge
Replace degraded cells or groups
Check for bad welds, loose wires, or BMS aging
🧠 Keep usage logs to track capacity loss and spot trends.
✅ Summary
Building a DIY e-bike battery involves more than connecting cells—it’s about understanding chemistry, safety, maintenance, and long-term performance. These FAQs help clarify common doubts and empower you to troubleshoot or improve your battery project like a pro.
Conclusion
Building your own 48V electric bike battery using 3.2V LiFePO₄ cells is more than just a DIY project—it’s a powerful step toward energy independence, technical empowerment, and financial savings. With a little planning, patience, and the right tools, anyone can build a battery that rivals commercial products in both performance and safety—often at half the cost.
Throughout this guide, we’ve covered every essential aspect of the process:
The fundamentals of battery technology—voltage, capacity, current, series vs. parallel wiring
The unique benefits of using LiFePO₄ cells, such as safety, longevity, and consistent output
A full parts and tools list, ensuring you’re prepared before building
Detailed guidance on designing, assembling, and testing a 48V pack
Step-by-step BMS wiring and charging instructions
Best practices for installation, safety, maintenance, and real-world performance
And we’ve answered the most pressing FAQs to guide you through potential challenges.
💡 Why It’s Easier Than You Think
A project like this may seem intimidating at first. But once you complete your first battery build, you’ll realize how approachable and educational it truly is. You don’t need to be an engineer—just someone with curiosity, caution, and a willingness to learn.
Most of the components are readily available online, and with resources like this article, you’re never on your own. Online communities, video tutorials, and forums provide further support, helping you improve with every build.
💸 The Value You Get
Let’s recap what you gain by building it yourself:
Save $200–$400+ compared to buying a commercial battery
Customize your battery’s shape, size, and capacity
Repair or upgrade individual parts instead of replacing the whole pack
Gain skills that transfer to solar systems, backup power, or even electric vehicles
Confidence in the quality and safety of your setup
🔋 More Than Just an E-Bike Battery
While this guide focuses on e-bikes, the knowledge you’ve gained is transferable. LiFePO₄ battery packs can be used for:
Solar energy storage
Electric scooters or trikes
Backup power systems (UPS)
Portable camping power stations
Once you understand how cells work together safely, you unlock the ability to power nearly anything, sustainably and affordably.
🚀 What’s Next?
If you’ve completed your first build—congratulations! You’re part of a growing movement of people taking control of their energy usage. Now:
Log your performance data
Maintain your battery monthly
Explore Bluetooth BMS options
Share your success and help others learn
You may even consider building additional packs for friends, family, or your own growing fleet of e-mobility devices.
🎉 Final Words
The future of transportation is electric—and by learning how to build your own power source, you’re putting the tools of that future in your own hands. Safe, smart, and efficient energy is no longer just for manufacturers or engineers. It’s for anyone willing to learn and take action.
So roll up your sleeves, power up your tools, and let your next ride be one you powered yourself—literally.
Happy riding, and stay charged! 🔋⚡