
How To Make Magnet Charging Machine With Microwave Oven Transformer and DC Capacitor At Home
Introduction
In the realm of DIY projects, creating a magnet charging machine using a microwave oven transformer and a DC capacitor is a fascinating endeavor. This comprehensive guide will walk you through the process, providing detailed instructions and insights to ensure your success.
In our quest to explore the fascinating world of DIY projects, we delve into the intriguing process of creating a magnet charging machine using a microwave oven transformer and a DC capacitor. This seemingly complex task can be accomplished right in the comfort of your home, with a little bit of patience, a dash of creativity, and a good understanding of the principles of electromagnetism.
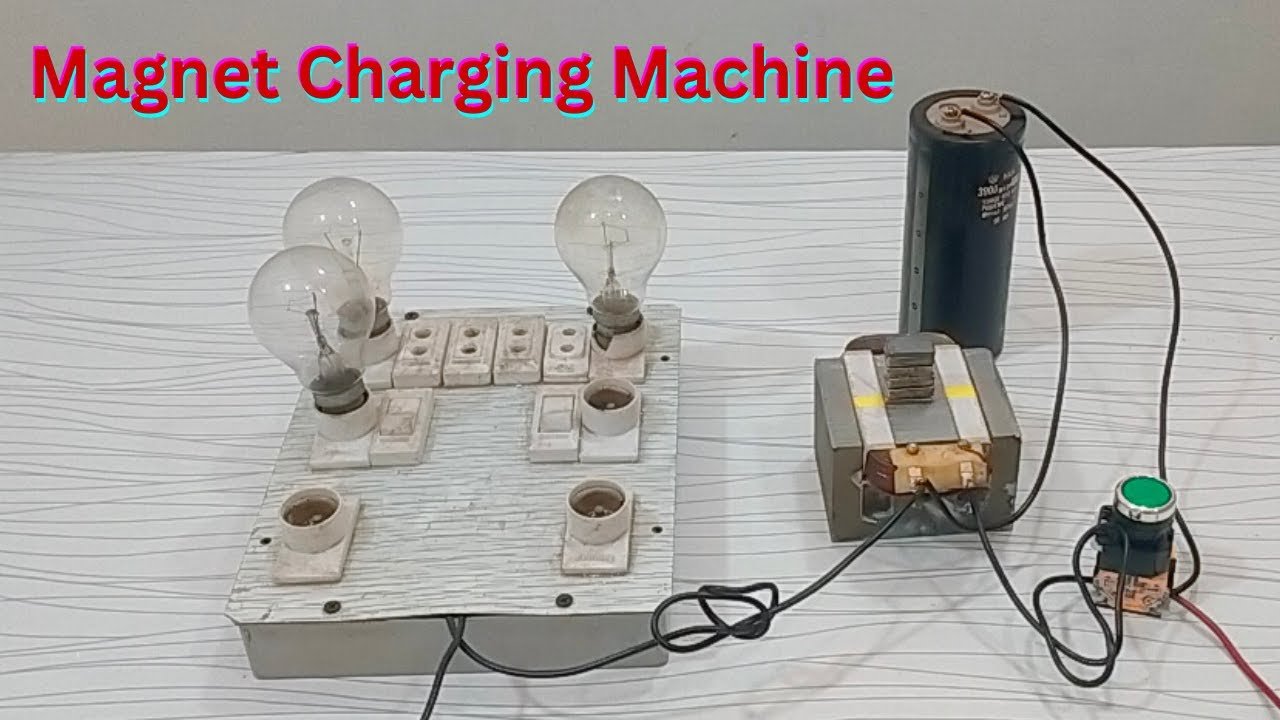
The first step in this exciting journey is to understand the key components involved. A microwave oven transformer, often abbreviated as MOT, is a high-powered transformer found in microwave ovens. It’s primarily used to step up the household voltage to a level high enough to operate the magnetron, the microwave’s heart. However, in our case, we will repurpose this transformer to create a powerful magnetic field.
Next, we have the DC capacitor. Capacitors are devices that store electrical energy in an electric field. A DC capacitor, in particular, is used in circuits where the current only flows in one direction. In our magnet charging machine, the DC capacitor will serve as the energy reservoir, storing the energy needed to create a strong magnetic field.
Now, let’s get down to the nitty-gritty of the process. First, we need to carefully remove the microwave oven transformer from an old microwave. Remember, safety is paramount. Ensure the microwave is unplugged and take necessary precautions while handling the transformer as it can still hold a charge.
Once we have the transformer, the next step is to remove the secondary coil. This coil is usually wound with thin wire and is responsible for stepping up the voltage. We will replace this coil with a few turns of a thick wire to step down the voltage and increase the current, creating a powerful electromagnet.
The DC capacitor comes into play next. We connect it to the primary coil of the transformer. The capacitor charges up when the current flows through the coil and discharges when the current is interrupted, creating a magnetic field.
To control the charging and discharging of the capacitor, we use a simple switch. When the switch is closed, the capacitor charges up, and when it’s opened, the capacitor discharges, creating a magnetic field.
In conclusion, creating a magnet charging machine at home using a microwave oven transformer and a DC capacitor is not only possible but also an exciting DIY project. It’s a practical application of the principles of electromagnetism and a great way to repurpose old appliances. Remember, safety should always be your top priority when handling electrical components. Happy experimenting!
Understanding the Basics
Before diving into the project, it’s crucial to understand the fundamental components involved. A microwave oven transformer and a DC capacitor are the primary elements in this setup.
Microwave Oven Transformer
A microwave oven transformer is a high-voltage device that converts household electricity into the energy required to heat your food in a microwave. It’s a robust and reliable component that can be repurposed for various DIY projects, including a magnet charging machine.
DC Capacitor
A DC capacitor, on the other hand, is an electronic component that stores and releases electrical energy. It’s a crucial part of this project as it helps regulate the flow of electricity, ensuring the magnet charging machine operates smoothly and efficiently.
What Is A DC Capacitor ?
In our quest to understand the world of electronics, we delve into the heart of one of its most fundamental components – the DC Capacitor. A DC Capacitor, in its simplest form, is an electronic component that stores and releases electrical energy. It’s a vital cog in the machinery of electronic circuits, playing a pivotal role in filtering, energy storage, and voltage regulation.
The DC Capacitor, often referred to as a ‘condenser’, is a two-terminal passive component, encapsulating two conductive plates separated by an insulating material known as the dielectric. The dielectric can be made from various materials, including ceramic, plastic, or even air, each offering unique properties that influence the capacitor’s performance.
When a DC voltage is applied across the terminals of a capacitor, an electric field is established between the plates, causing positive charges to accumulate on one plate and negative charges on the other. This accumulation of charges is what we refer to as ‘capacitance’, measured in Farads (F). The capacitance value of a DC Capacitor is a crucial factor, determining the amount of energy it can store.
A higher capacitance indicates a higher energy storage capacity, making it a critical parameter in applications requiring substantial energy storage, such as in power supplies or audio amplifiers. Conversely, a lower capacitance is ideal for applications like signal filtering, where rapid charge and discharge cycles are required.
DC Capacitors are also characterized by their voltage rating, which signifies the maximum voltage the capacitor can withstand before the dielectric breaks down. Exceeding this voltage can lead to catastrophic failure, resulting in a short circuit. Therefore, it’s imperative to choose a capacitor with a voltage rating that comfortably exceeds the maximum voltage in the intended application.
In the realm of electronics, DC Capacitors are indispensable. They’re found in virtually every electronic device, from the simplest of flashlights to the most complex supercomputers. They’re integral to power supply circuits, where they smooth out voltage fluctuations, ensuring a steady, reliable power output. In signal processing circuits, they filter out unwanted frequency components, enhancing the clarity and quality of the signal.
In conclusion, a DC Capacitor is more than just a simple electronic component. It’s a testament to the ingenuity of human innovation, a cornerstone of modern electronics, and a silent hero powering our digital world. Understanding its function and characteristics is not just essential for electronics enthusiasts and professionals, but also for anyone curious about the inner workings of the devices that surround us in our daily lives.
In our exploration of the DC Capacitor, we’ve only scratched the surface. There’s a wealth of knowledge waiting to be discovered, from the intricacies of dielectric materials to the nuances of capacitor design and manufacturing. So, let’s continue our journey, delving deeper into the fascinating world of electronics, one component at a time.
Gathering the Necessary Materials
Before starting, ensure you have all the necessary materials. These include a microwave oven transformer, a DC capacitor, a magnet, wires, and safety equipment such as gloves and goggles.
Safety Precautions
Working with electrical components can be dangerous. Always ensure you’re wearing appropriate safety gear, and never attempt to handle live wires or components without proper training and equipment.
Step-by-Step Guide to Building a Magnet Charging Machine
Now that we’ve covered the basics, let’s delve into the step-by-step process of building your magnet charging machine.
Step 1: Preparing the Microwave Oven Transformer
The first step involves preparing the microwave oven transformer. This process includes removing it from the microwave and ensuring it’s safe to use.
Step 2: Connecting the DC Capacitor
Next, you’ll need to connect the DC capacitor to the transformer. This step is crucial for regulating the flow of electricity and ensuring the machine operates efficiently.
Step 3: Assembling the Magnet Charging Machine
With the transformer and capacitor connected, you can now assemble the magnet charging machine. This process involves connecting the magnet and ensuring all components are securely fastened.
Step 4: Testing the Magnet Charging Machine
The final step is to test the magnet charging machine. This will ensure it’s working correctly and is safe to use.
Conclusion
Building a magnet charging machine with a microwave oven transformer and a DC capacitor is a rewarding DIY project. With the right materials, safety precautions, and a step-by-step guide, you can successfully create your magnet charging machine at home.
Frequently Asked Questions
How To Make Magnet Charging Machine With Microwave Oven Transformer At Home
Frequently Asked Questions
1. What is a magnet charging machine?
A magnet charging machine restores or enhances the magnetic strength of magnets using high current pulses from a transformer.
2. Why use a microwave oven transformer (MOT)?
MOTs are powerful, affordable, and can supply high current, making them ideal for magnet charging experiments at home.
3. Can I build this machine at home?
Yes, with basic electrical skills, you can repurpose a microwave oven transformer to make a DIY magnet charger. Safety precautions are essential.
4. What materials are needed?
A microwave oven transformer, copper coil, capacitor, insulated wires, switch, iron core, and safety gear.
5. How does a MOT magnet charger work?
The MOT delivers a strong pulse of current through coils placed around the magnet, realigning magnetic domains and restoring strength.
6. What type of magnets can be charged?
Ferrite, Alnico, and some neodymium magnets can be recharged, though results vary depending on magnet material and condition.
7. Is this method safe?
No, not entirely. MOTs output dangerous voltages. Extreme caution, rubber gloves, and insulated tools are mandatory.
8. What voltage and current does a MOT provide?
A MOT typically provides around 2,000 volts AC at low current, but when rewound, it can deliver high current at lower voltage.
9. Do I need to rewind the transformer?
Yes, usually the high-voltage secondary is removed and replaced with a thick copper winding to deliver high current for magnet charging.
10. Can this machine recharge dead magnets?
Yes, in many cases weak or partially demagnetized magnets regain strength, but completely damaged magnets may not recover fully.
11. How many turns of copper wire are needed?
Typically 5–15 turns of thick copper wire (AWG 8–12) provide strong charging current, depending on desired output.
12. Can I use this machine for neodymium magnets?
It works, but extreme care is needed because neodymium magnets are brittle and can break under sudden magnetic force.
13. Do I need a capacitor bank?
Optional but recommended. Capacitors store energy and release it in a short burst, producing a stronger magnetizing pulse.
14. What safety gear is required?
Insulated gloves, safety goggles, rubber shoes, and proper ventilation are critical when working with MOTs.
15. How long should the charging pulse last?
Usually a quick pulse of less than one second is enough. Prolonged exposure may overheat coils and damage the magnet.
16. Can this be used for large industrial magnets?
No, this setup is suitable only for small to medium magnets. Industrial applications require professional magnetizers.
17. What are common mistakes to avoid?
Using thin wires, poor insulation, touching live parts, and running the transformer for too long without cooling.
18. How do I know if the magnet is recharged?
Test it with metal objects. A recharged magnet should strongly attract iron pieces compared to before charging.
19. Can this machine run continuously?
No, MOTs overheat quickly. Allow cooling time between charging cycles to prevent burnout.
20. Who should not attempt this project?
Beginners without electrical safety knowledge should avoid working with MOTs, as they can cause severe injury or death.
Awesome! Its genuinely remarkable post, I have got much clear idea regarding from this post
The thoroughness in this piece is commendable.
Wonderful beat ! I would like to apprentice while you amend your site, how could i subscribe for a blog site? The account helped me a acceptable deal. I had been tiny bit acquainted of this your broadcast offered bright clear idea