
How to Make Electricity Generator at Home (Step-by-Step DIY Guide with Magnets & Coil)
Imagine generating your own electricity at home — not with a massive power plant or expensive solar installation, but with a simple device you built yourself. The idea of producing power from magnets, copper wire, and a rotating shaft feels almost magical the first time you see a bulb light up. Yet the science behind it is surprisingly straightforward. If you’ve ever wondered how to make electricity generator at home, this guide will walk you through the complete process in a clear, practical, and beginner-friendly way.
In recent years, DIY energy projects have exploded in popularity. Rising electricity costs are pushing homeowners to explore alternative power options. At the same time, growing awareness about sustainability and renewable energy has inspired people to understand where their electricity actually comes from. Schools are encouraging hands-on STEM learning, and science fair projects involving energy generation are more competitive than ever. That’s why learning how to make electricity generator at home is no longer just a hobby — it’s a valuable skill that combines physics, engineering, and creativity.
Another reason DIY generators are trending is accessibility. You don’t need a professional workshop or expensive tools. With basic materials like wooden plates, magnets from an old DC motor, copper wire, glue, and a small motor, you can build a functional homemade generator. This project demonstrates the real working principle used in commercial power plants — electromagnetic induction — but on a small, understandable scale.
This guide is designed for:
Students who want a practical understanding of how electricity is generated
DIY enthusiasts who love building functional mechanical projects
Science fair participants looking for an impressive and educational display
Beginners in electronics who want to move beyond theory and build something real
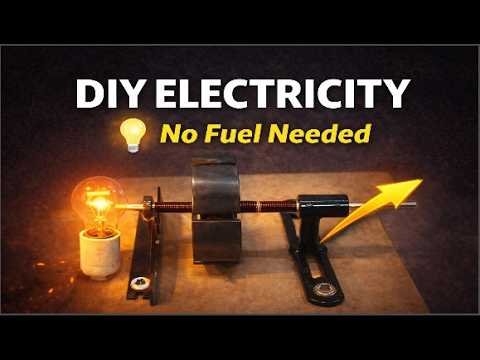
By the end of this article, you will clearly understand how to make electricity generator at home using a 6-magnet rotor system and a precisely wound 37-turn copper coil. Unlike overly simplified projects, this generator uses alternating magnet polarity for better magnetic interaction and a belt-driven motor system for smooth, controlled rotation. These features improve efficiency, reduce vibration, and create a more stable output — making this build both educational and genuinely functional.
What makes this generator especially interesting is its balanced design. The six evenly spaced magnets create a consistent magnetic field, while the 37-turn coil enhances electromagnetic interaction. The belt-and-pulley drive system ensures steady rotation, preventing wobbling that could damage the coil or magnets. It’s a compact setup, but it demonstrates real engineering principles used in large-scale generators.
If you’ve been searching for a clear, step-by-step explanation of how to make electricity generator at home, you’re in the right place. Before we begin assembling the parts, though, it’s important to understand the basic science that makes electricity generation possible. In the next section, we’ll break down exactly how a generator works — in simple terms — so you can build with confidence and purpose.
Understanding how to make electricity generator at home Works (Before You Build One)
Before you start assembling wooden plates, magnets, and copper wire, it’s essential to understand what is actually happening inside a generator. When you understand the science first, the building process becomes much easier and far more meaningful. Every successful build begins with knowing exactly how generator produces electricity and why each component plays a critical role.
At the heart of this project is a scientific principle called electromagnetic induction. This principle explains how motion can be converted into electrical energy. In simple terms, when a magnetic field moves past a conductor like copper wire, it forces electrons inside the wire to move. And when electrons move, electricity is produced. That’s the foundation of magnetic field electricity generation and the core of the DIY magnetic generator principle.
Think of it like this: imagine the copper wire as a pipe filled with tiny metal balls (electrons). The magnet acts like a force pushing those balls forward. When the magnet moves, it creates pressure inside the wire, and that pressure makes the electrons flow. No movement means no electricity. More movement means more electrical output. This is why rotation is essential in any generator system.
Magnets are responsible for creating the magnetic field. In this generator design, six magnets are mounted evenly around a rotating plate. As the rotor spins, these magnets pass closely by a stationary copper coil. The magnets themselves do not create electricity directly. Instead, they create a changing magnetic field, and that change is what forces electrons to move inside the coil. Stronger magnets or faster rotation increase the intensity of the magnetic interaction, which increases electrical output.
The copper coil is where electricity is actually generated. Copper is used because it is an excellent conductor, allowing electrons to move freely with minimal resistance. When the magnetic field around the coil changes rapidly due to the spinning magnets, electrons inside the copper wire begin flowing. That flow becomes electric current. The efficiency of this process depends heavily on how well the coil is made.
In this specific generator design, the coil is wound using 1.45 mm wire with exactly 37 turns. The number of turns directly affects voltage output. Each loop of wire experiences the magnetic field change. When you increase the number of turns, you increase the total voltage produced. You can think of each turn as adding more strength to the overall electrical effect. However, there must be balance. Too few turns result in weak output. Too many turns make the coil bulky and increase the risk of touching the rotating magnets. The 37-turn design provides a strong balance between size, efficiency, and safety.
Another important concept to understand is the difference between the rotor and the stator. The rotor is the rotating part of the generator. In this project, it holds the six magnets and spins using a belt-driven motor. The stator is the stationary part, which is the fixed copper coil mounted securely to the wooden base. When the rotor spins, the magnets pass by the stator coil. This constant movement creates the changing magnetic field required for electricity generation.
Alternating polarity of the magnets is extremely important. The magnets must be arranged in an alternating pattern: positive, negative, positive, negative, and so on. If all magnets faced the same direction, the magnetic field would not change properly as the rotor spins. Electricity generation depends on a changing magnetic field. Alternating polarity ensures that the magnetic field constantly shifts direction as each magnet passes the coil. This produces a stronger and more consistent output and is a key part of the DIY magnetic generator principle.
It’s also important to understand that this type of generator naturally produces alternating current (AC). As north and south poles pass the coil, the direction of electron flow changes. That means the current switches direction repeatedly. This is called AC. Direct current (DC), on the other hand, flows in only one direction. If you wanted to convert the output to DC for charging batteries, you would need a rectifier. But for lighting a small bulb or demonstrating electricity generation, AC works perfectly.
One critical mechanical detail in this build is maintaining a proper gap between the coil and the rotating magnets. If the coil touches the magnets while the rotor is spinning, serious damage can occur. The magnets can crack or break. The coil can become bent or loose. Friction can reduce efficiency and stop the generator from working entirely. This is why precision during installation is so important. There must be a small, consistent air gap—close enough for strong magnetic interaction but far enough to prevent contact.
Alignment also plays a major role in performance. If the magnets are not evenly spaced or the rotor is not balanced, vibration can occur during rotation. Vibration reduces efficiency, increases wear, and may loosen components over time. Proper marking, accurate spacing, and careful assembly ensure smooth rotation. A balanced rotor creates steady magnetic interaction and stable electricity production.
To improve reader understanding and engagement, consider adding beginner-friendly diagrams in WordPress, such as a simple illustration of a magnet passing a coil, a rotor and stator layout diagram, and a visual showing proper magnet polarity arrangement. Visual elements increase clarity and improve on-page SEO performance.
Now that you understand magnetic field electricity generation, how generator produces electricity, why coil turns matter, why alternating polarity is necessary, and why alignment and spacing are critical, you are ready to move forward with confidence. In the next section, we will cover all the materials and tools required to build your electricity generator safely and efficiently.
Materials and Tools Needed to Make a Generator at Home
Before starting your build, gathering the right materials for homemade generator construction is essential. The quality of your components directly affects performance, durability, and safety. The good news is that this is a cheap electricity generator project — most parts are affordable and easy to find locally or salvage from old devices.
Below is a complete breakdown of what you need and why each item matters.
Wooden Plates (Main Structure)
Two strong wooden plates form the base and support frame of your generator. These plates hold the shaft, magnets, and coil in proper alignment. Wood is used because it is easy to cut, drill, and work with, while also providing enough structural stability. The plates must be cut evenly and sanded smooth to prevent vibration and misalignment during rotation. A solid foundation ensures smoother performance and longer lifespan.
Shaft (Rotating Rod)
The shaft connects the rotating plate (rotor) to the motor via the pulley system. It must be straight and properly centered to prevent wobbling. A misaligned shaft can reduce efficiency and cause the magnets to hit the coil. Metal shafts are preferred for strength and durability.
Six Magnets (Old DC Motor Magnets)
Magnets are the heart of magnetic field electricity generation. In this design, six magnets are installed evenly around the rotor plate. Using magnets from an old DC motor keeps the project affordable and sustainable. Six magnets increase efficiency because they create more magnetic field changes per rotation. More magnetic interactions per spin mean stronger and more consistent voltage output. Always arrange them in alternating polarity (positive, negative, positive, negative) for proper performance.
1.45 mm Copper Wire (For the Coil)
This is one of the most important components in your copper coil generator DIY build. The 1.45 mm thickness is chosen because it provides a strong balance between conductivity and mechanical strength. Thinner wire increases resistance and can overheat. Thicker wire becomes difficult to wind tightly and may reduce the number of turns that fit properly.
The coil must have exactly 37 turns. Why 37? Because the number of turns directly impacts voltage. More turns increase voltage output, but too many turns make the coil bulky and increase the risk of touching the magnets. Thirty-seven turns provide efficient output while maintaining safe spacing and compact design.
Drill Machine
A drill is required to create a perfectly centered hole in the wooden plates for the shaft. Accuracy here is critical. If the shaft hole is off-center, the rotor will wobble and reduce performance.
Compass (For Accurate Magnet Placement)
A simple drawing compass is used to divide the rotor plate into six equal sections. Equal spacing ensures balance. Balanced magnet placement reduces vibration and improves smooth rotation.
Glue (High-Quality Wood Adhesive)
Strong wood adhesive secures the wooden plates and helps lock structural components in place. Glue is also applied over the thread wrapping to reinforce magnet stability. Always allow proper drying time before testing.
Thread (Reinforcement Wrapping)
Thread is wrapped tightly around the magnets and rotor plate before glue application. This adds mechanical strength and prevents magnets from shifting during high-speed rotation.
Screws
Screws are used to secure the coil to the wooden base. Avoid overtightening, as this can damage the coil or crack the wood. Firm but careful installation ensures stability.
Motor
A small electric motor drives the rotor using a belt and pulley system. The motor provides consistent rotational speed, which directly affects voltage output. Faster rotation increases electrical generation.
Belt & Pulley System
The pulley attaches to both the motor shaft and the generator shaft. The belt transfers motion smoothly. Proper alignment prevents slipping and unnecessary wear. This system ensures steady and controlled rotation.
Light Bulb (For Testing Output)
A small bulb is connected to the coil wires to verify electricity production. When the motor spins and the bulb glows, you know your generator is working. This simple test confirms successful electromagnetic induction.
Beyond materials, safety equipment is extremely important. Always use safety glasses while drilling. Wear gloves when handling magnets and sharp wire edges. Keep loose clothing away from rotating parts during testing. Ensure all connections are secure before powering the motor. Safety should never be overlooked in any cheap electricity generator project.
Now let’s briefly estimate the cost of this build.
Wooden plates may cost $5–$10 depending on size. Copper wire is usually the most expensive component, ranging from $10–$20 depending on length and quality. Magnets can be salvaged from an old motor (free) or purchased for around $10–$15. A small motor may cost $15–$25. Screws, glue, thread, and a light bulb add approximately $10.
In total, this project can typically be completed for $40–$70, making it highly affordable compared to commercial generators. If you reuse old parts, the cost can drop even further.
This makes it not only educational but also a realistic beginner-friendly build. With all materials ready, you are now prepared to move on to the most exciting part — assembling your generator step by step.
Step-by-Step Guide to Building Your DIY Electricity Generator
Now that you understand the working principle and have gathered all the materials, it’s time to build electricity generator step by step. Follow each stage carefully. Precision and patience are more important than speed in this simple generator project at home. Small mistakes in alignment or spacing can reduce efficiency or damage components later.
Step 1 – Cutting Wooden Plates
Start by cutting two wooden plates that will serve as the main structural frame of your generator. These plates must be exactly the same size. Accuracy here is critical because uneven plates can cause imbalance during rotation.
Measure carefully using a ruler or measuring tape. Mark straight, clear lines before cutting. Use a steady hand while cutting to ensure clean edges. Once both plates are cut, sand all edges thoroughly. Sanding removes splinters and ensures smooth alignment when assembling.
A stable foundation prevents vibration, reduces stress on the shaft, and improves long-term durability. Many beginners rush this step, but strong structure equals stable performance.
Pro Tip: Clamp the wood securely while cutting to maintain straight lines.
Common Mistake: Uneven plates leading to rotor wobble later.
Step 2 – Drilling the Center Shaft Hole
Next, drill a perfectly centered hole in both wooden plates. This hole will hold the rotating shaft, so alignment must be precise.
Measure the exact center point on both plates. Double-check measurements before drilling. Use a drill bit that matches the shaft diameter closely. The shaft should fit snugly but still rotate freely.
Hold the plate firmly while drilling and wear safety glasses to protect your eyes from wood particles.
If the hole is off-center, the rotor will wobble, causing vibration and possible magnet-to-coil contact.
Safety Note: Always drill on a stable surface and keep hands clear of the drill bit.
Step 3 – Gluing the Structure
Apply high-quality wood adhesive between structural sections to strengthen the assembly. Spread glue evenly along contact surfaces and press components firmly together.
Allow sufficient drying time before moving to the next step. Rushing glue drying can weaken the entire build.
A solid, rigid structure keeps all components aligned during operation.
Pro Tip: Use clamps while the glue dries for tighter bonding.
Step 4 – Reinforcing the Shaft with Wire
Wrap strong wire around the shaft area for additional mechanical support. Secure one end tightly and wind in neat, even layers.
This reinforcement stabilizes rotation and reduces vibration. Consistent wrapping prevents imbalance and improves smooth motion.
Loose wrapping can cause uneven spinning and reduce output efficiency.
Step 5 – Dividing the Rotor into 6 Equal Parts
Using a compass, draw a circle on the rotor plate and divide it into six equal sections. These marks indicate where the magnets will be placed.
Equal spacing is essential. Uneven magnet placement causes imbalance, vibration, and inconsistent magnetic interaction.
Think of it like balancing a car tire. If weight distribution is uneven, shaking occurs. The same applies to your generator rotor.
Precision at this stage ensures smoother magnetic field rotation and stable electricity production.
Step 6 – Installing the Magnets
Now install the six magnets on the marked sections. Arrange them in alternating polarity: positive, negative, positive, negative.
Alternating polarity is essential for magnetic field consistency. When the rotor spins, alternating north and south poles pass the coil, creating continuous magnetic field changes. This is the core of how to make generator with magnets successfully.
Secure each magnet firmly using strong adhesive. Double-check alignment before the glue sets.
Common Mistake: Installing all magnets facing the same direction, which drastically reduces output.
Pro Tip: Test polarity using another magnet before fixing permanently.
Step 7 – Wrapping Thread and Applying Glue
After installing the magnets, wrap strong thread tightly around the rotor to secure them further. Wind the thread evenly and firmly across the magnets and plate surface.
Once wrapped, apply glue over the thread to lock everything in place. Spread glue evenly and allow it to dry completely.
This reinforcement prevents magnets from shifting during rotation, which protects both magnets and coil.
Step 8 – Making the Coil
Now create the coil using 1.45 mm copper wire. This thickness provides excellent conductivity while remaining easy to shape.
Measure and begin winding carefully. You must complete exactly 37 turns. Count each turn to maintain precision.
Keep the windings tight and evenly spaced. Do not allow overlaps, as messy winding reduces efficiency.
Leave a short length of wire at both ends for connecting to the light bulb later.
The number of turns directly impacts voltage. Thirty-seven turns provide balanced output without making the coil too bulky.
Common Mistake: Loose winding, which weakens magnetic interaction.
Pro Tip: Wind slowly and maintain consistent tension.
Step 9 – Shaping the Coil Properly
After completing 37 turns, gently shape the coil to match the required form so it fits properly around the rotor.
Bend carefully to avoid damaging or loosening the windings. The coil should remain symmetrical and firm.
A properly shaped coil ensures even magnetic interaction and prevents physical contact with the spinning magnets.
Step 10 – Mounting the Coil with the Correct Gap
Fix the coil securely onto the wooden board using screws. Position it around the rotor so there is a small, consistent air gap between the coil and magnets.
This gap is critical.
If the coil touches the magnets, serious damage can occur. Magnets may crack, and the coil can deform or detach.
The gap must be small enough for strong magnetic interaction but large enough to prevent contact.
After mounting, rotate the rotor by hand to check for smooth movement before powering the motor.
Step 11 – Installing the Motor with Belt and Pulley
Secure the motor onto the wooden base. Attach a pulley to both the motor shaft and generator shaft.
Place the belt around both pulleys. The belt should be tight enough to transfer motion efficiently but not overly tight.
Proper alignment ensures smooth rotation and reduces wear. If the belt slips, output will decrease.
Run the motor briefly to test rotation before connecting electrical components.
Step 12 – Connecting the Light Bulb
Attach the two coil wire ends to the terminals of a small light bulb. Ensure connections are tight and secure.
Proper contact allows uninterrupted current flow.
Step 13 – Testing and Observing Output
Turn on the motor and observe the bulb carefully.
If everything is assembled correctly, the bulb should glow. This confirms successful electromagnetic induction.
Faster motor speed typically increases brightness.
If the bulb does not light:
Check coil connections
Verify magnet polarity
Ensure sufficient rotational speed
Confirm proper gap
This testing phase validates your simple generator project at home.
Step 14 – What Happens If the Coil Touches the Magnets
If the coil touches the spinning magnets, serious issues can occur. The magnets may crack or break under impact. The coil may bend, loosen, or become misaligned.
Contact increases friction, reduces efficiency, and can stop the generator completely.
Always maintain a consistent air gap and double-check alignment before testing.
Final Safety Reminders
Wear safety glasses while drilling.
Keep hands away from rotating parts.
Ensure glue is fully dry before testing.
Never touch exposed wires during operation.
By following this guide carefully, you can confidently build electricity generator step by step and understand exactly how to make generator with magnets using fundamental scientific principles. This simple generator project at home not only demonstrates electromagnetic induction but also builds real mechanical and electrical skills.
In the next section, we’ll cover common mistakes, troubleshooting tips, and ways to improve efficiency even further.
Common Mistakes, Safety Tips, and How to Improve Efficiency
Building a generator is exciting, but small errors can reduce output or stop it from working completely. If your generator not producing electricity, don’t panic. Most problems come from simple mechanical or wiring mistakes. This section will guide you through practical DIY generator troubleshooting, essential safety reminders, and proven ways to improve generator efficiency at home.
One of the most common mistakes is uneven magnet spacing. If the six magnets are not placed at equal distances on the rotor, the system becomes unbalanced. This imbalance causes vibration during rotation. Vibration reduces magnetic consistency, increases mechanical wear, and can even loosen parts over time. To avoid this, always divide the rotor precisely into six equal sections using a compass before attaching magnets.
Incorrect polarity is another major issue. If magnets are not arranged in alternating north-south order, the magnetic field will not change properly as the rotor spins. Since electricity generation depends on changing magnetic flux, incorrect polarity can result in very weak output or no output at all. Always double-check polarity before gluing magnets permanently. A simple test magnet can help confirm orientation.
Loose coil winding is another frequent beginner mistake. If the copper wire is not wound tightly and evenly, the magnetic interaction becomes weaker. Gaps and overlapping turns reduce efficiency and may cause uneven voltage output. The coil should be firm, symmetrical, and consist of exactly 37 tight turns for balanced performance.
One of the most damaging mistakes is having no gap between the rotor and the coil. If the coil touches the rotating magnets, physical collision can occur. This can crack magnets, bend the coil, or completely stop the generator. Always maintain a small, consistent air gap. Rotate the shaft by hand before powering the motor to ensure nothing rubs or collides.
A weak glue bond can also lead to failure. If magnets or structural parts are not secured properly, high-speed rotation can cause them to shift. Even slight movement changes alignment and reduces performance. Always use strong adhesive and allow it to dry completely before testing.
Belt misalignment is another overlooked issue. If the motor pulley and generator pulley are not aligned correctly, the belt may slip or wear unevenly. Slipping reduces rotational speed, which lowers electricity output. Proper belt tension and straight alignment ensure smooth power transfer.
Now let’s focus on safety. Generators involve moving parts and electrical output, so careful handling is essential. Always avoid magnet collisions. Strong magnets can snap together unexpectedly, which may cause injury or damage components. Handle them carefully and keep fingers clear during installation.
Do not overtighten screws when mounting the coil. Excessive force can crack the wooden base or deform the coil structure. Tighten just enough to hold components securely without strain.
Keep your hands away from rotating parts during testing. Once the motor is running, never attempt to adjust components while the system is spinning. Turn off the motor completely before making changes.
Check wiring insulation before testing. Exposed copper wire can cause short circuits or minor shocks. Ensure all connections are secure and properly insulated.
If your generator is not producing electricity, use a systematic troubleshooting approach. First, check magnet polarity. Second, verify the air gap between coil and rotor. Third, inspect coil connections to the bulb. Fourth, ensure the motor is spinning at sufficient speed. Most issues can be solved by carefully reviewing these four areas.
Once your generator is functioning properly, you can explore ways to improve generator efficiency at home. One simple method is increasing the number of coil turns. More turns increase voltage output because each loop adds to the total electromagnetic effect. However, ensure the coil does not become too bulky or interfere with rotor clearance.
Using stronger neodymium magnets instead of standard ferrite magnets can significantly increase output. Stronger magnets produce a more intense magnetic field, which increases the movement of electrons in the coil.
Adding multiple coils around the rotor can also improve performance. Instead of one coil, you can position two or three evenly spaced coils. This increases the total generated output per rotation.
Replacing the wooden shaft hole with metal bearings is another effective upgrade. Bearings reduce friction and allow smoother rotation. Less friction means more efficient energy conversion and less mechanical wear.
Upgrading motor speed can increase voltage output as well. Faster rotation means more magnetic field changes per second. However, higher speed also increases mechanical stress, so ensure all components are securely installed before increasing RPM.
Improving efficiency is about balance. Stronger magnets, better alignment, smoother rotation, and proper coil design all contribute to stronger output. At the same time, maintaining safety and mechanical stability ensures long-term reliability.
By avoiding common assembly mistakes, following safety precautions, and applying smart performance upgrades, your DIY generator can become both reliable and efficient. Understanding these principles not only helps in troubleshooting but also deepens your knowledge of how generators truly work. In the final section, we’ll explore practical uses for your homemade generator and how this project can inspire further innovation.
Practical Uses of a Homemade Generator and Final Thoughts
After successfully assembling your project, the most exciting question is: what can this homemade generator actually power? While this compact system is not designed to run heavy household appliances, it can produce enough electricity for small and meaningful applications. More importantly, it demonstrates the real working principle behind large-scale power generation in a hands-on and practical way.
One of the most immediate uses is powering LED bulbs. LEDs require very little current, making them ideal for small generator setups. When your rotor spins efficiently and the coil is properly wound, you can light up one or more LEDs depending on output strength. Watching the light glow is not just satisfying—it confirms that your mechanical energy is being successfully converted into electrical energy.
This generator can also power small low-voltage electronics. Simple circuits, small DC fans (with proper rectification), mini sensors, or digital meters can be tested using this system. It becomes a functional lab tool rather than just a display model.
With the addition of a rectifier, you can convert the generator’s AC output into DC. This makes it possible to charge small batteries. A simple diode bridge circuit allows smoother charging for low-capacity batteries used in DIY electronics projects. While charging speed will depend on rotation speed and coil efficiency, this upgrade turns your generator into a practical energy storage system.
Beyond powering devices, this setup is extremely valuable for science experiments. You can demonstrate how voltage changes with speed, how coil turns affect output, or how stronger magnets increase generation. By adjusting one variable at a time, you create a real-world physics lab environment at home.
From an educational perspective, this project is powerful. It helps students understand electromagnetic induction not just theoretically, but practically. Instead of memorizing formulas, they see electricity being generated in real time. This makes it perfect for physics projects, STEM learning modules, and science fairs.
For science fair participants, this generator offers strong presentation value. You can display the rotor and stator clearly, explain alternating polarity, demonstrate coil winding, and show live output using a bulb or multimeter. Judges appreciate projects that combine theory with working prototypes.
Teachers and educators can use this as a hands-on classroom demonstration. It visually explains how power plants operate, how wind turbines generate electricity, and how mechanical energy converts into electrical power. It bridges the gap between textbook knowledge and real engineering application.
There is also a strong sustainability angle. Building your own generator teaches renewable energy principles at a foundational level. While this version uses a motor for rotation, the same system can be adapted to manual cranking, bicycle pedaling, or even small wind turbines. Understanding these concepts builds awareness of alternative energy systems and self-reliance.
Manual-powered systems are especially interesting. By replacing the motor with a hand crank, you can create a manual emergency power source. This reinforces the idea that electricity is not mysterious—it is a result of motion and magnetic interaction. This perspective changes how people view energy consumption.
If you are creatively inclined, this project can even become a monetization opportunity. Starting a DIY YouTube channel showcasing step-by-step builds can attract a large audience interested in science and innovation. Educational energy projects consistently perform well on video platforms.
Another idea is selling generator kits. Pre-cut wooden plates, measured copper wire, and properly sized magnets packaged together can simplify the process for beginners. Schools and hobbyists are often willing to purchase ready-to-assemble educational kits.
You could also organize workshop classes. Hosting small group sessions where participants build their own generator provides hands-on STEM learning experiences. This can be offered to schools, community centers, or hobby clubs.
Most importantly, this project empowers you. When you learn how to make electricity generator at home, you are no longer just a consumer of technology—you become a creator. You understand the mechanics behind energy production. You gain confidence working with tools, magnets, coils, and motors.
Experimentation should not stop here. You can try increasing coil turns, adding additional coils, using stronger magnets, or experimenting with gear ratios to increase rotation speed. Each modification deepens your understanding and improves performance.
However, always remember safety. Keep proper spacing between the coil and magnets. Avoid touching rotating parts during operation. Ensure wiring is insulated and connections are secure before testing. Responsible experimentation ensures long-term success.
In the end, this project is more than just a simple generator. It represents curiosity, creativity, and practical engineering. It proves that complex systems can be understood and built step by step. Whether you are a student, hobbyist, or aspiring engineer, building your own generator is a powerful learning experience that sparks innovation and independence.
Keep building. Keep experimenting. And most importantly, keep learning.
FAQs
| Question | Answer |
|---|---|
| How much electricity can a homemade generator produce? | The amount of electricity depends on magnet strength, coil turns, and rotation speed. A small DIY generator typically produces enough power to light LED bulbs, small indicator lamps, or run low-voltage electronics. Output increases with faster rotation and stronger magnets. It is not designed for high-power appliances and is best suited for learning and experimentation. |
| Can I charge a battery with this generator? | Yes, but you need a rectifier to convert AC into DC. Once converted, the generator can charge small batteries such as rechargeable AA batteries or small 6V/12V batteries. Charging speed depends on rotation speed and coil efficiency. A voltage regulator improves charging stability and safety. |
| Why do magnets need alternating polarity? | Alternating polarity (north–south–north–south) ensures the magnetic field changes direction during rotation. Electricity is generated only when magnetic flux changes around the coil. If all magnets face the same direction, output drops significantly. |
| What happens if the coil touches the magnets? | Contact between the coil and rotating magnets can cause damage. Magnets may crack and the coil can bend or loosen. Friction reduces efficiency and may stop electricity generation completely. Always maintain a small air gap. |
| How many turns should a generator coil have? | For this design, 37 turns of 1.45 mm copper wire provide balanced voltage output and compact size. More turns increase voltage, but too many may reduce safe clearance between coil and magnets. |
| Can I use neodymium magnets instead? | Yes. Neodymium magnets are stronger and can significantly increase output. However, they must be handled carefully because they snap together forcefully and can cause injury or damage. |
| Is this generator AC or DC? | This generator naturally produces AC (alternating current). To obtain DC output for charging batteries, you must add a rectifier circuit. |
| Can this power household appliances? | No. This small homemade generator is not designed for large appliances like refrigerators or air conditioners. It is intended for LED lighting, small electronics, and educational demonstrations. |
I’ve gained a much better understanding thanks to this post.