
How to Make a 12-Volt PVC DC Motor Using Only PVC Pipe: A Complete DIY Engineering Guide
A 12-volt DC motor is one of the most important inventions powering modern life, yet most people never stop to consider how often they rely on it. From the cooling fan inside a desktop computer to the windshield wipers in a car, DC motors quietly convert electrical energy into motion, making countless conveniences possible. Understanding how these motors work is not just for engineers — it is a gateway into the broader world of electronics and mechanical design. When you build one yourself, the invisible principles behind everyday technology suddenly become clear, transforming abstract science into something you can see, touch, and control.
DIY engineering projects offer a unique kind of education that no textbook alone can provide. Instead of memorizing concepts, you actively experiment, troubleshoot, and refine your work. Each step develops confidence and technical intuition while teaching patience and precision. You also gain the freedom to innovate, discovering firsthand how small adjustments can dramatically improve performance. Whether you are a student, hobbyist, or simply someone who enjoys working with their hands, building a motor is a rewarding challenge that strengthens both practical skills and creative thinking.
At first glance, PVC pipe might seem like an unusual material for an electrical project, but it is surprisingly well-suited for motor construction. Lightweight, affordable, durable, and easy to cut, PVC provides a stable frame that supports internal components without adding unnecessary complexity. Its non-conductive nature also helps reduce the risk of electrical interference, making it a smart choice for beginners learning the fundamentals of safe motor design.
As you move through this project, you will develop a solid foundation in electronics basics, learn how mechanical parts must align for smooth motion, and sharpen your problem-solving abilities as you overcome real-world building challenges. Just as important, you will practice working safely — handling tools correctly, organizing your workspace, and respecting the power of electrical current.
By the end of this guide, you will have built a fully functional 12-volt DC motor from scratch.
Understanding How a 12-Volt DC Motor Works
Understanding how a 12-volt DC motor works is the key to building one successfully. You do not need advanced mathematics or engineering theory — just a clear grasp of a few core ideas. Once these principles click, the motor stops feeling mysterious and starts to feel logical, even intuitive.
What Is Electromagnetism?
At the heart of every DC motor is electromagnetism, the relationship between electricity and magnetism. When electric current flows through a wire, it creates a magnetic field around that wire. If the wire is shaped into a coil, the magnetic field becomes much stronger and more concentrated. This effect allows electricity to temporarily turn ordinary copper wire into an electromagnet.
Magnets naturally attract or repel each other depending on their polarity (north and south). When an electromagnet is placed near a permanent magnet, the magnetic fields interact, producing force and movement. A DC motor is essentially a clever system that repeatedly uses this attraction and repulsion to create continuous rotation.
A simple way to imagine this is to think of pushing a merry-go-round. One push makes it move a little, but timed pushes keep it spinning. In a motor, electric current provides those perfectly timed “pushes” using magnetic forces.
Components of a DC Motor
A basic DC motor consists of four main parts, each with a specific job:
Armature (Rotor): The rotating part of the motor. It contains coils of wire that become electromagnets when current flows through them.
Stator: The stationary part that provides a constant magnetic field, usually created by permanent magnets.
Commutator: A rotating electrical switch attached to the armature. It reverses the direction of current in the coils at the right moment.
Brushes: Conductive contacts that transfer electricity from the power source to the spinning commutator.
Together, these components ensure that the armature is always being pushed in the same rotational direction, even though the magnetic polarity inside the coils keeps changing.
Interaction Between Magnetic Fields and Electric Current
When current flows through the armature coils, they generate magnetic poles. These poles are attracted to the opposite poles of the stator magnets and repelled by similar poles. As the armature turns, the commutator flips the direction of current, reversing the magnetic poles in the coils. This reversal happens just as the armature reaches the point where it would otherwise stop, allowing rotation to continue smoothly.
This ongoing push-pull interaction is what keeps the motor spinning as long as power is supplied.
Energy Conversion: Electrical to Mechanical
A DC motor is an energy converter. Electrical energy from a battery enters the motor through the brushes and commutator. Inside the armature, that energy becomes magnetic energy. The magnetic interaction then produces mechanical energy in the form of rotation. This conversion happens continuously and efficiently, which is why DC motors are used in so many devices.
Why 12 Volts Is Ideal for DIY Motors
Twelve volts is powerful enough to generate useful torque and speed while still being relatively safe and easy to work with. It is commonly available from batteries, adapters, and power supplies, making it convenient for home projects. Lower voltages may struggle to overcome friction, while higher voltages increase heat and safety risks. For beginners, 12 volts offers the best balance of performance, control, and safety.
Common Beginner Misconceptions
One common misunderstanding is believing that stronger magnets alone make a better motor. In reality, balance, alignment, and proper current flow matter just as much. Another misconception is assuming the motor will spin automatically once power is applied — without a commutator or proper timing, the armature may simply lock into place instead of rotating.
Simple Diagram Explanation (Conceptual)
Imagine a straight coil sitting between two magnets. When current flows, the coil twists slightly. Now imagine the current flipping direction at just the right moment, causing another twist in the same direction. Repeat this process continuously, and rotation is created. That is the basic idea behind every DC motor — including the one you are about to build.
Materials and Tools — Building a Motor with PVC Pipe
Building a reliable 12-volt DC motor begins long before the first cut is made or the first wire is wrapped. Careful preparation ensures a smoother assembly process, fewer mistakes, and a motor that performs as expected. Fortunately, this project relies on accessible, affordable materials that are easy for beginners to work with while still delivering solid results.
The foundation of your motor will be PVC pipe, which serves as the frame and protective housing. PVC is an excellent choice because it is lightweight yet strong enough to maintain structural alignment — a critical factor in any rotating machine. It is also highly workable; you can cut, drill, and sand it with basic tools, making it ideal for DIY builders without specialized equipment. Another advantage is its non-conductive nature, which helps prevent accidental electrical pathways and adds an extra layer of safety.
Copper wire is the heart of the motor’s electromagnetic system. When wound into coils around the armature, it generates the magnetic fields responsible for motion. Look for insulated magnet wire, typically between 20 and 26 gauge, as it offers a good balance between conductivity and flexibility.
To create the stationary magnetic field, you will need neodymium magnets. These rare-earth magnets are significantly stronger than standard ceramic magnets, allowing your motor to produce more torque despite its compact size. Their strength also means you can use fewer magnets while still achieving effective performance.
A steel shaft forms the axis on which the motor spins. It should be straight, smooth, and durable to minimize vibration. Supporting the shaft with bearings or bushings reduces friction, allowing the motor to rotate more efficiently and preventing premature wear.
For power, a 12-volt battery provides the ideal combination of accessibility and performance. It delivers enough energy to overcome resistance without introducing unnecessary complexity. Electrical connectors help create secure, low-resistance pathways between components, while epoxy or a strong adhesive keeps everything firmly in place once alignment is finalized.
When it comes to tools, simplicity is the goal. A drill allows you to create accurate mounting holes, while a wire stripper ensures clean electrical connections. A hacksaw makes cutting PVC straightforward, and sandpaper smooths rough edges that could otherwise interfere with assembly. Finally, a multimeter is invaluable for checking continuity, verifying voltage, and troubleshooting if the motor does not run as expected.
One of the most appealing aspects of this project is its affordability. Depending on what you already own, most builders can gather the necessary parts for roughly $25–$50. Hardware stores typically carry PVC, adhesives, and basic tools, while electronics retailers or online marketplaces are excellent sources for magnet wire, connectors, and neodymium magnets.
Beginners should remember that substitutions are often possible. If precision bearings are unavailable, nylon bushings can work for lighter loads. A regulated power adapter can stand in for a battery during testing. Even reclaimed materials — such as wire from old appliances — can be useful if they are in good condition.
Preparation Checklist
Before you begin building, confirm the following:
✅ PVC pipe measured and ready for cutting
✅ पर्याप्त copper wire for coil winding
✅ Neodymium magnets matched in size and strength
✅ Straight steel shaft with compatible bearings or bushings
✅ Fully charged 12-volt battery or power supply
✅ Electrical connectors organized
✅ Epoxy or strong adhesive prepared
✅ Drill, hacksaw, wire stripper, and sandpaper available
✅ Multimeter tested and functioning
With these materials gathered and your workspace organized, you are fully prepared to move from planning to construction — the stage where your motor truly starts to take shape.
Step-by-Step Guide to Building the PVC DC Motor
This is where your preparation turns into action. Building a PVC DC motor is less about speed and more about precision — careful measurements, proper alignment, and patience will determine how well your motor performs. Move through each stage methodically, and remember that small adjustments often make a big difference.
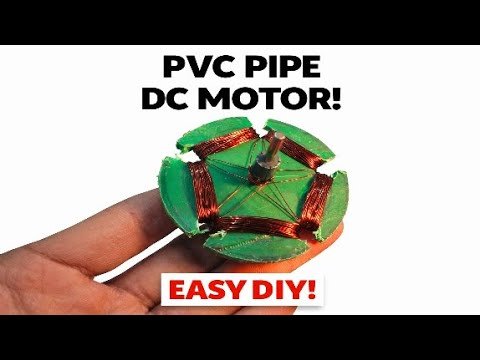
1. Designing the Motor Housing
The housing acts as the structural backbone of your motor. If it is uneven or poorly aligned, even perfectly assembled internal components will struggle to rotate smoothly.
Cutting the PVC
Start by measuring and marking your PVC pipe before cutting. A section between 4–6 inches typically provides enough room for the armature while keeping the motor compact. Use a hacksaw to make slow, controlled cuts rather than forcing the blade — rushing this step can create angled edges that affect alignment later. Once cut, smooth all edges with sandpaper to remove burrs.
Creating Mounting Points
Next, mark positions for the shaft supports on opposite sides of the pipe. These holes must be directly aligned with one another so the shaft can spin freely. Using a drill, create pilot holes first, then widen them gradually to avoid cracking the PVC.
Ensuring Alignment
Insert the shaft temporarily through the holes to confirm it sits perfectly straight. If the shaft tilts even slightly, friction will increase and performance will drop.
Pro Tip: Place the pipe on a flat surface and use a ruler or level when marking drill points. Visual estimation is one of the most common beginner mistakes.
2. Building the Armature
The armature is the rotating heart of your motor. Careful construction here directly affects torque, efficiency, and stability.
Wrapping Copper Coils
Choose a cylindrical core — this can be a smaller PVC section or another lightweight tube. Begin winding the copper wire tightly and evenly around the core, keeping each loop close to the previous one. Consistency matters more than speed; uneven coils produce uneven magnetic fields.
Leave a few inches of wire free at both ends for electrical connections, and gently scrape the insulation off those tips.
Balancing the Rotor
After winding, check the armature’s balance by placing the shaft across two level surfaces and letting it roll. If one side consistently falls downward, the weight distribution is off. Adjust by tightening coils or redistributing wire until rotation appears neutral.
Securing the Shaft
Fix the shaft firmly through the center of the armature using epoxy. Ensure it remains perfectly centered while the adhesive cures.
Pro Tip: Allow adhesives to fully cure — usually 12–24 hours. Premature assembly can shift components and undo your precision.
3. Installing Magnets
Magnets create the stationary field that interacts with your armature’s electromagnet.
Correct Polarity
Position the magnets so opposite poles face each other across the armature. This configuration maximizes the push-pull force responsible for rotation. Accidentally placing identical poles opposite each other weakens the motor dramatically.
Optimal Spacing
Keep the magnets close to the armature without letting them touch. A small air gap improves magnetic interaction while preventing mechanical interference.
Avoiding Efficiency Loss
Secure magnets with epoxy to prevent movement during operation. Even minor shifts can disrupt the magnetic field.
Pro Tip: Test polarity beforehand by letting magnets snap together naturally — the sides that attract should face the armature.
4. Creating a Simple Commutator
The commutator is what keeps your motor spinning instead of locking into place. Its job is to reverse current direction at exactly the right moment.
Copper Segments
Cut two small strips of copper and attach them around the shaft, leaving a slight gap between them. Each strip connects to one end of the coil wire.
Insulation
Ensure the copper segments do not touch each other. Use thin insulating material or epoxy between them to maintain separation.
Smooth Contact Surface
Lightly sand the copper so brushes can glide across without catching.
Pro Tip: An uneven commutator often causes vibration or power interruptions, so prioritize smoothness over speed during construction.
5. Attaching Brushes
Brushes deliver electricity from the battery to the spinning commutator — consistent contact is essential.
Maintaining Consistent Pressure
Use flexible metal strips or conductive springs that press gently against the copper segments. Too much force increases friction; too little causes power loss.
Preventing Excess Friction
Align brushes carefully so they touch only the commutator, not the shaft.
Pro Tip: If available, slightly curved brush tips improve contact and reduce sparking.
6. Final Assembly
Now it is time to bring everything together.
Fitting Components
Insert the armature into the housing, guide the shaft into the support holes, and confirm that it spins freely with a light flick of your finger.
Checking Clearances
Look from multiple angles to ensure the armature does not rub against magnets or the housing.
Secure any remaining loose components and allow adhesives to set completely.
Pro Tip: Perform a manual spin test before applying power. If it doesn’t rotate easily by hand, electricity will not fix the problem — alignment will.
7. First Power Test
This is the moment where engineering turns into motion.
What Should Happen
Connect the brushes to your 12-volt battery. The armature should begin spinning within a second or two. Some motors may need a gentle nudge initially — this is normal in simple DIY builds.
Signs Something Is Wrong
No movement → Check wiring and battery charge.
Jerky motion → Inspect the commutator and brush contact.
Excess heat → Look for electrical shorts or excessive friction.
Loud vibration → Recheck balance and shaft alignment.
Pro Tip: Run the motor in short intervals during early testing. This prevents overheating while you fine-tune performance.
Building a motor is a process of refinement as much as assembly. Do not be discouraged if it does not run perfectly on the first attempt — even experienced builders make adjustments. Each correction deepens your understanding and brings you closer to a smoother, more efficient machine. By approaching each stage with patience and precision, you are not just assembling parts — you are creating a working demonstration of electromagnetic engineering.
Testing, Troubleshooting, and Improving Motor Performance
Completing your 12-volt PVC DC motor is more than just a satisfying DIY achievement — it is the beginning of a much larger journey into electronics and mechanical innovation. What you have built is not merely a demonstration piece; it is a functional machine capable of powering real projects. More importantly, it represents a foundational understanding of how electrical energy becomes motion, a principle that underpins countless technologies.
Practical Applications You Can Try
Small Fans
Attach lightweight blades to the shaft, and your motor can quickly become a compact cooling fan. This is a great way to test sustained operation while observing airflow and efficiency. It also highlights how even simple motors can perform useful everyday tasks.
Mini Drills
With proper stabilization and a small drill bit adapter, your motor can handle light crafting work such as drilling thin plastic, foam board, or soft wood. This application demonstrates torque in action and helps you evaluate how the motor behaves under resistance.
Robotics Projects
Motors are the muscles of robotics. By integrating your build into a basic robot platform, you gain insight into motion control, power distribution, and mechanical coordination. Even a simple two-wheel robot can deepen your understanding of applied engineering.
Science Demonstrations
Because the motor’s components are visible and understandable, it makes an excellent teaching tool. Whether used in a classroom, workshop, or home learning environment, it clearly illustrates electromagnetism, energy conversion, and rotational mechanics.
Model Vehicles
Install your motor into a small car or prototype vehicle to explore speed versus torque. This hands-on experiment reveals how weight, traction, and power interact — lessons that scale directly into larger engineering concepts.
These projects reinforce an important realization: once you understand how to build a motor, you can power almost anything that moves.
Next-Level Upgrade Ideas
After your initial success, you may feel inspired to push performance further. That curiosity is exactly what drives innovation.
Add Speed Control (PWM)
Incorporating Pulse Width Modulation (PWM) allows you to regulate motor speed without sacrificing efficiency. Instead of simply turning the motor on or off, you gain precise control — a major step toward more advanced electronics projects.
Improve the Housing Design
While PVC is excellent for learning, redesigning the housing can enhance durability and alignment. Experiment with better internal supports, ventilation openings to reduce heat, or modular sections that make maintenance easier.
Convert It Into a Generator
Here is a fascinating twist: spin the shaft mechanically, and your motor can produce electricity. This reversal demonstrates the deep relationship between motors and generators and offers powerful insight into energy systems.
Build a Higher-Torque Version
Try thicker wire, stronger magnets, or a redesigned armature to increase rotational force. Engineering is often about iteration — refining what works and improving what does not.
Integrate 3D-Printed Hybrid Parts
Combining PVC with 3D-printed components opens the door to precision engineering. Custom brush holders, magnet mounts, or shaft supports can dramatically improve performance while introducing you to modern fabrication techniques.
Your Gateway Into Advanced DIY Electronics
This project is far more than a standalone build — it is your entry point into the broader world of DIY electronics. The skills you developed here apply directly to generators, electric vehicles, automated machines, and robotics systems. You have learned how critical alignment is, why efficient electrical pathways matter, and how thoughtful design influences performance.
Most importantly, you have experienced the engineering mindset: build, test, adjust, and improve.
Let this motor be the first of many creations. With each project, your confidence will grow, your designs will become more sophisticated, and challenges that once seemed complex will start to feel solvable. Great engineers are not defined by where they start, but by their willingness to experiment, learn, and keep building.
Conclusion
What began as a concept — a simple idea of turning electricity into motion — has now become something real, built by your own hands. By completing this project, you have accomplished far more than assembling a 12-volt PVC DC motor from PVC pipe. You have stepped into the role of a builder, transforming raw materials into a working machine through patience, precision, and curiosity.
Along the way, you developed practical skills that extend well beyond this single project. You learned the fundamentals of electromagnetism, discovered how electrical and mechanical systems must work together, and gained firsthand experience in alignment, troubleshooting, and performance optimization. Perhaps most importantly, you strengthened your problem-solving abilities — recognizing that challenges are not roadblocks but opportunities to refine your design and deepen your understanding.
Now is the perfect time to keep that momentum going. Experiment with improvements, test new configurations, and do not hesitate to modify your motor or apply these principles to entirely new creations. Every adjustment you make builds confidence and expands your engineering intuition. Remember, even the most advanced technologies trace their origins back to simple experiments like this one.
Great engineers are not defined by expensive tools or complex laboratories; they are defined by their willingness to start, learn, and persist. Today it was a motor — tomorrow it could be a robot, a generator, or something entirely your own.
I Made a 12V PVC DC Motor Using Only PVC Pipe 😱 | DIY Experiment
FAQS
| Question | Answer |
|---|---|
| What is a 12-volt DC motor? | A 12-volt DC motor is an electrical device that converts direct current (DC) power into mechanical rotation. It is commonly used in automotive systems, small appliances, robotics, and DIY engineering projects because it offers a strong balance between power and safety. |
| Can I really build a DC motor using PVC pipe? | Yes. PVC pipe is lightweight, durable, easy to cut, and non-conductive, making it an excellent material for creating the motor housing. While it may not replace industrial materials, it works very well for DIY and educational builds. |
| Is this project suitable for beginners? | Absolutely. With basic tools and careful guidance, beginners can successfully build a functional motor. The project is also a great introduction to electronics and mechanical design. |
| How long does it take to build the motor? | Most people can complete the build in about 3–6 hours, depending on their experience level and whether all materials are prepared beforehand. Taking extra time for alignment and testing is recommended. |
| Why is 12 volts ideal for a DIY motor? | Twelve volts provides enough power to generate useful torque without creating excessive heat or safety risks. It is also a widely available voltage from batteries and power supplies. |
| What type of copper wire should I use? | Insulated magnet wire between 20 and 26 gauge is typically recommended. It is flexible, conducts electricity efficiently, and allows you to create strong electromagnetic coils. |
| Do I need very strong magnets? | Strong magnets, such as neodymium magnets, significantly improve motor performance by increasing torque and efficiency. Weaker magnets may still work but often produce slower rotation. |
| Why is my motor not spinning? | The most common causes include loose wiring, poor brush contact, incorrect magnet polarity, or shaft misalignment. Start by checking electrical connections and ensuring the rotor spins freely by hand. |
| Is building a DC motor safe? | Yes, as long as you follow basic safety practices such as insulating wires, securing components, wearing protective eyewear when cutting materials, and avoiding prolonged contact with powered circuits. |
| How can I make my motor more powerful? | You can increase coil turns, use stronger magnets, reduce friction with better bearings, and ensure precise alignment. Even small improvements can noticeably boost performance. |
| What are the signs of a poorly aligned motor? | Excess vibration, unusual noise, overheating, and reduced speed usually indicate alignment issues. A properly aligned shaft should rotate smoothly with minimal resistance. |
| Can this motor power real projects? | Yes. It can be used for small fans, model vehicles, science demonstrations, and beginner robotics. While it is not designed for heavy-duty applications, it is highly functional for light tasks. |
| How do I control the motor speed? | Adding a Pulse Width Modulation (PWM) controller allows you to adjust speed efficiently without wasting energy. This is a popular upgrade for DIY motors. |
| Can a DC motor become a generator? | Yes. If you mechanically spin the shaft, the motor can produce electrical energy. This demonstrates the reversible relationship between motors and generators. |
| What is the biggest mistake beginners make? | Rushing the build. Most performance problems come from poor alignment, uneven coils, or skipping testing steps. Taking your time leads to a smoother, more reliable motor. |