
Building a High Speed BLDC Motor
A 10-Magnet, Copper Coil Design Building a high-speed BLDC motor can be a rewarding project, offering significant control and efficiency advantages over brushed motors. This article will guide you through the process of constructing a BLDC motor using ten magnets and copper coils, emphasizing the design choices that contribute to high rotational speed. Remember, this is a complex project requiring precision and safety precautions.
Understanding the Design Choices
The number of magnets directly impacts the BLDC motor’s speed and torque characteristics. A ten-magnet design provides a relatively high pole count, leading to: * Higher speed potential: More poles translate to more torque pulses per revolution, allowing for smoother operation at higher speeds. * Increased switching frequency: The controller needs to switch the coils more frequently, demanding a faster and more responsive electronic speed controller (ESC).
Higher complexity: The increased number of poles and coils increases the complexity of the winding and control circuitry.
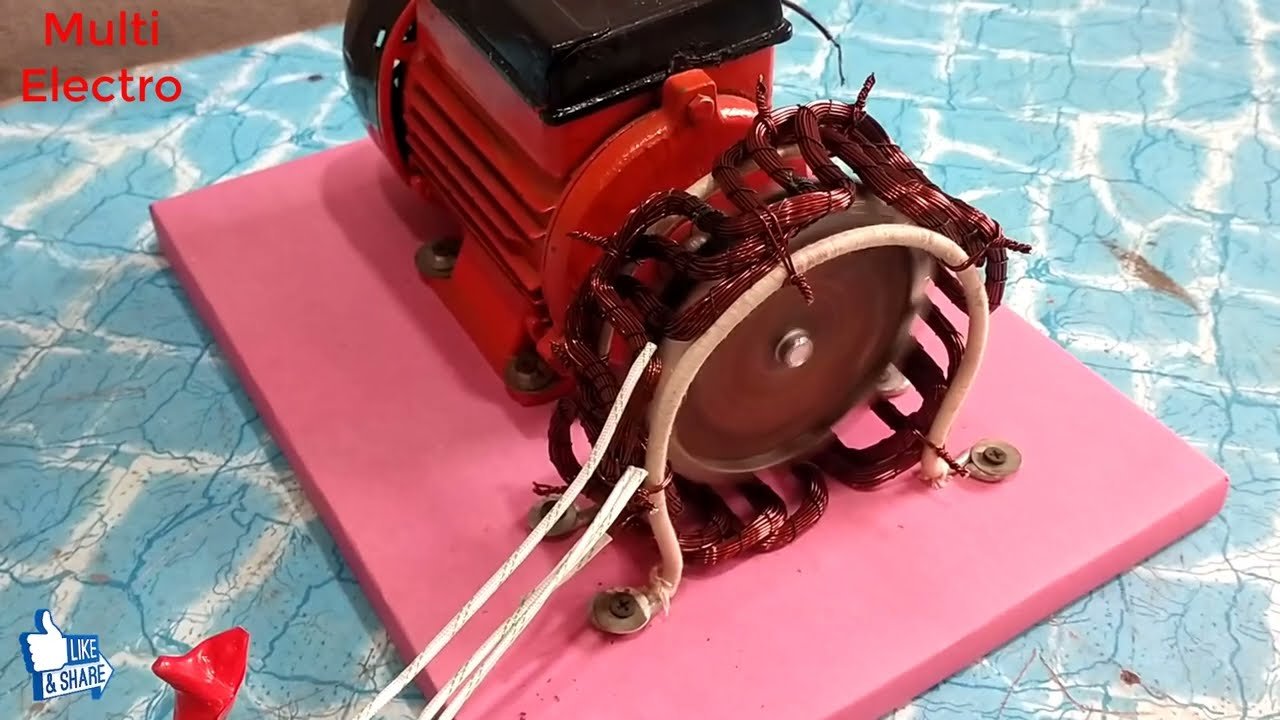
Materials Required
Stator: A precisely machined stator with slots to accommodate the copper coils. The stator’s dimensions will dictate the overall motor size and performance. Consider using a high-quality material like laminated steel to minimize eddy current losses. * Magnets: Ten strong neodymium magnets (N52 or higher grade recommended for optimal performance).
Careful magnet placement is crucial for balanced operation. Precise dimensions and orientation are essential. Copper Wire: Magnet wire with appropriate gauge for the desired current and coil resistance. Thicker wire handles higher currents but increases the coil resistance. Precise calculations are necessary to determine the optimal wire gauge. Insulation: High-temperature insulation (e.g., Kapton tape) for the copper windings. Electronic Speed Controller (ESC): A high-frequency ESC capable of handling the increased switching frequency of a ten-pole motor. The ESC will require careful configuration for optimal performance.
Power Source:
A suitable power source capable of supplying the required voltage and current. Hall Effect Sensors (optional but recommended): Three Hall effect sensors are crucial for accurate commutation (determining which coils to energize at any given rotor position). Soldering Equipment: High-quality soldering iron and solder. Measuring Instruments: Multimeter, oscilloscope
For Advanced Diagnostics. Construction
Steps:
1.
Stator Winding: Carefully wind the copper coils into the stator slots, following a specific winding pattern determined by the motor’s design. Precise coil placement and consistent winding tension are vital for optimal performance. Ensure proper insulation between coil layers and the stator.
2.
Magnet Placement: Precisely position the ten magnets around the rotor, ensuring correct polarity and spacing. Any imbalance will lead to vibrations and reduced efficiency. Consider using adhesive specifically designed for magnets.
3.
Hall Sensor Integration (optional): If using Hall sensors, carefully position them around the stator to accurately sense the rotor’s position. Their output signals will be fed into the ESC.
4.
ESC Connection: Connect the motor coils and Hall sensors (if used) to the ESC according to its instructions.
5.
Testing and Calibration: Carefully test the motor, starting at low voltages and gradually increasing. Monitor the current draw and temperature to avoid overheating. Calibration of the ESC might be necessary to optimize performance. Advanced Considerations: *
Finite Element Analysis
(FEA): FEA simulations can help optimize the motor’s design for maximum efficiency and speed. Thermal Management: High-speed motors generate significant heat. Consider implementing cooling solutions like heat sinks or forced air cooling.
Controller Design:
For maximum control and performance, consider designing a custom ESC using microcontrollers.
Safety Precautions:
High voltages and currents can be dangerous. Take appropriate precautions to avoid electric shock. Neodymium magnets are powerful. Keep them away from electronic devices and pacemakers. High-speed motors can generate significant centrifugal forces. Ensure the motor is securely mounted.
Conclusion:
Building a high-speed BLDC motor with ten magnets and copper coils is a challenging but rewarding project. Careful planning, precise execution, and a thorough understanding of the underlying principles are essential for success. This article provides a general overview; further research and experimentation will be necessary to refine your design and achieve optimal performance. Remember to prioritize safety throughout the entire process. Visit Multi Electro for more resources and information.
FAQs
1.
Why use ten magnets instead of a smaller number?
A:
Using ten magnets increases the number of poles in the motor. More poles lead to higher torque at lower speeds and potentially higher top speed, depending on other design factors. The higher pole count also results in a smoother rotation due to more frequent commutation events. However, it also increases the complexity of winding and the precision required in magnet placement.
2.
What type of copper wire is best for the coils?
A
The best copper wire depends on the desired motor characteristics and space constraints. Litz wire (many thin strands) minimizes skin effect losses at high speeds, leading to higher efficiency. However, it’s more expensive and complex to work with. Solid copper wire is cheaper and easier to handle, but might experience higher losses at very high speeds. The gauge of the wire determines the current carrying capacity, which needs to be balanced with the space available in the stator slots.
3.
How do I determine the optimal number of turns per coil?
A
The number of turns per coil influences the motor’s voltage and torque characteristics. More turns generally increase the back-EMF (electromotive force) and torque at lower speeds but reduces the maximum speed and increases winding resistance, leading to higher losses. This is a design trade-off determined through experimentation or motor design software. Consider the desired torque-speed curve when determining the number of turns
4.
What kind of magnets should I use?
A
Neodymium magnets (NdFeB) are the most common choice for their high magnetic strength and relatively small size. However, their strength necessitates careful handling and secure mounting to prevent damage or injury. The grade of the Neodymium magnet (e.g., N35, N52) will affect the motor’s performance. Higher grade magnets offer stronger magnetic fields, but are also more expensive.
5.
How do I design and wind the stator coils?
A
Designing the stator requires precise calculations considering the magnet placement, air gap, and coil geometry. Software tools can aid in this process. Winding the coils requires patience and attention to detail to ensure proper placement and connection to avoid shorts or imbalances. Consistent spacing and even winding are critical for balanced motor operation. Consider using a winding jig for consistency.
6.
How do I control the speed and direction of the motor?
A
A BLDC motor requires an electronic speed controller (ESC) to commutate the coils correctly. This ESC uses sensors (Hall effect sensors are common) to determine the rotor’s position and switches the power to the coils accordingly. The ESC also allows for speed and direction control through pulse-width modulation (PWM).
7.
What safety precautions should I take when building this motor?
A:
Neodymium magnets are incredibly strong and can pinch fingers or cause damage to electronics. Always handle them with care. Working with high voltages and currents can be dangerous; ensure you have appropriate safety equipment and knowledge before working on the electrical aspects. Wear safety glasses to protect your eyes from flying debris during construction. Consider using insulated wires and proper shielding to prevent electric shock.
This submission is excellent.
I found new insight from this.
This is the kind of content I look for.
More posts like this would make the internet more useful.
I discovered useful points from this.
Such a informative insight.
I’ll certainly return to read more.
The thoroughness in this write-up is praiseworthy.