
DIY Alternator Generator – How to Produce 220V Electricity at Home
Introduction
Electricity DIY Alternator Generator has become so deeply woven into our daily lives that most people only notice its importance when it suddenly disappears. Imagine sitting at home on a hot evening when the power goes out without warning. The fans stop spinning, the lights go dark, your Wi-Fi drops instantly, and your phone battery is already at 12%. In moments like these, one question naturally comes to mind: what if I could generate my own electricity whenever I needed it? The idea of producing reliable power at home is no longer reserved for engineers or large power companies. With the right knowledge, practical expectations, and safe approach, even a dedicated DIY enthusiast can build a system capable of producing useful electricity. One of the most interesting and accessible ways to do this is by using a car alternator paired with a motor to generate household-style voltage.
For many people, the concept sounds almost unbelievable at first. A device originally designed for automobiles helping power lights, tools, or small appliances at home? Yet the truth is that alternators are incredibly capable machines. Every time you drive a car, the alternator quietly converts mechanical rotation from the engine into electrical energy, charging the battery and powering the vehicle’s electronics. It is a proven, reliable technology that has been refined over decades. When you understand how it works and how to adapt it for a stationary setup, it opens the door to a practical DIY generator project that is both educational and genuinely useful.
Before going further, it is important to set clear and realistic expectations. This guide is not about creating “free energy,” nor is it about building a machine that runs forever without input. The laws of physics simply do not allow energy to be created from nothing. Instead, what you are building is a system that converts one form of energy into another — mechanical motion into electrical power. Just like commercial generators, the electricity you produce will always come from the energy used to spin the motor. Understanding this from the start puts you ahead of many beginners because it helps you focus on efficiency, safety, and performance rather than chasing impossible outcomes.
So why build a generator like this at all? The answer lies in independence, preparedness, and learning. Power outages are becoming more common in many regions due to extreme weather, aging infrastructure, and increasing electricity demand. Having a backup power solution can make a huge difference in comfort and safety. Even if you never face long outages, a generator project teaches you how electricity is actually produced, giving you skills that are valuable for a lifetime. Once you grasp the fundamentals, you begin to see electrical systems everywhere with new clarity — from portable generators to wind turbines and even large-scale power plants.
Another reason this project attracts so many DIY builders is accessibility. Unlike highly specialized equipment, car alternators are widely available, relatively affordable, and built to withstand demanding conditions. Many can be sourced from auto parts stores or salvage yards, making them a practical choice for experimentation. Pairing an alternator with an appropriately sized motor allows you to create a controlled system where you can observe voltage generation, measure output, and gradually improve performance. Whether your goal is emergency backup power, workshop electricity, or simply expanding your technical skills, this type of build offers a strong balance between challenge and achievability.
You might be wondering what kind of electricity output is realistically possible. While this depends heavily on the motor size, alternator rating, and system design, a properly configured setup can generate meaningful power — enough for lighting, charging devices, running fans, or operating certain tools. It will not replace a full household power supply, but that is not the purpose. Think of it as a reliable supplemental source of electricity and a powerful learning platform. Many experienced builders will tell you that constructing your first generator changes the way you think about energy consumption. Suddenly, leaving unnecessary devices running feels different when you understand exactly how much effort is required to produce that power.
This project also provides an excellent opportunity to deepen your understanding of core electrical principles without requiring an advanced engineering background. Concepts such as electromagnetic induction, rotational speed, voltage regulation, and load management become far less abstract when you see them in action. Instead of reading about how generators work, you witness the process firsthand — the hum of the motor, the movement of the belt, and the moment your meter shows voltage for the first time. That experience alone makes the project worthwhile for many builders.
Of course, enthusiasm should always be balanced with responsibility. Working with electricity demands respect for safety practices. Proper wiring, adequate ventilation, secure mounting, and correct component sizing are not optional details — they are essential parts of a successful build. Approaching the project with patience and attention to detail will not only protect you but also improve the generator’s reliability. Fortunately, once you understand the key guidelines, building and operating a small generator can be both safe and rewarding.
One of the most satisfying aspects of a project like this is the sense of control it provides. Modern life often leaves us dependent on systems we rarely think about until they fail. Learning how to generate electricity restores a measure of self-reliance. It reminds us that power is not mysterious; it is the result of understandable physical processes that anyone willing to learn can grasp. Even if you eventually purchase a commercial generator or invest in solar equipment, the knowledge gained here will help you make smarter decisions and better evaluate your options.
You may also discover that this project sparks further curiosity. Many DIY enthusiasts begin with a simple alternator generator and later explore battery storage, inverter systems, renewable energy integration, or higher-efficiency designs. Each step builds upon the last, gradually transforming a beginner into a confident builder. That journey often starts with a single question: “Can I actually make electricity myself?” The answer, as you are about to see, is yes — provided you approach the task with realistic expectations and a willingness to learn.
In the sections ahead, you will learn how a car alternator can be adapted into a stationary generator, how a motor provides the mechanical force required for power production, and how the generated electricity can ultimately be converted into usable household voltage such as 220V AC with the help of an inverter. More importantly, you will understand why each component matters and how they work together as a complete system. By the end, you should not only know how to assemble the setup but also feel confident explaining the process to someone else.
Building your own generator is more than a technical exercise — it is a practical demonstration of energy transformation happening right before your eyes. Few DIY projects combine theory and hands-on results so effectively. When the system finally comes to life and begins producing electricity, the experience is both empowering and memorable. It serves as proof that complex technologies are often just a collection of simple principles working in harmony.
So if you have ever wanted greater control over your power supply, a deeper understanding of electrical systems, or the satisfaction of creating something truly functional with your own hands, you are in the right place. This guide will walk you through the process with clarity and realism, helping you avoid common misconceptions while focusing on what actually works. With patience, careful assembly, and respect for safety, generating your own electricity is not just an idea — it is an achievable project waiting to be built.
What This Project Is About ? DIY Alternator Generator
This project is about building a practical system that can generate usable 220-volt electricity by combining two powerful and widely available machines — a car alternator and an AC motor. At its core, the idea is simple: use mechanical motion to produce electrical energy that can support basic household needs, power tools, or serve as a dependable backup during outages. While the phrase “electricity forever” often captures attention, what this project truly represents is reliability, continuous generation when properly operated, and a deeper understanding of how power is created rather than consumed.
Most people rely entirely on the electrical grid without ever thinking about what happens behind the scenes. Electricity flows into our homes so effortlessly that it feels almost automatic — until it suddenly stops. Whether caused by storms, infrastructure issues, or unexpected demand, power interruptions remind us how dependent modern life is on a steady energy supply. This project aims to reduce that dependence by showing you how to produce electricity yourself using equipment that is durable, affordable, and designed for real-world performance.
A car alternator is an excellent starting point because it is engineered to generate electricity efficiently under demanding conditions. Inside every vehicle, the alternator converts the engine’s rotation into electrical power, charging the battery and running essential electronics. By pairing this alternator with an AC motor, you essentially recreate the same energy conversion process in a stationary setup. The motor provides the rotational force, the alternator transforms that motion into electrical output, and with the proper configuration, the system can deliver voltage that can be converted into standard 220V AC for practical use.
What makes this project especially valuable is not just the electricity it produces, but the knowledge you gain while building it. You begin to understand the relationship between speed and voltage, how mechanical energy becomes electrical energy, and why efficiency matters in every generator system. Instead of electricity being an invisible convenience, it becomes something tangible — something you can measure, control, and improve.
It is important to approach this project with clear expectations. This system does not create energy from nothing, nor does it eliminate the need for an energy source. The motor requires power to spin, and that input is what ultimately allows the alternator to generate electricity. Think of the setup as a conversion system rather than a limitless power machine. When designed correctly, however, it can run continuously for long periods, making it highly useful for backup applications, workshops, remote locations, or learning environments.
Another reason this project appeals to DIY builders is the sense of independence it creates. Producing your own electricity — even on a small scale — changes how you think about energy. You become more aware of consumption, more appreciative of efficiency, and more confident in your ability to handle technical challenges. There is also a unique satisfaction in seeing a system you assembled with your own hands come to life and deliver real, measurable power.
Ultimately, this project is about empowerment through practical skill. It demonstrates that electricity generation is not reserved only for massive power plants or professional engineers. With patience, proper planning, and attention to safety, it is entirely possible to build a generator that serves real purposes. Beyond the wires, pulleys, and components, what you are really creating is capability — the ability to produce power when you need it and the confidence that comes from truly understanding how it all works.
Who This Guide Is For DIY Alternator Generator
This guide is designed for curious builders, practical thinkers, and anyone who has ever wondered what it would be like to generate their own electricity instead of relying completely on the power grid. You do not need to be an electrical engineer or a seasoned technician to benefit from this project. In fact, it is written especially for people who enjoy learning by doing — those who are willing to pick up tools, follow instructions carefully, and gain confidence through hands-on experience.
If you are a DIY enthusiast, this guide will feel right at home. Maybe you already enjoy repairing equipment, building small mechanical projects, or improving things around your house. Projects like these naturally spark a deeper interest in how systems work, and building a generator is one of the most rewarding challenges you can take on. It combines mechanical motion, electrical principles, and practical problem-solving into a single build that produces something genuinely useful. For many hobbyists, it becomes more than just a project — it becomes a stepping stone into a broader world of energy knowledge.
This guide is also ideal for beginners who are ready to move beyond theory and try something real. You might have watched videos about generators, read articles on electricity, or simply felt curious about how power is created. Instead of overwhelming you with complex calculations or technical jargon, the goal here is to help you understand the process in a clear and approachable way. As long as you are patient, safety-conscious, and willing to learn, you can successfully complete this project even if your prior electrical experience is limited.
Homeowners looking for greater preparedness will also find this guide valuable. Power outages can disrupt daily life in an instant — from spoiled food to uncomfortable living conditions and interrupted work. Having the ability to generate electricity provides peace of mind. While this setup is not meant to replace a full household power system, it can support essential devices and help you stay functional during emergencies. More importantly, it gives you a sense of control in situations where many people feel helpless.
Students and lifelong learners are another group who can benefit greatly from this guide. Reading about electromagnetic induction is one thing; seeing it happen in a machine you built yourself is something entirely different. This project transforms abstract scientific concepts into visible, measurable results. It encourages critical thinking and helps you develop practical skills that extend far beyond a single build.
Even small workshop owners or garage tinkerers may discover new possibilities here. Whether you need occasional backup power or simply enjoy experimenting with equipment, a generator project strengthens your technical independence. Understanding how electricity is produced also helps you make smarter decisions when purchasing tools, planning upgrades, or managing energy usage.
However, this guide is best suited for people who respect the importance of safety and realistic expectations. Working with electrical systems requires attention to detail and a responsible mindset. If you are someone who takes the time to do things properly rather than rushing through them, you are exactly the type of reader this guide was created for.
Ultimately, this guide is for anyone who believes that learning practical skills is always worthwhile. It is for the curious mind that asks, “How does this work?” and the determined builder who follows that question with, “Can I build it myself?” If that sounds like you, then you are in the right place to begin.
What You Will Learn About DIY Alternator Generator
By the time you finish this guide, you will walk away with more than just a working generator setup — you will gain a practical understanding of how electricity is produced and how different components work together to create usable power. One of the most valuable things you will learn is that generating electricity is not mysterious or reserved only for large power plants. It is a process built on clear physical principles that can be understood and applied on a smaller, hands-on scale.
First, you will learn how a car alternator actually generates electricity. Many people know that alternators charge vehicle batteries, but few understand what is happening inside the unit. This guide will help you grasp the basic idea of electromagnetic induction — how spinning a rotor inside a magnetic field produces electrical current. Once you understand this relationship between motion and energy, the entire system begins to make sense, and you will see why rotational speed, stability, and proper configuration are so important.
You will also learn how mechanical power becomes the driving force behind electrical output. The AC motor in this project is responsible for creating the rotation that the alternator needs to function. Understanding this connection teaches an essential lesson about energy conversion: electricity must come from somewhere. Rather than chasing unrealistic ideas, you will develop a grounded perspective on how power systems operate in the real world.
Another key takeaway will be system design. You will see how each component — the motor, alternator, pulleys, wiring, battery, and inverter — plays a specific role. More importantly, you will learn how these parts depend on one another. A well-balanced system runs smoother, produces more stable voltage, and lasts longer. This type of thinking strengthens your problem-solving skills and prepares you for more advanced projects in the future.
Safety awareness is another major area of learning. Working with electrical equipment requires respect and careful planning. Throughout the process, you will become more conscious of proper connections, load limits, ventilation, and secure mounting. These habits are not just useful for this build; they are valuable skills you can apply to any technical project.
Perhaps most importantly, you will gain confidence. There is a unique satisfaction that comes from building something functional with your own hands and watching it produce real results. What once seemed complex becomes manageable, and what once felt intimidating becomes an opportunity to learn.
In the end, this guide is not just about generating 220V electricity — it is about expanding your capabilities. You will develop practical knowledge, strengthen your technical mindset, and prove to yourself that with patience and effort, you are capable of creating systems that truly work.
How Electricity Generation Actually Works
Have you ever stopped to think about where electricity actually comes from? Every time you flip a switch, charge your phone, or turn on a fan, power arrives instantly as if it were simply waiting inside the wires. It feels effortless — almost magical. Yet behind that convenience is a fascinating process rooted in motion, magnetism, and one of the most important scientific discoveries in human history. Once you understand how electricity generation actually works, you begin to see energy very differently. It stops being an invisible service and becomes something mechanical, measurable, and surprisingly logical.
At the heart of electricity generation is a simple idea: energy cannot be created from nothing — it can only be converted from one form into another. This principle shapes every power plant, generator, and alternator in the world. Whether electricity is produced by falling water, spinning wind turbines, steam engines, or fuel-powered motors, the process always begins with movement. That movement is what allows a generator to transform mechanical energy into electrical power that can travel through wires and operate the devices we depend on daily.
The breakthrough that made modern electricity possible dates back to the early 19th century, when scientists discovered electromagnetic induction. While the term may sound complex, the concept is surprisingly straightforward. When a conductor such as copper wire moves through a magnetic field — or when a magnetic field moves around the wire — an electric current is created. No magic, no endless power source, just physics doing exactly what it is designed to do.
Inside a typical generator or alternator, this principle comes to life through carefully engineered parts. There is usually a rotating component called a rotor and a stationary section known as the stator. The rotor spins, creating a changing magnetic field around the stator’s coils of wire. As this magnetic environment shifts, electrons begin to flow through the wire, producing electricity. The faster the rotation, the greater the potential electrical output — although only within the safe limits of the machine.
This is why motion is so important. Without rotation, there is no changing magnetic field. Without that change, there is no current. In other words, electricity generation is not about producing energy out of thin air; it is about converting physical effort into a usable form. Imagine riding a bicycle with a small generator attached to the wheel. As you pedal harder, the light connected to the generator glows brighter. The energy powering that light comes directly from your muscles. Large-scale power stations operate on exactly the same principle — they simply use stronger forces like steam pressure, flowing water, or wind to spin much larger generators.
Understanding this connection also clears up one of the biggest misconceptions people have about electricity: the idea of “free energy.” While it is an appealing phrase, real-world physics tells a different story. Every generator requires an input force. If a system appears to run continuously, it is because energy is being supplied from somewhere, whether it is fuel, solar input, water flow, or mechanical rotation from a motor. Recognizing this truth is empowering because it shifts your focus toward efficiency and smart design rather than chasing impossible outcomes.
Another important factor in electricity generation is consistency. Smooth, stable rotation produces more reliable voltage, while uneven motion can lead to fluctuations that affect performance. This is why well-built systems pay close attention to alignment, balance, and speed control. It is not just about making something spin — it is about making it spin properly.
You might also be surprised to learn how adaptable this technology is. The alternator in a car, for example, follows the same fundamental rules as the massive generators inside power plants. The difference lies mostly in scale and capacity. A vehicle alternator produces enough electricity to charge a battery and run automotive electronics, while industrial generators power entire cities. Yet both rely on magnetic fields, rotating components, and the predictable behavior of electrons.
Voltage is another piece of the puzzle worth understanding. Generators can produce different voltage levels depending on their design and speed. However, the electricity coming directly from an alternator is not always ready for household use. That is where additional components — such as voltage regulators and inverters — become essential. They help stabilize and convert the raw electrical output into a form that is safe and practical for everyday devices.
As you begin to grasp how electricity generation works, something interesting happens: you become more aware of energy itself. You start noticing how much effort is required to power even small appliances and why efficiency matters so much in modern technology. Devices are not just “using power”; they are drawing from a system that required real mechanical force to operate.
Perhaps the most inspiring part of all this is realizing that the process is not beyond your reach. The same scientific principles that power entire grids can be demonstrated on a smaller scale through hands-on projects. When you see a generator produce electricity right in front of you, the theory transforms into reality. It builds confidence and replaces mystery with understanding.
Electricity generation, at its core, is a story of transformation — motion becoming energy, magnetism guiding electrons, and human innovation turning natural laws into everyday convenience. Once you understand this process, you no longer see power as something distant or abstract. Instead, you recognize it as the result of movement, design, and ingenuity working together to keep the modern world running.
Why This Is NOT Free Energy
The idea of “free energy” is incredibly attractive. Imagine a machine that could run forever, producing unlimited electricity without fuel, effort, or cost. No power bills, no outages, no dependence on the grid — just endless energy whenever you need it. It sounds almost too good to question, which is exactly why the concept has captured the imagination of inventors, hobbyists, and curious minds for generations. But once we step away from wishful thinking and look at how the physical world actually operates, a different — and far more practical — truth emerges.
To understand why this system is not free energy, we must begin with one of the most fundamental rules of physics: the law of conservation of energy. This law states that energy cannot be created or destroyed; it can only be converted from one form into another. Every working generator on Earth follows this rule without exception. When you produce electricity, you are not creating new energy — you are transforming mechanical energy into electrical energy.
Think about riding a bicycle at night with a small dynamo powering the headlight. The moment the light turns on, pedaling becomes slightly harder. That extra resistance is not a coincidence; it is physics in action. Your muscles are supplying the energy that becomes electricity for the lamp. If you stop pedaling, the light goes out. The system depends entirely on the input force.
The same principle applies to a generator built with a car alternator and an AC motor. The motor spins the alternator, and that rotation produces electrical current. But the motor itself requires power to operate. Energy flows into the motor, becomes mechanical motion, and is then converted into electricity by the alternator. At every stage, some energy is lost as heat and friction — a natural part of any real-world machine. Because of these losses, the output energy will always be slightly less than the input energy. This is not a design flaw; it is simply how nature works.
So why do some setups appear to run continuously? The answer is steady energy supply, not energy creation. As long as the motor receives power, the alternator can keep generating electricity. The system may feel self-sustaining when everything is running smoothly, but it is actually part of an ongoing energy conversion cycle.
Understanding this is not meant to discourage you — quite the opposite. Accepting realistic physics allows you to focus on what truly matters: efficiency, reliability, and smart engineering. Instead of chasing the illusion of a machine that powers itself forever, you can build a system that performs predictably and serves real needs, such as backup electricity or workshop power.
It is also helpful to recognize that even the world’s largest power plants are not free energy systems. A hydroelectric dam relies on flowing water. Wind turbines depend on moving air. Solar panels require sunlight. Fuel-powered generators burn energy-dense materials to create motion. Every method traces back to the same universal rule — energy must come from somewhere.
In many ways, letting go of the free energy myth is empowering. It shifts your mindset from searching for shortcuts to developing genuine technical understanding. When you know what is realistically possible, you make better design choices, operate equipment more safely, and avoid common misconceptions that lead to disappointment.
There is another benefit as well: appreciation. Once you realize how much effort is required to generate electricity, you naturally become more aware of how you use it. Devices left running unnecessarily no longer feel trivial, because you understand the mechanical work behind every watt.
This project is not about defying physics — it is about working with it. By converting mechanical motion into electrical power, you are applying the same principles that keep modern civilization running. There is nothing unrealistic about that. In fact, it is far more impressive to build a system grounded in real science than to chase an impossible promise.
So while this generator is not free energy, it is something far more valuable: a practical demonstration of how power is truly produced. It offers knowledge, independence, and the satisfaction of creating electricity through your own effort — and that is anything but an illusion.
Mechanical Energy vs Electrical Energy
Have you ever wondered what really happens behind the scenes when electricity is produced? It is easy to think of electrical power as something that simply exists inside outlets, ready to flow whenever we plug in a device. Yet electricity does not appear on its own — it is the result of energy being transformed from one form into another. One of the most important relationships in power generation is the connection between mechanical energy and electrical energy. Understanding how these two forms interact will completely change the way you think about generators and the electricity you use every day.
Mechanical energy is, at its simplest, the energy of motion and force. Whenever something moves — a spinning wheel, a rotating motor shaft, flowing water, or even the turning of a hand crank — mechanical energy is present. It is tangible and often visible. You can see a turbine spinning, feel the vibration of a running engine, or hear the steady hum of a motor at work. Electrical energy, on the other hand, is less obvious. It travels silently through wires as moving electrons, powering lights, appliances, and tools without drawing much attention to itself.
The fascinating part is how one becomes the other. Generators do not create electricity out of thin air; they convert mechanical motion into electrical current through electromagnetic interaction. When a conductor such as copper wire moves within a magnetic field, electrons begin to flow. That flow is what we recognize as electricity. Remove the motion, and the current stops immediately. This direct dependence highlights an essential truth: electrical output always reflects the mechanical input driving the system.
A helpful way to picture this is to imagine drawing water from a well using a manual pump. The harder and faster you pump, the more water flows. Slow down, and the output decreases. Stop completely, and nothing comes out. The effort you provide determines the result. Electricity generation follows the same logic — the strength, speed, and consistency of the mechanical force directly influence how much electrical energy is produced.
This relationship also explains why generators require a reliable driving source. In large power plants, mechanical energy may come from steam turbines, falling water, or wind. In smaller DIY systems, an electric motor or fuel-powered engine often provides the rotation needed to spin an alternator. Regardless of scale, the principle never changes: motion is the bridge that transforms physical effort into usable power.
However, there is another important detail many beginners overlook — efficiency. No machine is perfect, and some energy is always lost during conversion. Friction between moving parts generates heat, electrical resistance wastes a small portion of the current, and vibrations consume additional energy. Because of these natural losses, the electrical energy produced will always be slightly less than the mechanical energy supplied. This is not a flaw but a universal characteristic of energy systems.
Recognizing this balance helps set realistic expectations and encourages smarter design choices. When builders focus on smooth rotation, proper alignment, and quality components, they reduce unnecessary losses and improve overall performance. Even small improvements in efficiency can make a noticeable difference in how stable and effective a generator feels during operation.
Perhaps the most valuable takeaway from understanding mechanical versus electrical energy is the sense of awareness it brings. Electricity stops feeling like an unlimited resource and instead becomes something earned through motion and engineering. You begin to appreciate the work behind every powered device and understand why thoughtful energy use matters.
In the end, the partnership between mechanical and electrical energy is what makes modern life possible. From massive generators lighting entire cities to compact systems powering a small workshop, the process is built on the same elegant exchange — movement becoming electricity, effort turning into capability. Once you grasp that connection, electricity is no longer a mystery but a remarkable demonstration of physics in motion.
How a Car Alternator Produces Power
If you have ever looked under the hood of a running car, you may have noticed that despite powering headlights, dashboard electronics, charging ports, sensors, and entertainment systems, the battery alone is not doing all the work. In fact, if a vehicle relied only on its battery, it would drain quickly and leave you stranded. The real hero quietly working behind the scenes is the alternator — a compact yet powerful machine designed to generate electricity continuously while the engine runs. Understanding how a car alternator produces power is not only fascinating but also incredibly useful, especially if you are planning to adapt one for a generator project.
At first glance, an alternator might look like just another metal component with a pulley attached, but inside it is a carefully engineered system built on one of the most important discoveries in electrical science. Its job is simple in concept: convert mechanical motion into electrical energy. Yet the way it accomplishes this task is a beautiful example of physics and engineering working together.
Basic Working Principle
The alternator begins its work the moment the engine starts. A belt connected to the engine’s crankshaft spins the alternator pulley, which rotates an internal component known as the rotor. This rotation is the foundation of the entire power-generation process. Without motion, nothing happens — but once the rotor begins spinning, the alternator comes alive.
Inside the alternator, surrounding the rotor, is another critical component called the stator. While the rotor spins, the stator remains stationary and contains coils of copper wire. These coils are precisely arranged to capture the electrical energy that will soon be produced.
Here is where the transformation begins. As the rotor turns, it creates a moving magnetic field around the stator windings. This changing magnetic environment causes electrons inside the copper wire to start flowing. That flow of electrons is electricity.
However, the electricity produced at this stage is alternating current (AC), meaning the direction of electron flow switches back and forth rapidly. Since most automotive systems require direct current (DC), the alternator includes a set of diodes that convert AC into DC before sending it to charge the battery and power the vehicle’s electrical components.
Another important piece of the puzzle is the voltage regulator. Without regulation, the alternator could produce too much voltage at higher speeds, potentially damaging electronics. The regulator monitors the output and adjusts the magnetic field strength to maintain a stable voltage, typically around 12 to 14 volts in standard vehicles.
What makes this system remarkable is its ability to respond instantly to demand. Turn on the headlights, and the alternator increases output. Switch on the air conditioning, and it works harder still. It is constantly balancing production with consumption, ensuring the battery stays charged while all electrical systems operate smoothly.
When you think about adapting an alternator for a generator, the principle remains exactly the same. Instead of an engine spinning the pulley, you use another mechanical source — such as a motor — to provide the rotation. The alternator does not care where the motion comes from; it simply converts that motion into electricity.
Role of Electromagnetic Induction
At the heart of the alternator’s operation lies electromagnetic induction, the scientific principle that makes modern electricity generation possible. Although the term might sound technical, the idea is surprisingly approachable once you picture what is happening.
Imagine waving a magnet back and forth near a loop of copper wire. Even without touching the wire, that moving magnetic field encourages electrons inside the metal to start moving. Now imagine repeating that motion thousands of times per minute with perfect consistency — this is essentially what an alternator does.
The rotor acts like a rotating magnet. In many alternators, an electric current is first sent into the rotor to create a magnetic field. As the rotor spins, this magnetic field moves past the stator coils again and again. Each pass nudges electrons forward, generating electrical current.
What is especially important here is change. A stationary magnetic field does nothing on its own; it is the movement — the constant shifting — that creates electricity. This is why rotation is so critical. No motion means no changing magnetic field, and without that change, there is no power.
This principle scales beautifully. The same concept powering a small car alternator is used in massive generators capable of supplying electricity to entire cities. Whether large or small, the underlying physics never changes.
Recognizing this helps eliminate one of the biggest misconceptions about electricity generation: the idea that machines somehow “make” energy. In reality, they are converting it. Mechanical effort becomes electrical output through the predictable behavior of magnetic fields and electrons.
There is also something elegantly efficient about electromagnetic induction. There is no need for physical contact between moving parts to transfer energy into the wire — magnetism does the work silently and reliably. This reduces wear and allows alternators to operate for thousands of hours with minimal maintenance.
For a DIY builder, understanding induction builds confidence. Instead of seeing the alternator as a mysterious sealed device, you begin to understand the invisible forces at play inside it.
Why RPM Matters
If electromagnetic induction is the heart of an alternator, rotational speed — usually measured in revolutions per minute, or RPM — is what determines how strongly that heart beats.
Simply put, faster rotation produces a more rapidly changing magnetic field. A faster-changing field pushes electrons with greater energy, which increases voltage and overall electrical output. Slow the rotor down, and output drops. Stop it entirely, and generation ends instantly.
This is why vehicles are designed with pulley ratios that allow the alternator to spin much faster than the engine at idle. Even when your car is barely moving, the alternator is already rotating quickly enough to keep electricity flowing.
For generator projects, RPM becomes one of the most important design considerations. Many automotive alternators are built to operate efficiently within a certain speed range — often between about 2,000 and 6,000 RPM. Operating below this range may result in weak output, while pushing far beyond it can cause overheating and premature wear.
That is why pulley sizing matters so much. By adjusting the ratio between the driving motor pulley and the alternator pulley, you can control how fast the alternator spins without overworking the motor. A properly chosen ratio allows the system to reach optimal speed smoothly and safely.
Consistency is just as important as speed. Sudden fluctuations in RPM can lead to unstable voltage, which is not ideal for powering equipment. A steady rotational force produces cleaner, more reliable electricity and reduces stress on internal components.
It is also worth noting that higher RPM does not automatically mean better performance. Efficiency, cooling, and mechanical limits all play a role. The goal is not maximum speed but balanced operation — fast enough to generate strong output while maintaining long-term durability.
Once you understand the importance of RPM, you start seeing the alternator less as a simple part and more as a precision machine that thrives under the right conditions.
Bringing It All Together
When you step back and look at the entire process, the alternator becomes a perfect example of energy conversion in action. Mechanical rotation creates a moving magnetic field. Electromagnetic induction sets electrons in motion. Diodes shape the current into usable form. The voltage regulator keeps everything stable. And RPM determines how effectively it all happens.
What makes this especially inspiring is how approachable the technology is. The same device that keeps a car running can become the centerpiece of a DIY generator. Once you provide the rotation it needs, it will faithfully produce electricity using principles that scientists discovered nearly two centuries ago.
Understanding how a car alternator produces power does more than prepare you for a project — it changes how you view electricity itself. Instead of something distant and automatic, it becomes the result of motion, magnetism, and thoughtful engineering working together.
And perhaps the most exciting realization is this: when you spin an alternator and watch voltage appear on a meter, you are not just observing science — you are actively participating in it.
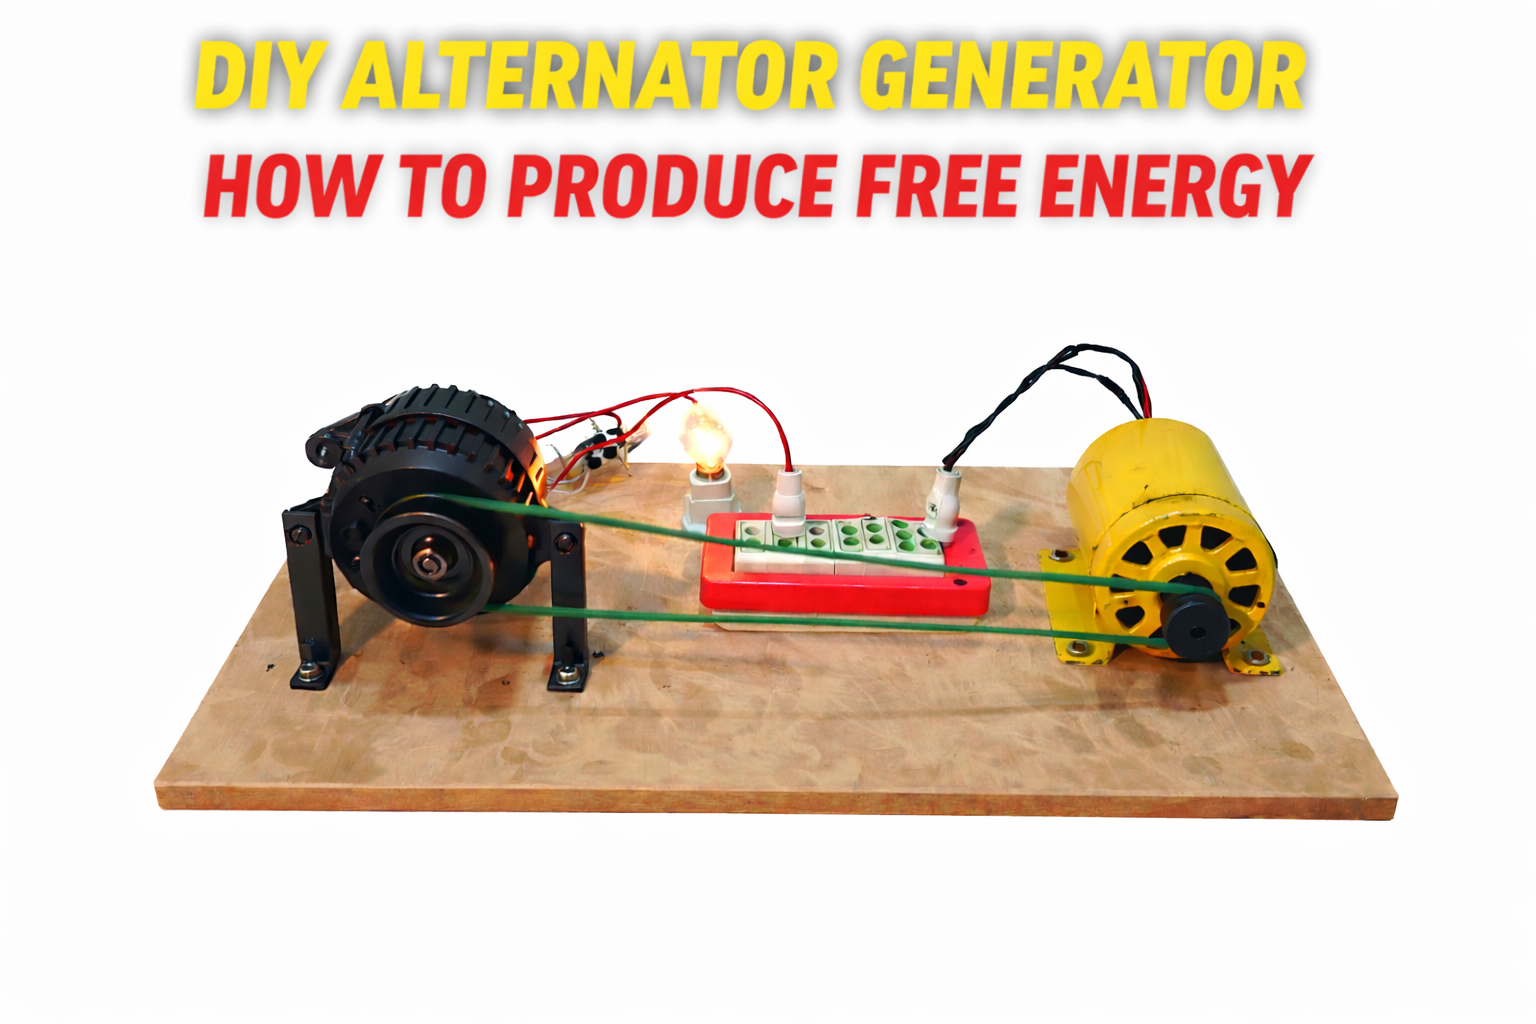
How the Alternator and Motor Work Together
Have you ever watched two perfectly synchronized gears turning together and wondered how something so mechanical could produce something as invisible and powerful as electricity? At first glance, pairing a motor with an alternator might seem like connecting two ordinary machines. But when these devices begin working in harmony, they form a complete energy conversion system — one that transforms motion into usable electrical power. Understanding how the alternator and motor work together is the key to seeing the bigger picture behind generator setups. Once you grasp this relationship, the entire process stops feeling complicated and starts feeling logical.
Think of the motor as the driving force — the muscle of the system — while the alternator acts as the translator, converting physical rotation into electrical energy. Neither device can accomplish the goal alone. A motor can spin endlessly, but without a generator, that motion does not become electricity. Likewise, an alternator has the ability to produce power, but it is completely dependent on rotational movement. It is the partnership between the two that makes electricity generation possible.
When the system starts, the motor is the first component to come alive. Drawing energy from its power source, it converts electrical energy into mechanical motion by spinning its shaft. This rotation is smooth, controlled, and designed to deliver consistent torque — exactly what the alternator needs to operate effectively.
Attached to the motor shaft is typically a pulley connected by a belt to the alternator pulley. As the motor spins, the belt transfers that motion directly to the alternator. Within seconds, the alternator rotor begins turning inside its housing, creating the changing magnetic field required for electromagnetic induction. Electrons start flowing through the stator windings, and electricity is born.
What makes this interaction so fascinating is how seamless it is. There is no dramatic moment where electricity suddenly appears; instead, it is the natural result of motion being converted step by step. Energy flows into the motor, becomes mechanical rotation, travels through the belt system, spins the alternator, and emerges as electrical output. It is a continuous chain where every link matters.
Power Flow Explained
To truly understand this system, it helps to visualize the journey energy takes from beginning to end. Power flow is not random — it follows a clear path, and recognizing that path makes troubleshooting, improving efficiency, and designing your setup much easier.
The process begins with the input energy source that runs the motor. Depending on the design, this could come from grid electricity, a battery bank, solar storage, or even another generator. Regardless of the source, the motor receives electrical power and immediately converts it into rotational force.
This is the first major transformation:
Electrical Energy → Mechanical Energy
As the motor shaft rotates, torque is delivered through the pulley and belt arrangement. Belt tension must be properly adjusted here — too loose, and energy is lost through slipping; too tight, and unnecessary strain is placed on the bearings. When balanced correctly, the transfer of motion is highly efficient.
Now the alternator takes over.
The spinning rotor generates a moving magnetic field inside the stator coils, triggering electromagnetic induction. Electrons begin moving through the copper windings, producing alternating current. That AC is then routed through diodes, which convert it into direct current suitable for charging batteries or feeding into an inverter.
This marks the second transformation:
Mechanical Energy → Electrical Energy
If your goal is household-style voltage, the electricity typically passes through an inverter next. The inverter converts low-voltage DC into higher-voltage AC, such as 220V, making it usable for appliances and tools.
So the complete power journey looks like this:
Input Power → Motor → Rotation → Alternator → Electrical Output → Inverter → Usable Electricity
Seeing the flow laid out this way reveals an important truth: every stage introduces small energy losses. Heat, friction, electrical resistance, and magnetic inefficiencies all consume a portion of the input energy. This is why no generator system can produce more energy than it receives. Instead, the objective is to minimize losses and maximize efficiency.
Another interesting aspect of power flow is responsiveness. When electrical demand increases — for example, when you connect additional devices — the alternator requires more torque to maintain voltage. The motor must then work harder to supply that torque. This dynamic balance is happening constantly, even if you cannot see it.
In well-designed systems, this relationship feels almost effortless. Voltage remains stable, the motor sound stays consistent, and the entire setup operates with a reassuring sense of control.
Diagram Overview (Recommended)
While words can paint a clear picture, a simple diagram often makes the system instantly understandable. Even if you are not looking at one right now, imagine the layout from left to right.
Start with the motor. It sits firmly mounted on a base frame to prevent vibration. Its shaft extends outward, fitted with a pulley.
Next comes the belt — a seemingly modest component but one that plays a crucial role. It forms the mechanical bridge between the motor and alternator, transferring rotational energy with every spin.
On the other end sits the alternator, aligned carefully so the belt tracks straight without wobbling. Inside, the rotor spins while the stator captures the generated electricity.
From the alternator, wires lead outward to the electrical side of the system. Depending on the setup, they may connect first to a battery for stabilization, then to a voltage regulator, and finally to an inverter that transforms the output into usable AC power.
If you were to sketch it, the diagram would look something like this:
Power Source → Motor → Pulley → Belt → Alternator → Battery (optional) → Inverter → Electrical Loads
This straightforward visual helps highlight something many beginners overlook — electricity generation is not about a single device but about cooperation between multiple components. Remove one element, and the chain breaks.
Diagrams also reinforce the importance of spacing and alignment. Components should not be crowded together, and airflow should be considered to prevent overheating. A thoughtful layout improves both safety and longevity.
The Importance of Balance
For the motor and alternator to work together effectively, balance is everything. Misalignment can cause vibration, which leads to mechanical wear. Incorrect pulley ratios can spin the alternator too slowly — producing weak output — or too fast, risking damage.
Consistency in rotational speed is equally critical. Smooth motion produces stable voltage, while fluctuations can result in inconsistent power delivery. This is why sturdy mounting frames and quality hardware are not optional; they are foundational to the system’s success.
Cooling is another factor that deserves attention. Both motors and alternators generate heat during operation. Adequate ventilation ensures they remain within safe temperature ranges, preserving efficiency and extending service life.
A System Built on Cooperation
Perhaps the most valuable insight you gain from understanding this partnership is that electricity generation is never the result of a single heroic component. It is always about cooperation — energy moving from one stage to the next in a carefully orchestrated sequence.
The motor does not compete with the alternator; it empowers it. The alternator does not create energy independently; it transforms what it receives. Together, they form a reliable cycle grounded in the laws of physics.
And there is something deeply satisfying about watching this cooperation in action. The motor hums steadily, the belt glides in a continuous loop, and the alternator quietly produces power. What began as separate pieces of equipment becomes a unified system capable of supporting real electrical needs.
Seeing the Bigger Picture
Once you understand how the alternator and motor work together, you begin to see generators everywhere with new awareness. Large power plants, portable generators, wind turbines — they all rely on the same fundamental partnership between motion and conversion.
More importantly, you stop viewing electricity as something mysterious. Instead, it becomes the predictable outcome of energy flowing through a well-designed path.
And perhaps that is the most exciting realization of all: when these machines spin in harmony, you are witnessing physics transformed into practical capability — motion becoming power, and engineering turning effort into electricity you can actually use.
Tools and Materials Required
Before any successful build begins, there is a moment of preparation that often determines the outcome long before the first bolt is tightened or the first wire is connected. Imagine starting a project only to realize halfway through that a critical component is missing or that a tool is not strong enough for the job. Frustration builds, progress slows, and what should have been an exciting hands-on experience turns into a series of unnecessary delays. That is why understanding the tools and materials required is not just a preliminary step — it is the foundation of a smooth, safe, and efficient generator build.
When constructing a system that combines a motor and an alternator, every component plays a role in the overall performance. Some parts provide the mechanical strength needed to keep everything aligned, while others ensure the electrical output remains stable and usable. Choosing reliable materials from the start saves time, reduces maintenance, and helps your generator operate with confidence rather than unpredictability.
Let’s begin with the main components — the essential pieces without which the system simply cannot function.
The heart of your setup is the car alternator. This is the device responsible for transforming mechanical rotation into electrical power. Automotive alternators are designed for durability, often capable of running for thousands of hours under demanding conditions. Their built-in voltage regulation and efficient design make them ideal for DIY generator projects. When selecting one, it is wise to avoid extremely old or worn units. A reconditioned or low-mileage alternator often delivers better reliability and reduces the chance of early failure.
Next comes the AC motor, the driving force behind the entire operation. If the alternator is the heart, the motor is the muscle. Its job is to provide steady rotational energy — not erratic bursts of speed, but smooth and consistent motion. Stability here directly affects the quality of the electricity produced. A motor that struggles under load can lead to fluctuating voltage, overheating, and mechanical strain.
Equally important is the mounting frame. While it might not seem as exciting as spinning machinery, the frame is what keeps everything secure and properly aligned. Even slight movement during operation can create vibration, which leads to noise, belt wear, and long-term mechanical damage. A solid steel frame or a thick, reinforced metal base is strongly recommended. Some builders underestimate this part, only to discover later that stability is what separates a professional-feeling setup from a temporary experiment.
Connecting the motor to the alternator requires a pulley and belt system. This is where mechanical energy is transferred, so quality matters. A properly tensioned belt allows efficient motion without slipping, while well-machined pulleys help maintain consistent speed. The ratio between pulley sizes also determines alternator RPM, making this component more influential than many beginners realize.
You will also need a battery, even if your long-term goal is direct power usage. Many alternators require an initial electrical charge — known as excitation — to begin generating power. Beyond startup, a battery helps stabilize voltage and acts as a buffer when electrical demand suddenly increases. Think of it as a shock absorber for your system.
To convert the alternator’s output into household-friendly electricity, an inverter becomes essential. Alternators typically produce low-voltage DC after rectification, while most homes operate on higher-voltage AC. A quality inverter bridges this gap, transforming raw electrical output into usable power for lights, tools, and small appliances.
Do not overlook wiring and connectors, either. Thick, properly insulated cables reduce resistance and heat buildup while improving efficiency. Undersized wires are a common mistake and can become dangerous under load. Investing in good electrical connections is really an investment in safety.
Finally, basic tools such as wrenches, socket sets, screwdrivers, a drill, and a multimeter will make assembly and testing far easier. A multimeter, in particular, is invaluable — it allows you to monitor voltage, diagnose problems, and confirm that your system is behaving as expected.
Now that you know the essential parts, it is helpful to consider recommended specifications. These guidelines are not rigid rules but rather proven ranges that tend to deliver reliable results.
For the alternator, many builders prefer units rated between roughly 70 and 120 amps. This range offers a practical balance between output capability and mechanical demand. Extremely high-amp alternators can require significantly more torque, placing additional strain on the motor.
When choosing a motor, something in the range of 1 to 3 horsepower often provides enough strength for small to medium generator setups. The goal is not brute force but steady performance. Motors that can maintain consistent speed under load tend to produce cleaner, more stable electrical output.
Pulley ratios deserve careful thought as well. Alternators typically perform best when spinning faster than the driving motor. A ratio that increases alternator speed — often around 2:1 or 3:1 — helps the unit reach its optimal operating range without forcing the motor to work excessively hard.
Battery capacity should match your intended usage. A moderately sized deep-cycle battery is often a smart choice because it is built for repeated charging and discharging. Unlike standard automotive batteries, deep-cycle models handle sustained energy flow more gracefully.
For the inverter, it is wise to choose a unit with a capacity comfortably above your expected load. Running an inverter at its absolute limit can shorten its lifespan and reduce efficiency. A little overhead goes a long way toward reliability.
Once the core system is in place, you might begin thinking about optional upgrades — enhancements that are not strictly required but can significantly improve performance and user experience.
One of the most valuable upgrades is an automatic voltage regulator if your alternator does not already include a robust one. Stable voltage protects connected devices and makes the entire system feel more refined.
Improved cooling solutions are another worthwhile investment. Both motors and alternators generate heat during operation, and excessive temperatures can shorten component life. Adding ventilation fans or ensuring generous airflow helps maintain safe operating conditions.
Some builders choose to install a belt tensioner, which keeps the belt at an ideal tightness even as it naturally stretches over time. This small addition can reduce maintenance and improve energy transfer.
Upgrading to high-quality bearings or vibration-dampening mounts can also make a noticeable difference. A quieter, smoother-running generator is not only more pleasant to operate but often more efficient as well.
For those interested in monitoring performance closely, installing digital meters for voltage, current, and frequency provides real-time insight into how the system is behaving. Knowledge like this allows you to adjust loads intelligently and spot issues before they escalate.
You might even consider weatherproofing if the generator will operate in a garage or outdoor workspace. Protective covers and moisture-resistant connections help guard against environmental wear.
What becomes clear through all of this is that a generator is more than the sum of its parts. It is a carefully balanced system where each component supports the others. Choosing dependable materials, following sensible specifications, and considering thoughtful upgrades transforms the project from a simple mechanical exercise into a reliable source of electricity.
Preparation may not carry the same excitement as flipping the switch for the first time, but it is what makes that moment possible. When your tools are ready and your materials are chosen with care, the entire build feels less like guesswork and more like craftsmanship. And in the world of DIY power generation, that preparation is often what separates a temporary setup from a machine you can trust.
Understanding Power Output
One of the first questions that comes to mind when building any generator is simple yet incredibly important: How much power will it actually produce? It is an exciting moment to imagine your system running smoothly, lights glowing, tools humming, and electricity flowing from a machine you assembled with your own hands. But alongside that excitement should come a clear understanding of power output — because knowing what your generator can realistically deliver is what turns a hopeful experiment into a dependable energy solution.
Power output is more than just a number printed on a device label. It represents the balance between mechanical input, electrical conversion, and system efficiency. When you understand how voltage and wattage work together — and what influences them — you gain the ability to design smarter, operate safer, and avoid the disappointment that often comes from unrealistic expectations.
Expected Voltage and Wattage
Let’s begin with voltage, since it is often the most recognizable figure in a generator setup. Voltage can be thought of as the pressure that pushes electrical current through wires. In many DIY alternator systems, the raw output typically starts around 12 to 14 volts DC after regulation, because automotive alternators are originally designed to charge vehicle batteries within that range.
However, most homes operate on much higher voltage, such as 220V AC in many parts of the world. This is why an inverter plays such an important role. It takes the lower-voltage DC electricity produced by the alternator and steps it up into usable household power. When properly configured, the system can run lights, fans, chargers, and certain tools — but the key is understanding the wattage available.
Wattage is the true measure of usable power. It tells you how much work your generator can perform at any given moment. Think of voltage as the pressure in a water pipe and wattage as the total amount of water flowing. You need both pressure and flow for a system to be effective.
A modest alternator-driven generator might realistically provide anywhere from about 500 watts to 1,500 watts, depending on the motor strength, alternator rating, and system design. Stronger motors paired with higher-capacity alternators can push beyond that range, but doing so requires careful planning to prevent overheating or mechanical strain.
It is also helpful to think in terms of practical usage rather than abstract numbers. For example, LED lighting consumes relatively little power, often under 20 watts per bulb. A fan might require 50 to 100 watts. Phone and laptop chargers are typically modest as well. But appliances with heating elements or compressors — such as kettles, refrigerators, or air conditioners — demand far more electricity and can quickly exceed the comfortable limits of a small generator.
Understanding this difference helps you prioritize loads wisely. Instead of expecting your system to power everything at once, you begin to see it as a strategic resource — ideal for essential devices and backup situations.
Factors That Affect Performance
Power output is never determined by a single component. It is the result of multiple variables working together, and even small changes can influence overall performance.
One of the biggest factors is rotational speed. Alternators are designed to operate within specific RPM ranges, and reaching that optimal speed is critical for strong electrical generation. Too slow, and voltage drops. Too fast, and you risk excessive heat and wear. Achieving steady, consistent rotation is often more valuable than chasing maximum speed.
Another major influence is the strength of the driving motor. If the motor cannot maintain speed under load, the alternator’s output will fluctuate. This is why choosing a motor with sufficient horsepower is not about excess — it is about stability. A motor that operates comfortably within its limits tends to last longer and produce smoother power.
Pulley ratios also deserve attention. By adjusting the size relationship between the motor pulley and the alternator pulley, you control how fast the alternator spins relative to the motor. A well-chosen ratio allows the alternator to reach its productive range without forcing the motor into constant strain.
Then there is electrical resistance, an often invisible but very real factor. Every wire introduces a small amount of resistance, which converts some energy into heat. Using thick, high-quality cables minimizes these losses and improves efficiency.
Temperature plays a role as well. Machines naturally generate heat during operation, and excessive temperatures can reduce electrical performance while accelerating wear. Proper ventilation helps maintain output and protects your investment.
Even mechanical alignment matters more than many beginners realize. Misaligned pulleys or loose mounting frames create vibration, and vibration wastes energy. Smooth, balanced motion translates directly into better electrical generation.
Finally, the type of load connected to your generator affects performance. Devices with sudden startup demands — such as motors or compressors — can momentarily pull more power than their rated wattage. Planning for these surges prevents unexpected shutdowns.
Efficiency Explained
No generator is perfectly efficient, and understanding why is one of the most important lessons in power generation. Every time energy changes form, a portion is lost — usually as heat, friction, or electromagnetic resistance.
Picture pushing a heavy box across a floor. Some of your effort moves the box forward, but some is lost to friction between the surfaces. Electrical systems behave in a similar way. When your motor converts electrical energy into mechanical motion, a fraction is lost as heat. When the alternator converts that motion back into electricity, more energy slips away. By the time power reaches your devices, the total output is always slightly less than what you started with.
This is not a flaw; it is simply the reality of physics.
What you can control is how much energy is lost. High-quality components, proper alignment, good cooling, and sensible load management all help improve efficiency. Even small upgrades — such as better bearings or heavier cables — can produce noticeable gains over time.
It is also worth recognizing that efficiency is not just about maximizing numbers; it is about creating a system that operates reliably without excessive stress. A generator running comfortably at 70–80% of its capacity will usually outlast one pushed to its limits.
Perhaps the greatest benefit of understanding efficiency is the mindset it creates. Instead of asking, “How much power can I squeeze out of this machine?” you begin asking, “How smoothly can this system run?” That shift leads to smarter decisions and longer equipment life.
Seeing Power with New Awareness
Once you truly understand power output, something interesting happens — electricity stops feeling unlimited. You become more aware of what each device demands and more intentional about how energy is used. This awareness often leads to better planning, whether you are preparing for outages, running a workshop, or simply experimenting with DIY generation.
In the end, understanding voltage, wattage, performance factors, and efficiency gives you more than technical knowledge. It gives you confidence. Instead of guessing what your generator can handle, you operate with clarity.
And when your system runs steadily, delivering the power you expected, you realize that the real success was never about chasing the biggest number — it was about building a generator that performs exactly as it should.
Pulley Ratio and Speed Calculation
At first glance, pulleys might seem like simple mechanical parts — just round wheels connected by a belt. They rarely get the same attention as motors or alternators, yet they quietly control one of the most important aspects of generator performance: speed. If the pulley ratio is wrong, even the most powerful motor and highest-quality alternator can struggle to produce usable electricity. But when the ratio is carefully chosen, the entire system feels smoother, stronger, and far more reliable. Understanding pulley ratio and speed calculation is not just a technical detail; it is the difference between a generator that merely spins and one that truly performs.
Imagine riding a bicycle with gears. When you shift into a lower gear, pedaling becomes easier but slower. Shift into a higher gear, and each pedal stroke moves you farther — but it requires more effort. Pulleys work on exactly the same principle. By adjusting the size relationship between the motor pulley and the alternator pulley, you control how fast the alternator spins relative to the motor. This relationship directly determines how much electricity your system can generate.
Pulley Ratio and Speed Calculation
Let’s start with the basic idea. Pulley ratio refers to the comparison between the diameter of the driving pulley (attached to the motor) and the driven pulley (attached to the alternator). The calculation itself is surprisingly straightforward:
Alternator RPM = Motor Pulley Diameter ÷ Alternator Pulley Diameter × Motor RPM
This formula tells you how rotational speed is transferred — and often increased — as motion travels through the belt.
For example, suppose your motor runs at 1,500 RPM. If you install a 6-inch pulley on the motor and a 2-inch pulley on the alternator, the ratio becomes 3:1. That means the alternator spins three times for every single motor rotation:
1,500 × 3 = 4,500 RPM
Suddenly, a moderate motor speed becomes ideal alternator speed. This is why pulley sizing is so powerful — it allows you to multiply rotational velocity without demanding unrealistic performance from the motor.
However, speed multiplication is not free. Increasing alternator RPM requires more torque from the motor. If the motor is undersized, it may struggle under load, causing voltage drops and overheating. The goal is always balance: enough speed for strong output, but not so much strain that the system becomes inefficient or unstable.
Another important detail is belt contact. Larger pulleys generally provide better belt grip, reducing the chance of slipping under heavy load. Slippage wastes energy and creates heat, both of which lower overall efficiency. A well-matched pulley system transfers motion smoothly and quietly — something you will appreciate every time the generator runs.
Choosing the Correct Pulley Size
Selecting the right pulley sizes begins with understanding your motor’s operating speed. Most AC motors run at standardized speeds such as 1,500 RPM or 3,000 RPM (depending on frequency and design). Once you know this number, you can work backward to determine what alternator speed you need.
The key question becomes: how fast should the alternator spin to generate reliable power?
Automotive alternators are designed to operate efficiently at relatively high speeds compared to many motors. In vehicles, engine pulley systems often spin alternators faster than the engine itself, especially at idle. Your DIY setup should aim for a similar strategy.
For many builds, a ratio between 2:1 and 3:1 offers an excellent starting point. This allows the alternator to reach productive RPM without forcing the motor into constant heavy effort.
Here is a simple way to think about it:
If your motor runs at 1,500 RPM, aim for an alternator speed between roughly 3,000 and 5,000 RPM.
If your motor runs at 3,000 RPM, you may only need a modest ratio — sometimes even close to 1:1 — depending on your alternator’s design.
Pulley diameter also affects mechanical behavior. Extremely small pulleys can reduce belt contact area, increasing the chance of slip. Extremely large pulleys add rotational mass, which may slow startup and strain bearings. Moderation is your ally here.
Material quality matters too. Steel or high-grade alloy pulleys tend to maintain alignment better than lightweight stamped versions. Precision machining helps prevent wobble, and wobble is the enemy of efficiency.
Another tip many experienced builders follow is to allow some adjustment room. Mounting the motor on sliding rails or an adjustable plate makes it easier to fine-tune belt tension later. Over time, belts stretch slightly, and having adjustability prevents unnecessary frustration.
Ideal Alternator RPM
So what exactly counts as the “ideal” speed?
Most automotive alternators begin generating noticeable charging voltage somewhere above 1,500–2,000 RPM, but they truly perform best at higher speeds — often between 4,000 and 6,000 RPM. Within this range, voltage stabilizes more easily, and the alternator can respond better to changing electrical loads.
That said, faster is not always better.
Push the alternator too hard — say beyond 8,000 RPM — and several risks emerge. Bearings experience more stress, internal temperatures climb, and long-term durability declines. Efficiency may even drop as friction increases.
Think of it like jogging versus sprinting. A steady jog can be maintained for a long time, but an all-out sprint quickly leads to exhaustion. Your alternator prefers the mechanical equivalent of a comfortable jog.
Consistency is just as important as peak speed. A stable 4,500 RPM is far more useful than a system fluctuating wildly between 2,000 and 6,000 RPM. Smooth rotation produces cleaner electrical output and reduces wear across the entire setup.
Cooling should also be considered when targeting higher RPM. Faster spinning generates more heat, so good airflow around the alternator is essential. Many alternators include internal fans, but they still benefit from open space and ventilation.
When you hit that sweet spot — strong RPM without excessive strain — the generator begins to feel effortless. Voltage stabilizes, the motor hums evenly, and the entire machine operates with quiet confidence.
Common Ratio Mistakes
Even experienced builders occasionally underestimate how influential pulley ratios can be. Avoiding a few common mistakes can save you hours of troubleshooting.
One frequent error is choosing too small a ratio. If the alternator spins too slowly, it may never reach proper charging voltage. The system appears functional — everything turns — but the electrical output remains weak. Builders sometimes misinterpret this as a wiring problem when the real issue is simply insufficient speed.
On the opposite end is the temptation to chase extreme RPM. Installing a tiny alternator pulley to maximize speed might seem clever at first, but it often backfires. The motor strains, belts wear rapidly, and mechanical noise increases. Over time, this approach shortens component life.
Another overlooked mistake is ignoring motor capability. Speed multiplication increases torque demand. If the motor cannot supply that torque comfortably, it will overheat or slow down under load — both bad outcomes for power generation.
Misalignment is another silent troublemaker. Even a slight angle between pulleys can cause belts to track improperly, leading to vibration and premature wear. Taking extra time during installation to ensure perfect alignment pays enormous dividends later.
Some builders also forget to recheck belt tension after the first few hours of operation. New belts naturally stretch, and a loose belt reduces efficiency while increasing heat.
Finally, there is the mistake of focusing only on speed while ignoring the system as a whole. Generators are ecosystems — motor strength, alternator capacity, wiring quality, and cooling all interact. The pulley ratio should complement these elements, not fight against them.
Bringing Balance to Your System
When you step back, pulley ratio is really about harmony. It is the mechanical translator that ensures the motor and alternator speak the same language. Too much emphasis on speed creates strain; too little leaves potential untapped.
The best setups are rarely the most extreme — they are the most balanced.
Take the time to calculate, measure, and align everything carefully. Listen to how the system sounds during operation. A smooth generator often announces itself with a steady, reassuring hum rather than rattles or squeals.
And perhaps the most satisfying moment comes when you realize that something as humble as a pair of pulleys helped unlock the full potential of your machine. What once looked like simple hardware becomes a symbol of thoughtful engineering — proof that in power generation, even the smallest details can make the biggest difference.
Step-by-Step Build Guide
There is a unique kind of satisfaction that comes from building a machine with your own hands — especially one that produces something as essential as electricity. What begins as a collection of metal parts, wires, and tools gradually transforms into a working system capable of delivering real power. But the difference between a generator that runs smoothly and one that constantly causes problems often comes down to how carefully it is assembled. A step-by-step approach removes guesswork, improves safety, and ensures every component works in harmony from the very beginning.
Think of this build as more than just mechanical assembly. You are creating a balanced energy system where motion becomes electricity. Each step builds on the previous one, so patience and precision will reward you with a generator that feels dependable rather than experimental.
Let’s begin where every strong machine starts — with the foundation.
Step 1: Preparing the Base Frame
Before mounting a single component, you need a solid structure capable of supporting weight, absorbing vibration, and maintaining alignment. The base frame is not just a platform; it is the backbone of your entire generator.
Choose a material that resists flexing. Steel frames are ideal, but a thick metal plate or reinforced channel structure can also work well. Avoid lightweight materials that may warp over time, because even small shifts can misalign pulleys and strain bearings.
Place the frame on a level surface and check it carefully. A generator that sits unevenly can develop vibration issues that grow worse during operation. If necessary, use rubber feet or anti-vibration pads to stabilize the frame while also reducing noise.
Spacing is another detail worth planning early. Leave enough room between the motor and alternator for belt adjustment, airflow, and future maintenance. Crowding components might save space initially, but it makes repairs far more difficult later.
Once the frame is ready, take a moment to visualize the entire layout. Imagine how the belt will travel, where the wires will run, and how airflow will cool the system. A few minutes of planning here prevents hours of correction later.
With a strong foundation in place, you are ready to install the muscle of the system.
Step 2: Mounting the Motor
The motor is responsible for generating the rotational force that drives everything else, so it must be mounted securely. Position it on the frame and mark the bolt locations carefully before drilling.
If possible, use slotted mounting rails or an adjustable plate. This allows you to slide the motor slightly forward or backward when setting belt tension — a small feature that makes a big difference during installation.
When tightening bolts, aim for firm and even pressure. Over-tightening can distort mounting brackets, while loose bolts invite vibration. Once secured, try gently rocking the motor by hand. It should feel completely stable.
Pay attention to shaft orientation as well. The motor shaft should point directly toward where the alternator will sit. This alignment will simplify pulley installation and reduce the chance of belt tracking issues.
It is also wise to think about ventilation at this stage. Motors generate heat, and giving them breathing room improves efficiency and lifespan. Avoid placing the motor flush against walls or barriers that trap warm air.
Now that the driving force is anchored, it is time to install the component that will convert motion into electricity.
Step 3: Installing the Alternator
Position the alternator so its pulley lines up naturally with the motor shaft. Just like the motor, it must be firmly mounted to prevent movement during operation.
Many builders fabricate a simple bracket to hold the alternator in place. The key goal is rigidity — the alternator should not shift even slightly once the belt is under tension.
Check that the alternator sits at the same height as the motor pulley. Even minor vertical differences can cause belts to wear unevenly. A straightedge or ruler can help confirm alignment before tightening everything down.
As you secure the alternator, remember that accessibility matters. Leave room to reach electrical terminals and adjustment points. Future you will appreciate this thoughtful spacing when performing maintenance.
At this point, your system is starting to look like a real machine. But one critical step remains before electricity can flow: connecting the rotational path.
Step 4: Aligning the Pulleys
Pulley alignment is where precision truly matters. A misaligned belt might still spin, but it will waste energy, create noise, and shorten component life.
Hold a straightedge across both pulley faces. They should form a perfectly straight line. If they do not, adjust the alternator or motor position until they do.
Next comes belt tension. The belt should feel snug but not overly tight. A good rule of thumb is that it should flex slightly under firm finger pressure. Too tight, and you risk damaging bearings. Too loose, and slipping will steal valuable energy.
Once installed, rotate the system manually if possible. Watch how the belt tracks along the pulleys. It should glide smoothly without drifting sideways.
When pulleys are aligned correctly, the entire generator tends to run quieter and more efficiently — a small detail with a big payoff.
Now we move from mechanical assembly into the electrical side of the build.
Step 5: Wiring the DIY Alternator Generator
Wiring may seem intimidating at first, but careful organization makes it manageable. Start by identifying the alternator terminals — typically the output terminal, ground, and excitation connection.
Use thick, well-insulated cables rated for the expected current. Undersized wires can overheat and waste power, so this is not an area to cut corners.
Keep wire paths tidy and secure them with clamps or ties to prevent movement. Loose wires can rub against metal edges over time, leading to dangerous shorts.
Grounding is especially important. A proper ground connection stabilizes the system and improves safety. Make sure the contact point is clean and free of paint or corrosion.
As you work, double-check each connection. Accuracy now prevents troubleshooting later.
With the alternator wired, you are ready to provide the spark that brings it to life.
Step 6: Connecting the Battery for Excitation
Most alternators require a small initial current to energize the rotor’s magnetic field — a process known as excitation. Without it, the alternator may spin but fail to produce meaningful voltage.
Connect the battery according to your wiring plan, ensuring correct polarity. Reversing connections can damage components instantly, so take your time here.
Beyond startup, the battery acts as a stabilizer. It absorbs fluctuations and helps maintain consistent voltage when loads change suddenly. Think of it as a buffer that smooths the electrical experience.
Secure the battery in a stable position to prevent movement. Batteries are heavier than they appear, and shifting weight can strain cables.
Now everything is in place. Only one step remains — the moment where preparation turns into performance.
Step 7: Testing the System
Before powering up, perform a final inspection. Check bolts, belt tension, wiring, and spacing. Look for anything that seems out of place.
When you start the motor for the first time, let it run without a load. Listen carefully. A healthy system produces a steady, confident hum rather than rattles or squeals.
Use a multimeter to measure voltage at the alternator output. Seeing that first reading is often an exciting confirmation that your work is paying off.
Next, apply a small load — perhaps a light or modest device. Observe how the system responds. Stable voltage and smooth sound are excellent signs.
During the first extended run, periodically check for excessive heat or vibration. Catching minor issues early prevents larger problems later.
Bringing It All Together
By the time your generator completes its first successful test, something remarkable has happened. What was once a collection of separate parts has become a unified system capable of producing real electrical power.
More importantly, you have gained something beyond the machine itself — a deeper understanding of how motion becomes electricity and how thoughtful assembly creates reliability.
Building a generator is not about rushing to the finish line. It is about respecting each step, knowing that careful preparation leads to confident operation.
And when your system runs smoothly for the first time, you will likely feel more than just relief. You will feel the quiet pride that comes from turning knowledge into something tangible — a machine that spins, generates, and proves that with patience and precision, you are fully capable of building power with your own hands.
How to Convert Output to 220V AC DIY Alternator Generator
There is a moment in every generator build when the project shifts from mechanical curiosity to real-world usefulness. You hear the motor running, see the alternator spinning, and measure voltage at the terminals — proof that electricity is being created. But then a practical question arises: How do you turn this raw electrical output into the kind of power that can actually run household devices? After all, most appliances are designed for high-voltage alternating current, not the lower-voltage direct current typically produced by an DIY Alternator Generator system. This is where conversion becomes the final and crucial step in transforming your setup into something genuinely functional.
Understanding how to convert your generator’s output to 220V AC is less complicated than it might sound. The key lies in using the right equipment, choosing proper capacity, and following safe connection practices. Once these pieces are in place, your system stops being just an experiment and starts behaving like a dependable source of usable electricity.
Using an Inverter
At the center of this conversion process is a device called an inverter. Its role is straightforward but incredibly important: it takes direct current (DC) electricity and converts it into alternating current (AC), the form of power used in most homes around the world.
To appreciate why this matters, it helps to briefly understand the difference between the two. Direct current flows steadily in one direction, much like water traveling through a pipe without interruption. Alternating current, by contrast, rapidly switches direction many times per second. This constant reversal allows electricity to travel efficiently across long distances and power a wide range of devices.
Your alternator system, especially when paired with a battery, typically delivers low-voltage DC — often around 12V or 24V depending on the setup. While this is perfect for charging batteries or running certain electronics, it is not suitable for standard household equipment that expects roughly 220 volts of AC power.
The inverter acts as a translator between these two electrical languages.
Inside the inverter, sophisticated circuitry first boosts the voltage to the required level and then shapes the electrical waveform into alternating current. High-quality inverters produce what is known as a “pure sine wave,” closely mimicking the smooth electrical signal supplied by utility grids. This is especially important for sensitive electronics such as laptops, modern televisions, and appliances with digital controls.
Lower-cost models sometimes generate a “modified sine wave.” While these can power basic tools or lighting, they may cause humming in motors, reduce efficiency, or even damage delicate equipment over time. If your goal is reliability and versatility, investing in a pure sine wave inverter is often the wiser choice.
Another benefit of using an inverter is consistency. Even if your generator experiences small fluctuations, a good inverter helps regulate the outgoing power, providing a steadier electrical experience for connected devices.
Selecting the Right Inverter Size
Choosing the correct inverter is not about buying the biggest unit available — it is about matching capacity to your realistic power needs while allowing room for safe operation.
Start by estimating the total wattage of the devices you plan to run. Add their power requirements together, and then give yourself a comfortable margin rather than operating at the absolute limit.
For example, if your expected load is around 700 watts, selecting a 1,000–1,200 watt inverter provides breathing space. Running equipment continuously at maximum capacity generates heat and shortens lifespan, whereas operating below the limit promotes durability.
It is also important to consider surge power. Many devices — especially those with motors or compressors — require a brief burst of extra electricity when starting. Refrigerators, pumps, and power tools are common examples. A good inverter lists both continuous wattage and surge capacity. Make sure the surge rating comfortably exceeds the startup demands of your equipment.
Voltage compatibility matters too. If your battery bank operates at 12V, choose a 12V inverter. Larger systems sometimes use 24V or 48V configurations, which can improve efficiency by reducing current and heat in the wiring.
Efficiency ratings deserve attention as well. No inverter is perfect; some energy is always lost during conversion. However, higher-efficiency models waste less power as heat, allowing more of your generated electricity to reach your devices.
Cooling is another feature worth examining. Many inverters include built-in fans that activate under heavier loads. Proper ventilation around the unit ensures those cooling systems can do their job effectively.
Finally, resist the temptation to oversize dramatically. While having extra capacity is beneficial, extremely large inverters draw more idle power even when lightly loaded. Balance is the goal — enough capability to meet your needs without unnecessary waste.
Safe Connection Method Of DIY Alternator Generator
Once you have selected the right inverter, proper installation becomes the next priority. Electrical safety is not optional; it is the foundation of a reliable system.
Begin by positioning the inverter in a dry, well-ventilated area away from excessive dust or moisture. Avoid placing it directly on the floor where accidental spills could reach it. A raised platform or secure mounting surface is ideal.
Use short, thick cables to connect the inverter to the battery. Thicker cables reduce resistance, minimize voltage drop, and prevent dangerous heat buildup. Always follow the manufacturer’s recommendations for cable size — this is one area where guessing can lead to serious problems.
Polarity is critical. Positive must connect to positive, and negative to negative. Double-check before tightening terminals, because reversing connections can damage the inverter instantly.
Installing a fuse or circuit breaker between the battery and inverter is strongly recommended. This protective device acts as a safeguard, cutting power if a fault occurs and helping prevent fires or equipment damage.
Grounding the inverter adds another layer of protection. Proper grounding helps stabilize voltage and reduces the risk of electrical shock.
When connecting devices, start small. Test the system with a light load first — perhaps a lamp — before moving on to larger equipment. This gradual approach lets you confirm everything is functioning correctly.
One practice to avoid is plugging the inverter directly into household wiring unless a qualified electrician has installed an appropriate transfer switch. Feeding power into home circuits without isolation can create dangerous backflow, posing risks to both equipment and utility workers.
Keep airflow in mind during operation. Inverters naturally produce heat, and blocking ventilation openings can trigger automatic shutdowns or shorten the unit’s life.
It is also wise to periodically inspect connections. Over time, vibration and temperature changes can loosen terminals. A quick check ensures your system remains safe and efficient.
Bringing Usable Power to Life
When you step back and look at the entire process, converting generator output to 220V AC represents the final bridge between raw energy and practical application. The motor creates motion, the alternator generates electricity, the battery stabilizes it, and the inverter refines it into a form your everyday devices understand.
What once seemed like a complicated transformation becomes a logical sequence — each component supporting the next.
Perhaps the most rewarding moment comes when you plug in your first appliance and watch it operate exactly as it would on grid power. It is a quiet but powerful reminder that electricity is not mysterious; it is engineered.
More importantly, mastering this conversion gives you flexibility. Whether preparing for outages, powering a workshop, or simply expanding your technical skills, you now have the knowledge to turn generated energy into something immediately useful.
And that is the real beauty of the inverter’s role. It does more than change voltage — it completes the journey from spinning machinery to practical electricity, allowing your generator to step confidently from the realm of experimentation into everyday capability.
Battery Integration
There is a noticeable difference between a generator system that simply produces electricity and one that delivers power smoothly, reliably, and with confidence. Many first-time builders focus heavily on the motor and alternator — understandably so, since they are the most visible parts of the setup. But experienced builders know a secret that often separates a basic system from a truly dependable one: battery integration. Adding a battery is not just an optional upgrade; in many cases, it is the component that transforms fluctuating electrical output into steady, usable energy.
Think of a battery as a quiet partner working behind the scenes. While the alternator generates electricity, the battery absorbs inconsistencies, supports sudden demand, and helps maintain a balanced electrical environment. Without it, your system may still function, but you are far more likely to notice voltage swings, unstable performance, and unnecessary strain on your equipment.
Let’s explore why integrating a battery is strongly recommended and how it enhances nearly every aspect of your generator’s operation.
Why a Battery Improves Stability
Electricity generation is rarely perfectly uniform. Even with a well-aligned pulley system and a strong motor, tiny variations in speed occur naturally. When electrical demand changes — for example, when a device switches on — the alternator must instantly respond. Without a buffer, these transitions can cause momentary drops or spikes in voltage.
This is where the battery shines.
A battery acts as an electrical reservoir. When the alternator produces more energy than the system is currently using, the extra power flows into the battery and is stored for later. When demand suddenly increases, the battery releases some of that stored energy, preventing a noticeable dip in voltage.
The result is smoother, more predictable power delivery.
Imagine a water system with a storage tank. If water is pumped directly into a pipe without a tank, pressure rises and falls depending on pump activity. But with a tank in place, supply remains steady even when usage fluctuates. The battery performs a similar function — it stabilizes the flow of electricity so your devices experience consistency rather than turbulence.
Another important advantage is startup support. Many alternators require an initial electrical current to energize their magnetic field before they can begin generating power effectively. The battery provides this excitation effortlessly, allowing the alternator to transition into production mode almost immediately.
Battery integration also reduces stress on the alternator. Instead of constantly adjustingctioning every minor load change, the alternator can operate at a more even pace while the battery handles short-term variations. This balanced workload often leads to longer component life and fewer maintenance concerns.
You may also notice quieter operation. Systems without batteries sometimes produce subtle changes in motor sound as loads shift. With a battery smoothing the demand curve, the generator tends to sound more stable — a small but reassuring sign that everything is working in harmony.
Perhaps most importantly, a battery adds resilience. If the motor briefly slows or the load spikes unexpectedly, the battery helps bridge the gap, preventing abrupt shutdowns.
Wiring Configuration
Integrating a battery properly requires thoughtful wiring. While the concept is straightforward — connect the alternator to the battery so it can charge — careful execution ensures safety and efficiency.
Start by positioning the battery in a secure location close enough to minimize cable length but far enough to avoid exposure to excessive heat from the motor or alternator. Batteries prefer moderate temperatures, and protecting them from heat improves longevity.
Use thick, high-quality cables for all primary connections. Electricity flowing between the alternator, battery, and inverter can be substantial, and undersized wiring creates resistance that wastes energy as heat. Heavy-gauge cables allow current to travel more freely while keeping temperatures under control.
The positive output terminal of the alternator typically connects to the positive battery terminal, while the negative side connects to ground. Though simple in theory, polarity must always be double-checked. Reversing connections can cause severe damage almost instantly.
Installing a fuse or circuit breaker between the alternator and battery is strongly recommended. This protective device acts like a safety valve, interrupting the circuit if current rises beyond safe limits. It is a small addition that provides significant peace of mind.
Clean connection points are equally important. Dirt, paint, or corrosion can interfere with conductivity. Before tightening terminals, ensure contact surfaces are bright and free of debris.
Cable management deserves attention as well. Secure wires so they cannot rub against sharp edges or vibrate loose over time. Neatly routed cables not only look professional but also reduce the risk of electrical faults.
Grounding completes the picture. A solid ground path stabilizes voltage and enhances overall system safety. Many builders attach the ground to the metal frame, provided it is properly connected throughout.
Once everything is wired, take a moment to inspect the layout. Order and clarity now will make troubleshooting far easier should you ever need it.
Charging Considerations
While connecting a battery is relatively simple, charging it correctly requires a bit more awareness. Batteries thrive when treated properly, and thoughtful charging practices can dramatically extend their service life.
First, it is important to match the alternator’s output characteristics with the battery type. Deep-cycle batteries are often preferred for generator systems because they are designed to handle repeated charging and discharging. Unlike standard automotive batteries — which excel at short bursts of high current — deep-cycle models are built for sustained energy flow.
Voltage regulation plays a crucial role here. Overcharging can shorten battery life, cause overheating, and in extreme cases lead to dangerous conditions. Fortunately, many alternators include built-in regulators that maintain appropriate charging voltage. Even so, monitoring the system occasionally with a meter is a wise habit.
Temperature also affects charging behavior. Batteries charge differently in hot versus cold environments, and excessive heat is particularly harmful. Good ventilation helps maintain safe operating conditions.
Another smart practice is avoiding deep discharges whenever possible. Draining a battery completely places significant stress on its internal chemistry. Keeping the charge level within a moderate range promotes longevity and reliability.
Charging speed is worth noting as well. While rapid charging might sound appealing, slower, steady charging is generally healthier for the battery. Think of it like filling a glass carefully rather than blasting it with a strong stream that causes overflow.
You may also want to consider adding a battery monitor. These devices provide real-time insight into voltage levels, charge state, and energy usage. Having this information at a glance makes it easier to manage loads intelligently.
If your system includes an inverter, the battery becomes even more essential. The inverter draws power from the battery to produce stable AC output, and the alternator replenishes that energy. This continuous cycle — generate, store, use, recharge — creates a rhythm that keeps electricity available when you need it.
The Bigger Picture
What becomes clear after integrating a battery is that your generator stops behaving like a raw mechanical device and starts acting more like a refined power system. Voltage steadies. Load transitions feel smoother. Components operate with less strain.
Beyond the technical benefits, there is also a psychological one: confidence. Knowing that stored energy is available provides reassurance, especially during unexpected demand or temporary interruptions.
Battery integration also opens the door to future expansion. Should you decide to increase capacity, add renewable sources, or extend runtime, a battery bank makes those upgrades far easier to implement.
And perhaps the most compelling reason to include a battery is the sense of balance it brings. Instead of electricity appearing only in the exact moment it is generated, you create a reserve — a cushion that transforms immediacy into reliability.
In the end, the battery is more than just another component; it is the stabilizing force that allows your generator to deliver power with consistency and grace. When the motor hums, the alternator spins, and the battery quietly manages the flow of energy, you witness a system working exactly as it should — steady, prepared, and ready to support your electrical needs whenever called upon.
Safety Guidelines
Building a generator is an exciting achievement, but it also comes with real responsibility. Electricity is incredibly useful, yet it demands respect because even small mistakes can lead to equipment damage or personal injury. The good news is that most risks can be avoided with careful planning and smart habits. When safety becomes part of your routine rather than an afterthought, your system not only performs better but also lasts longer.
One of the most important areas to focus on is electrical safety. Always double-check connections before powering up the system. Loose terminals can cause arcing, while incorrect polarity can damage components instantly. It is wise to install fuses or circuit breakers wherever high current flows — these protective devices act as your first line of defense if something goes wrong. Keeping your hands dry when working with electrical parts is another simple but powerful precaution. If you ever need to adjust wiring, shut the system down completely rather than working around live current. Developing this habit greatly reduces the chance of accidents.
Preventing overheating should also be a priority. Motors, alternators, inverters, and even cables naturally produce heat during operation. A slight warmth is normal, but excessive heat is a warning sign that something is under strain. Overloading the generator is one of the most common causes, so stay within the system’s recommended capacity whenever possible. Periodically touch the outer casing of components — carefully — to check for unusual temperature buildup. If something feels too hot to keep your hand on, it is time to pause and investigate. Often, early detection prevents more serious problems later.
Proper cable sizing plays a surprisingly large role in safety. Wires that are too thin create resistance, and resistance generates heat. Over time, overheated insulation can degrade and become hazardous. Using thick, high-quality cables allows electricity to flow efficiently while keeping temperatures manageable. It is also important to secure cables so they cannot rub against sharp edges or vibrate loose. Neat wiring is not just about appearance; it protects the entire system.
Ventilation is another factor that should never be overlooked. Electrical equipment needs room to breathe. When heat becomes trapped, efficiency drops and component life shortens. Place your generator in an area where air can circulate freely, and avoid enclosing it in tight spaces. If the setup is indoors, consider adding a fan to help move warm air away from critical parts.
Ultimately, safety is about awareness. Listen for unusual sounds, watch for warning signs, and never rush adjustments. A well-protected system gives you more than reliable electricity — it gives you peace of mind every time you switch it on.
Testing and Troubleshooting
There is a special kind of anticipation that builds when your generator is finally assembled and ready for its first run. Every bolt has been tightened, every wire connected, and every component carefully positioned. Now comes the moment of truth — testing the system and making sure everything performs exactly as it should. This stage is not just about flipping a switch; it is about observing, listening, and confirming that your hard work has resulted in a reliable machine. Even the best-built systems sometimes need small adjustments, and knowing how to troubleshoot effectively will save you time, protect your equipment, and build your confidence as a builder.
Initial Startup Checklist
Before starting the generator, take a few minutes to perform a thorough visual inspection. Confirm that all mounting bolts are secure and that the motor and alternator feel solid with no unwanted movement. Check belt tension — it should be firm but not overly tight — and make sure the pulleys are aligned properly.
Next, review your wiring. Look for loose terminals, exposed conductors, or anything that appears out of place. Verify correct polarity on the battery connections and ensure protective devices like fuses or breakers are installed.
When you power up for the first time, allow the system to run without any electrical load. Listen carefully. A smooth, steady hum usually indicates that everything is functioning correctly. Use a multimeter to measure the output voltage so you know exactly what your baseline performance looks like. Establishing this reference makes it much easier to detect changes later.
If the DIY Alternator Generator Is Not Charging
Few things are more frustrating than seeing the system spin perfectly while the meter shows little or no charging activity. Fortunately, this issue is often caused by something simple.
Start by checking the excitation circuit. Many DIY Alternator Generators require an initial current from the battery to energize the rotor’s magnetic field. Without it, the alternator may rotate but fail to generate power.
Next, inspect the belt. If it is slipping, the alternator may not be reaching the speed needed to produce voltage. Tightening the belt slightly — without overdoing it — often resolves the problem.
Also examine your electrical connections. A poor ground or corroded terminal can interrupt charging even when everything else appears normal.
Low Voltage Problems Of DIY Alternator Generator
If the DIY Alternator Generator is charging but the voltage seems lower than expected, the first thing to consider is speed. Alternators depend heavily on RPM, so confirm that your pulley ratio is allowing the unit to spin within its effective range.
Electrical resistance is another common culprit. Thin or overly long cables can reduce voltage before it ever reaches your battery or inverter. Upgrading to heavier wiring often produces immediate improvement.
It is also wise to evaluate the load. Drawing more power than the system can comfortably provide will naturally pull voltage down. Try disconnecting some devices and observe whether the reading stabilizes.
Excessive Noise or Vibration Of DIY Alternator Generator
A well-built generator should sound steady, not chaotic. Unusual rattling, grinding, or shaking signals that something needs attention.
Begin with alignment. Misaligned pulleys are a leading cause of vibration and can wear belts quickly. Adjust the positioning until the belt tracks straight.
Check the frame as well. Loose mounting bolts allow movement that amplifies noise. Tightening them often restores smooth operation.
Finally, consider balance. Components should sit evenly on the base, and the surface beneath the generator should be level. Sometimes, adding vibration-dampening pads can make a noticeable difference.
Testing and troubleshooting are not signs that something went wrong — they are part of the process of refining your system. Each adjustment brings you closer to a generator that runs quietly, charges properly, and delivers dependable power whenever you need it.
Precautions
Working with a generator system is both rewarding and demanding, because you are dealing with real electrical power and moving mechanical parts. Taking proper precautions is not about being overly cautious — it is about protecting yourself, your equipment, and the environment around you. A few mindful habits can prevent most problems before they ever have a chance to develop.
One of the most important precautions is to never rush the setup or operation of your system. Always inspect the generator before starting it. Look for loose bolts, worn belts, damaged wires, or anything unusual. Small issues can quickly grow into serious hazards if ignored. Developing a routine inspection habit helps you catch problems early and keeps your generator running safely.
Keep your workspace clean and organized. Tools left near rotating components can become dangerous if they get pulled into moving parts. Likewise, avoid placing flammable materials close to the generator, since electrical equipment and motors naturally produce heat during operation.
Moisture is another factor to watch carefully. Electricity and water are a risky combination, so always operate your generator in a dry location. If the system is installed in a garage or workshop, make sure the floor is free from spills and the area is protected from rain or damp conditions.
It is also wise to avoid overloading the generator. Every system has limits, and pushing beyond them can cause overheating, voltage drops, or permanent damage. If you notice unusual smells, excessive heat, or sudden performance changes, shut the system down and investigate before restarting.
Personal safety matters just as much as equipment safety. Avoid wearing loose clothing or accessories that could get caught in belts or pulleys. If you need to make adjustments, turn the generator off completely rather than attempting quick fixes while it is running.
Finally, ensure proper airflow around the machine. Good ventilation helps control temperature and improves overall performance.
Precautions are not obstacles — they are what allow you to operate your generator with confidence. When safety becomes second nature, you create an environment where your system can perform reliably while giving you peace of mind every time you power it on.
Conclusion
There is something deeply satisfying about watching a machine you built with your own hands come to life. What started as a collection of separate components — a motor, an alternator, a frame, and carefully routed wiring — has now become a working system capable of producing real electricity. That transformation is more than mechanical; it represents patience, learning, and the willingness to take on a challenge that many people would never attempt. By reaching this point, you have done more than assemble a generator — you have gained practical knowledge that will stay with you for years to come.
Looking back, a few key takeaways stand out. First, successful power generation is all about balance. The motor must provide steady rotation, the alternator must operate within its ideal speed range, and every connection must support efficient energy flow. Small details — such as pulley alignment, cable sizing, ventilation, and secure mounting — often make the biggest difference in long-term performance. You have also seen how adding a battery improves stability and why an inverter is essential for converting raw output into usable household electricity. Perhaps most importantly, you now understand that electricity is not mysterious; it is the predictable result of energy being converted from motion into power.
So when does a project like this truly make sense? It is especially valuable for those who want a dependable backup power option, enjoy hands-on learning, or prefer greater independence from the grid. It may not replace a full home electrical system, but it can provide meaningful support during outages, power a workshop, or serve as a reliable experimental platform for expanding your technical skills. For many builders, the real benefit lies not just in the electricity produced but in the confidence gained along the way.
If you are a DIY builder, consider this project proof of what you are capable of achieving. Every expert once started as a beginner who decided to try. Do not be afraid to refine your setup, explore improvements, or take on more advanced builds in the future. Each project strengthens your understanding and sharpens your instincts.
As your generator runs steadily, remember that it represents more than energy — it reflects curiosity turned into capability. And that is the true power behind any successful DIY journey.
For Example
How To Make Free Energy 220 Volt Electricity Forever | Diy Car Alternator + AC Motor
FAQ About DIY Alternator Generator
| Question | Answer |
|---|---|
| 1. Can a car alternator really generate electricity for home use? | Yes, a car DIY Alternator Generator can generate electricity when spun by a motor. However, it must be paired with a battery and inverter to produce usable household AC power. |
| 2. Is this system truly “free energy”? | No. The system converts mechanical energy into electrical energy. It requires an input power source to spin the motor. |
| 3. How much electricity can this setup produce? | Most DIY alternator systems produce between 500 and 1500 watts depending on motor strength, alternator rating, and efficiency. |
| 4. Can it power an entire house? | No, this type of generator is better suited for essential devices like lights, fans, chargers, and small tools rather than whole-house power. |
| 5. Why is a battery recommended? | A battery stabilizes voltage, supports sudden load changes, and provides the excitation current needed for the alternator to begin generating power. |
| 6. Do I need an inverter? | Yes. An inverter converts the alternator’s DC output into 220V AC, which most household appliances require. |
| 7. What size motor should I use? | A 1–3 horsepower motor is typically suitable for small to medium DIY generator setups. |
| 8. What is the ideal alternator RPM? | Most alternators perform best between 3,000 and 6,000 RPM for stable voltage output. |
| 9. How important is pulley ratio? | Very important. The correct pulley ratio ensures the alternator spins fast enough without overloading the motor. |
| 10. Should I choose a pure sine wave inverter? | Yes. Pure sine wave inverters provide cleaner power and are safer for sensitive electronics. |
| 11. What type of battery works best? | Deep-cycle batteries are ideal because they are designed for repeated charging and discharging. |
| 12. How can I prevent overheating? | Ensure proper ventilation, avoid overloading the system, and regularly check component temperatures. |
| 13. Why is my alternator not charging? | Common causes include missing excitation current, loose wiring, poor grounding, or insufficient RPM. |
| 14. What causes low voltage? | Low RPM, thin cables, excessive load, or wiring resistance are the most frequent reasons. |
| 15. Is this project beginner-friendly? | Yes, but basic knowledge of tools, wiring, and safety practices is recommended. |
| 16. How do I reduce vibration? | Use a strong base frame, align pulleys carefully, and tighten all mounting bolts securely. |
| 17. Can I run the generator continuously? | Yes, if the system is properly cooled and operated within safe limits. |
| 18. Is maintenance required? | Regularly inspect belts, wiring, and connections, and keep components clean for reliable performance. |
| 19. What is the biggest mistake to avoid? | Overloading the generator or ignoring safety guidelines can lead to equipment damage and reduced lifespan. |