
How to Generate Electricity Using Magnets at Home (Simple DIY Guide)
Have you ever wondered if you could generate your own electricity at home using simple materials? For many people, this curiosity begins during a power outage, a school science project, or simply the desire to understand how electricity really works. We depend on electricity every day, yet very few people know how it is actually produced.
The good news is that you can learn the basics of electricity generation with a simple DIY setup using magnets and copper wire. In this guide, you’ll learn how to generate electricity using magnets at home, understand the science behind it, and build a small working generator step by step.
This beginner-friendly project is simple, educational, and a great way to explore the fascinating world of magnetic energy and electricity generation.
How Magnets Generate Electricity
Before building the generator, it’s important to understand the basic concept behind it.
Electricity is generated when a magnetic field changes near a conductor like copper wire. This process is called electromagnetic induction. When magnets move near a coil of wire, they create a changing magnetic field, which forces electrons in the wire to move and produce electric current.
This is the same principle used in real power plants and generators—just on a much smaller scale.
In this DIY project, rotating magnets pass near a copper coil to create electricity that can power a small LED or produce measurable voltage.
Materials You Need to Generate Electricity Using Magnets
One of the best things about this project is that most materials are affordable and easy to find. You may even have some of them at home already.
Core Components
Transformer Core
A transformer core made from stacked iron plates helps guide the magnetic field efficiently toward the coil. This improves electricity generation and reduces energy loss.
Copper Wire
Copper wire is used to make the coil where electricity is generated. A wire thickness around 0.6 mm works well for balancing resistance and current flow.
Mechanical Components
12V Motor
The motor rotates the magnets continuously, creating the changing magnetic field needed to generate electricity.
Wooden Base
A strong wooden base keeps the setup stable and properly aligned during operation.
Wooden Disk
The wooden disk is attached to the motor shaft and holds the magnets in position.
Magnetic Component
Strong Magnets
Magnets are the most important part of the generator. Stronger magnets create a stronger magnetic field, resulting in better electricity output.
Neodymium magnets are highly recommended because of their strength and efficiency.
Supporting Materials
You’ll also need:
- PVC frame
- Glue
- Thread
- Screws and brackets
- LED bulb
- Voltmeter (optional but recommended)
These materials help secure and stabilize the setup.
Step-by-Step Guide to Generate Electricity Using Magnets
Now comes the exciting part—building your own homemade generator.
Step 1: Prepare the Transformer Core
Take the transformer core and carefully cut the center strip to create space for the rotating magnets.
Be careful while cutting and use proper safety precautions.
This modification allows the magnetic field to interact more effectively with the coil.
Step 2: Build the Coil Support
Attach a PVC frame securely to the transformer core.
This frame will hold the copper wire coil tightly in place and keep the winding organized.
Proper alignment at this stage improves overall efficiency.
Step 3: Install the Motor
Create a hole in the wooden base that matches the size of your motor.
Insert the motor firmly into the hole so it stays stable during operation.
A properly aligned motor ensures smooth rotation and consistent electricity generation.
Step 4: Set Up the Magnet Rotor
Attach the round wooden disk to the motor shaft.
Now place five magnets evenly around the disk. Equal spacing is important for smooth balance and consistent magnetic interaction.
Secure the magnets using thread and glue to prevent movement during high-speed rotation.
As the magnets spin, both magnetic poles interact with the coil, increasing electricity generation.
Step 5: Wind the Copper Coil
Take the copper wire and wind approximately 300 turns around the transformer core.
Keep the winding:
- Tight
- Neat
- Evenly spaced
Loose winding can reduce performance and produce weak voltage output.
The coil is the part where electricity is actually generated, so this step is extremely important.
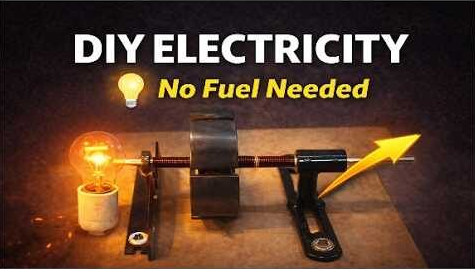
Step 6: Final Assembly
Position the transformer core close to the rotating magnets.
The gap between the magnets and core should be very small, but they should never touch.
Secure all components firmly onto the wooden base using screws or brackets.
Good alignment helps maximize magnetic interaction.
Step 7: Test the Generator
Connect an LED bulb to the coil wires.
Turn on the motor and observe the result.
If everything is assembled correctly, the LED may glow, showing that electricity is being generated successfully.
If the LED doesn’t light up immediately, small adjustments may be needed.
Using a voltmeter can help measure voltage output and identify problems more easily.
Common Problems and Solutions
DIY projects rarely work perfectly on the first attempt. Here are some common issues and how to fix them.
No Electricity Output
Possible causes:
- Loose wiring
- Faulty LED
- Incorrect connections
Solution:
Check all wire connections carefully and test the LED separately.
Weak Voltage Output
Possible causes:
- Weak magnets
- Large gap between magnets and coil
Solution:
Use stronger magnets and reduce the distance between the magnets and core.
Incorrect Coil Winding
If the coil is wound incorrectly, the generated current may become weak or inconsistent.
Solution:
Rewind the coil carefully in one consistent direction.
Poor Alignment
Misaligned components reduce efficiency and create vibration.
Solution:
Ensure:
- The motor is straight
- The disk is balanced
- Magnets are evenly spaced
Tips to Improve Electricity Generation
Once your generator works, you can improve its performance with a few upgrades.
Use Stronger Magnets
Neodymium magnets can dramatically increase electricity output compared to regular magnets.
Increase Coil Turns
More coil turns generally produce higher voltage.
However, balance is important because too many turns can increase resistance.
Reduce the Magnet Gap
Keeping magnets closer to the coil increases magnetic interaction and improves efficiency.
Improve Stability
A stable setup reduces vibration and ensures smoother operation.
Use:
- Strong screws
- Balanced disks
- Solid mounting
Upgrade the Core Material
High-quality laminated iron cores improve magnetic flow and reduce energy loss.
Can This Generator Power Real Devices?
This simple DIY generator is mainly designed for learning and experimentation.
It can:
- Light LEDs
- Produce small voltage
- Charge small batteries (with modifications)
However, it is not powerful enough to run household appliances or power an entire home.
Large-scale electricity generation requires much bigger systems using the same basic principle.
Why This DIY Project Is Valuable
This project is more than just a science experiment.
It helps you understand:
- Electromagnetic induction
- Magnetic fields
- Coil design
- Generator mechanics
- Basic electrical engineering concepts
It also encourages creativity, problem-solving, and hands-on learning.
Frequently Asked Questions
Can magnets generate electricity permanently?
Magnets themselves do not permanently create electricity. Electricity is generated when magnets move near a conductor and create a changing magnetic field.
Which magnets are best for electricity generation?
Neodymium magnets are usually the best choice because they produce a strong magnetic field.
How many coil turns should I use?
Around 300 turns work well for beginners, but more turns can increase voltage output.
Can this setup charge a battery?
Yes, with proper voltage regulation and improvements, small batteries can be charged.
Is this project safe?
Yes, but always handle tools, sharp objects, and strong magnets carefully.
Conclusion
Learning how to generate electricity using magnets at home is an exciting and educational DIY project. By combining magnets, motion, and copper wire, you can create a simple generator that demonstrates the basic principle used in real-world power generation.
Along the way, you’ll learn how magnetic fields interact with coils, why alignment matters, and how small improvements can increase efficiency.
Most importantly, this project encourages experimentation and curiosity. Don’t worry if it doesn’t work perfectly the first time—every adjustment teaches you something new.
Try different magnet arrangements, coil sizes, and setups to improve your results and deepen your understanding of electricity generation.
Building your own homemade magnet generator is not only fun but also a great first step into the world of science, engineering, and renewable energy.
Discussion
No comments yet. Be the first to join the conversation!